


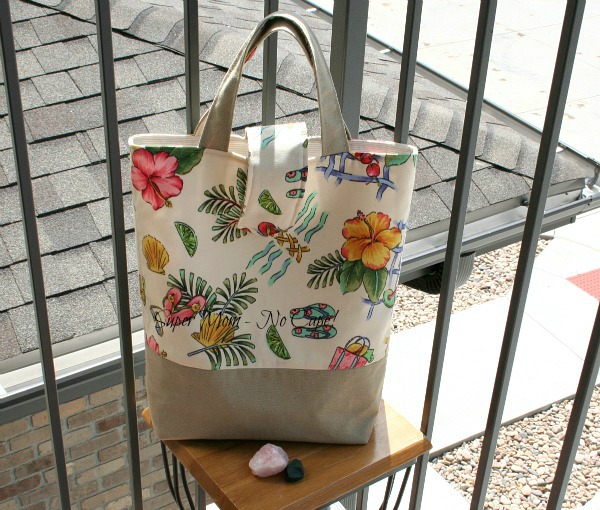
When I purchased the fabric to recover the small footstool, I liked the fabric so much that I bought a full yard so that I would have more than enough leftover to make a new tote bag to hold all my embroidery supplies.
Constructing the tote turned out to be a bit more challenging than I had anticipated. As I wanted a durable fabric for the footstool I purchased outdoor décor weight fabric. What I hadn’t taken into account when I decided I also wanted to make a tote out of it was whatever coating they used to make the fabric resistant to weather would in turn make it difficult to fuse interfacing to the wrong side of the fabric.
Whenever I work with a new fabric, I do an “iron” test on a scrap of the fabric to check to see how much temperature the fabric can handle. Well when I tried to iron on the fusible interfacing at that safe temperature, the interfacing simply would not fuse. So out came my cotton pressing clothes and with the fabric facing down and the fusible interfacing on top of it (fusible side to the wrong side of the fabric) and a pressing cloth over that, I was able to turn the iron temperature up enough to get them fused together.
Once that step was taken care of the actual sewing of the tote went smoothly and I love how it turned out!
I lined the inside with quilting cotton in a cream color with light beige stripes. I also added two pockets to the inside.
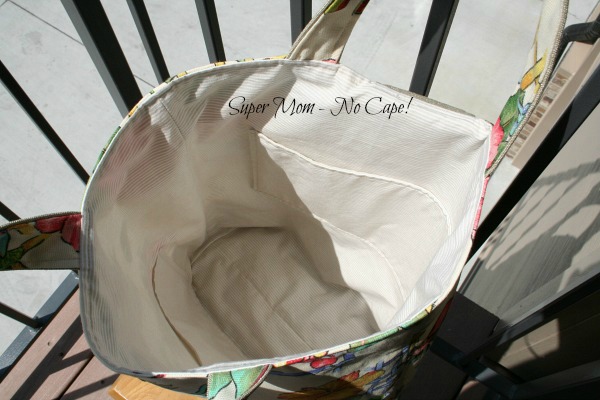
The pocket on the bottom was measured and cut to fit my largest embroidery hoop. The pocket higher up on the opposite side was made wide enough to fit the pencil I use for tracing the patterns onto the fabric I’m embroidering.
For the flap closure, I decided to use a set of magnetic snaps
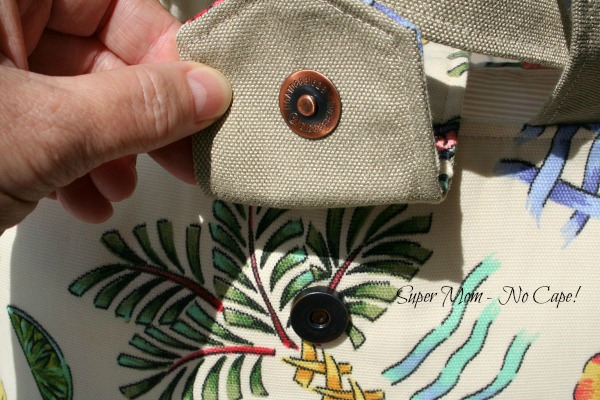
I’d never installed magnetic snaps before but it’s pretty straight forward. Everything Mary has a video showing how easy it is. One thing I did differently from what’s shown in the video is I added a couple of small squares of interfacing to reinforce the fabric where the snaps were positioned. This will make the fabric less likely to tear away over time from the snapping and unsnapping.
I also tried something new when sewing the bottom of the tote. I used this tutorial to make and sew in a nice firm base to give the bottom added structure. I didn’t have any Peltex so instead I used two pieces of the heaviest interfacing
The finished tote measures 14” by 14.5” with a 4” squared bottom. As I mentioned, I love how it turned out and can see a few more of these in my future.
This post contains affiliate links. For more information please check my Disclosures and Disclaimers page. It doesn’t cost you any extra, but it does help support this site.


3 Comments
Gemini Jen NZ
July 26, 2014 8:01 amI love your bag – great fabric and well made!
Lorrie
July 23, 2014 4:24 pmA great looking tote bag. Love the fabric and the idea of making a very stiff bottom. I’ll be checking out that tutorial. Thanks.
Vickie Horsfall
July 23, 2014 9:12 amWhat a fantastic tote! The fabric is so pretty and I can see why you purchased extra! Making a tote has been on my want-to-do list for quite some time, and you have inspired me by sharing yours. Have a wonderful day!
Comments are closed.