


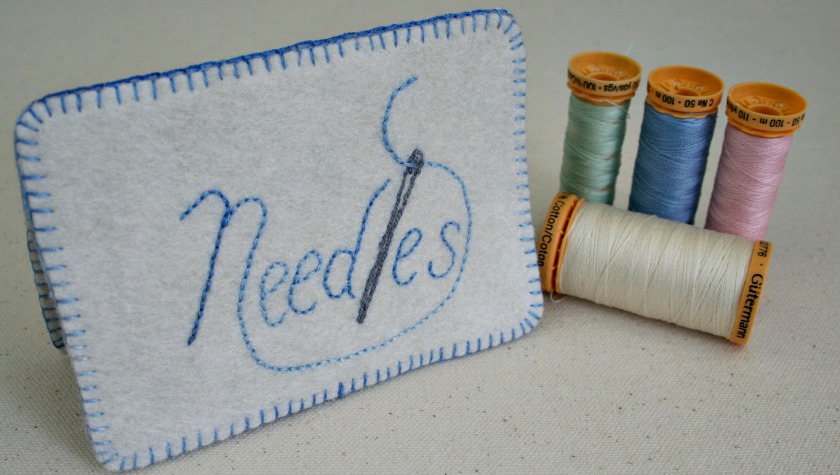
Needle books are such handy little sewing accessories to have. This month’s free embroidery pattern features the word ‘Needles’ stitched on felt to make a fun little needle book.
A threaded hand sewing needle forms the ‘l’ in needles. Now how cute is that!

‘Needles’ – Embroidered Needle Book Pattern
Materials needed to make one needle book:
- 8″ X 12″ piece of good quality felt
- 4″ X 12″ piece of heavy weight fusible interfacing (I used Pellon 808 fusible interfacing
)
- Embroidery floss in colors of your choice
- Small piece of white tissue paper
- Clover Iron-On Transfer Pencil
(optional)
You’ll also need to download and print the free ‘Needles’ embroidery pattern (scroll down for the link.)
When embroidering on felt, I usually trace the pattern onto tissue paper, pin that to the felt and then embroider through the tissue paper.
But recently I came across one of these Clover Iron-On Transfer Pencils


The instruction insert said to:
“Place tracing paper on the design you wish to copy. Trace the design with Iron-On Transfer Pencil. Remove the tracing paper and place it on top of the fabric you wish to copy and iron (iron without the steam.) The copy of the design will appear.
Note: The design will be copied in reverse.”
When you print of this month’s pattern, you’ll notice that there are two needle book patterns per page. This allows you the option of having your needle book’s spine at the top or the side.
You’ll also notice that there are two pages… the second page has the patterns reversed to make it easy if you decide you’d like to give using the iron-on transfer pencil a try.
Using a light source, trace the word Needles with the transfer pencil.
Any bright light source will do. For years, I taped my patterns to a window.
Then several months ago, I purchased a Huion A2 Light Box
Do you ever buy something and then wonder where it’s been all your life? Well that’s how I feel about this Huion light box.
Tracing patterns is much more comfortable now. The light is fully adjustable and has a neat feature where it “remembers” where you set it the last time you used it.
They’re available in various sizes to fit your needs. We’ve even been using ours when we make minor (and sometimes not so minor) changes to our dream house plans.
Tape the paper pattern to your light source. Tape a 4″ X 6″ piece of white tissue paper over the pattern.
Trace the pattern with the transfer pencil.

You may want to trace over the reversed pattern a second time to make sure you’ve got nice solid lines. On the other hand, don’t make the lines too thick or they won’t be covered by the floss.

To make the felt needle book outer and inside covers, trace the needle book outline onto freezer paper four times following the solid line.
(Please note: The dotted lines on the pattern are the ¼” seam allowance should you decide to make your needle book out of cotton fabric.)
Iron the freezer paper patterns onto the felt.
Cut out along the lines. Peel off the freezer paper.

Place the traced word ‘Needles’ reverse side down on one of the felt needle book covers.

Press with a hot dry iron using a steady pressure. Do not move the iron around while doing this or the lines may blur.
The transfer comes out fairly light on the felt so it was difficult to get a good photo of it. But in person the lines are clear enough to follow when stitching.

To duplicate the needle book pictured below, backstitch the letters in ‘Needle’ using 2 strands of DMC 93 – Variegated Cornflower Blue.
Use 2 strands of DMC 414 – Dark Steel Gray and whipped backstitch to embroider the needle that forms the “l”.
Once you’ve embroidered the word ‘Needles’, use the pattern as a guide to cut two pieces of the fusible interfacing. Trim off approximately 1/8″ all the way around.
Fuse one piece of interfacing to the back of the embroidered piece and the second piece of interfacing to one of the other pieces of felt that you cut out.
These will form the front and back cover of the needle book.
The remaining two pieces of felt are the inside covers. Pin one of each of the outside covers to the inside covers, wrong sides together. Clover Wonder Clips
Blanket stitch all the way around both using 2 strands of DMC 93 – Variegated Cornflower Blue.
Again using the DMC 93, stitch the front and back cover together along the top (or if using the second pattern, along the left hand side.)
And you’re finished!

The interfacing makes the needle book sturdy enough to stand up.


Add a variety of hand sewing needles to the inside.

Make one to add to your sewing box and more to tuck into each of your take along project bags.
They’re also a quick and easy gift to make to give to friends and family who love to embroider or work on other hand sewing projects such as hand sewing quilt binding.
For a larger gift, pair it with my Butterfly Pincushion!

These would be awesome Mother’s Day or birthday gifts!
They’re even quick enough to make to be “just because” gifts.
Click the link below to download and print this month’s free pattern:
‘Needles’ – Embroidered Needle Book Pattern
If you make one, please post a photo of it somewhere on social media and tag me so I can come see. I’m @supermomnocape on Instragram, @1SuperMomNoCape on Twitter and @1SuperMomNoCape on Facebook.
Be sure to save April’s ‘Needles’ – Embroidered Needle Book Pattern by clicking on the Pinterest button underneath this post.
And of course, I’d love it if you shared it on Facebook and Twitter as well.


7 Comments
Leanna
April 9, 2019 5:44 pmI specifically stopped by to see if you had ever made a needle book only to find this as your latest post. How amazing is that!! I want to do one with a linen outside and blanket stitch with an embroidered sewing machine on the front. Wish me luck and as always thank you for sharing your expertise.
Rachel
April 9, 2019 2:27 pmPractical and pretty…
Addie
April 9, 2019 1:28 pmSo cute and vintage looking!!! Love it!!!! Might have to try this one. It would be so relaxing to stitch
while watching American Idol!!!!
Mary
April 9, 2019 8:28 amThat is really nice….and practical too. After using windows as a light ox for so many years, I got a real one too. Like you, I love it and it is so much more accurate.
Super Mom No Cape
April 9, 2019 12:53 pmThanks so much Mary. I’m glad you like it. 🙂
I’ve got a couple more of them in the works so I can try out different combinations of felt and floss.
So glad to hear you got a light box too. Every time I use mine, I think… why did I wait so long… lol
Julie
April 9, 2019 1:59 amThis is so sweet. I love a good needle book and often make them as gifts for people who sew.
Super Mom No Cape
April 9, 2019 12:54 pmThanks so much Julie! I love having needle books too. They do make great gifts.
Comments are closed.