


Do you have holiday traditions that without them it just wouldn’t feel like Christmas?
One of our family traditions is to always put up a real tree the weekend before Christmas. In fact, only twice in all the years that Dave and I have been together have we had an artificial tree.
The first time was when we went to Hawaii for a belated honeymoon back in 1983. When we arrived back home on December 26th, we discovered that my Mom had put up an artificial tree and decorated it as a Christmas surprise for us. We also walked in to the smell of turkey roasting in the oven! Now how cool is my Mom!!!
The second time was last year when we spent most of the month of December in Maui. I wanted to come home to the house all decorated so I bought a really nice artificial tree and we had a decorating party with our adult children the weekend before we left.
We’re back to putting up a real tree this year, so needless to say, I don’t have a decorated tree to show you for Day 10 of the 12 Days of Christmas. What I do have is a tutorial for how to make beautiful Poke and Push Fabric Christmas Trees.
They’re a super easy, no sew project that anyone can make.
The trees do take a few hours each to complete but they’re so simple that they’re the perfect project to work on while watching all your Christmas movie favorites. You could make a whole forest while enjoying time with your family.
Welcome to Day 10 of the Fourth Annual 12 Days of Christmas Series!

We have teamed up with 50 plus bloggers to bring you a oodles of DIY Ideas and Recipes to make your holiday season merrier. There are 12 different posts in the series and we have spread them out over a four week period with three posts per week. Now is the time to subscribe!
GO HERE for the complete list of Dates and Topics plus a collection of most popular holiday ideas including ornaments, games, recipes and more from all 50 plus talented bloggers!
If you haven’t had a chance to check out all the DIY Christmas Ideas I’ve shared click the links below:
Day 1: How to Make a Christmas Wreath Kit featuring an adorable Hedgehog Wreath
Day 2: Quilted Hourglass Candle Mat Tutorial
Day 3: Ring in the Holly Days Advent Calendar Tutorial
Day 4: Christmas Button Lace Ornament Tutorial
Day 5: Delicious Mini Puff Pastry Cone Appetizers
Day 6: Dresden Charm Ornament Tutorial
Day 7: How to Make a Christmas Floral Arrangment
Day 8: How to Make a Mason Jar Embroidery Kit
Day 9: Christmas Furoshiki (Japanese Fabric Wrapping)
Day 10: You’re here!
Day 11: Mini Spiced Orange Buttercream Bundt Cakes
Day 12: DIY Christmas Stocking Stuffer Ideas
It’s Day 10 and we are sharing our Christmas Tree!

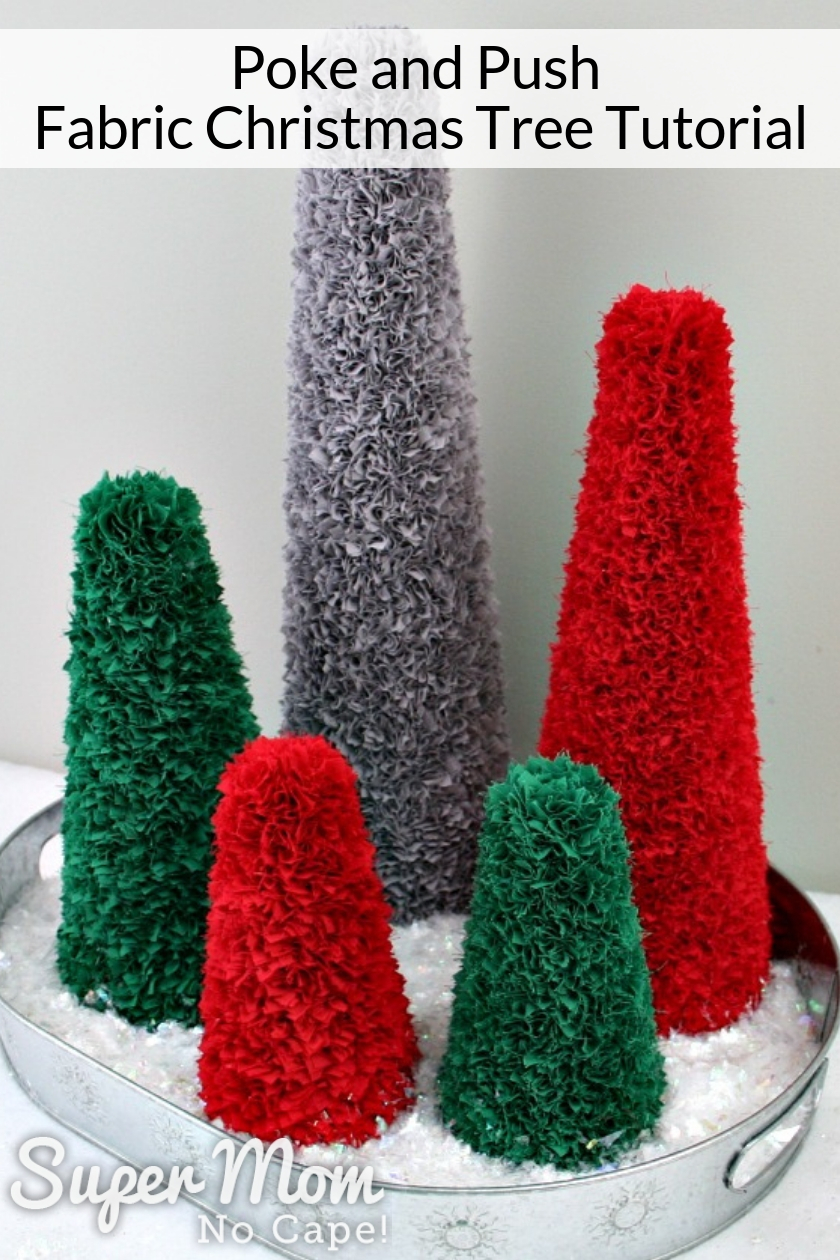
Poke and Push Fabric Christmas Tree Tutorial
Materials needed:
- 6″ Styrofoam® Cone (not the smooth kind, the kind with tiny holes and texture)
- ½ to 2/3 yard of red broadcloth (or color of your choice)
- Felt to match the color of the fabric
- Hi-tack glue
- Toothpicks
- Bandaids™

You really don’t need to buy expensive cotton quilting fabric for this project, broadcloth will work perfectly.
Cutting the fabric is much faster using a rotary cutter


To make cutting the fabric faster, fold the fabric in half selvage to selvage and then fold in half again lengthwise. You’ll be cutting through 4 layers of fabric.
Cut 1″ strips width of fabric (WOF) until all the fabric has been cut.
This would go even faster if you have one of those fancy strip cutting rulers.


Lay the strips of fabric beside each other, 4 strips deep. Square off one end and cut the strips into 1″ squares.
Continue cutting until you get to the end of the strips.

You’ll end up with a whole pile of 1″ squares.

To add the felt to the bottom of the cone:
Cut a 4″ square of freezer paper.

Trace around the bottom of the cone.

Iron the freezer paper onto red felt.

Cut around the circle you drew and then remove the paper from the felt.
Apply hi-tack glue to the bottom of the cone and spread even. Don’t use hot glue to do this, you will melt the Styrofoam™.
Add the felt circle and allow a few minutes for the glue to set.

To make the Poke and Push stick:
You’ll need a round toothpick and two small and one large Band-aid™.

Snip the pointed end off one toothpick.

Wrap one of the small Band-aids™ around the end you just cut.

Take the other small Band-aid™ and wrap it over the top of the toothpick.

Then wrap the large Band-aid™ around both smaller ones.
You’ve just made a Poke and Push stick and by the time you get finished pushing all those fabric squares into the Styrofoam™ cone you will be glad you added lots of padding to the end of the toothpick.

Now you’re ready to make a Poke and Push Fabric Christmas Tree.
Put your favorite Christmas movie in, you’re going to be a while.
The trees aren’t hard to make, in fact they are super easy but it does take time to cover the cone with the fabric squares. That’s why they’re the perfect TV watching activity!

Poke the end of the stick into the middle of the square of fabric as shown below.

Wrap the fabric around the stick.

And push it into the top edge of the Styrofoam™ cone.

Insert fabric squares all the way around the edge.

Then fill in the top of the cone.

Lay the cone down and continue to add fabric squares working around the cone in circles.

When you get about two-thirds done, you may begin wonder why you ever started this project. But they turn out so pretty, don’t stop now.

Keep going, you’re almost there!

And it’s done. Didn’t it turn out pretty!

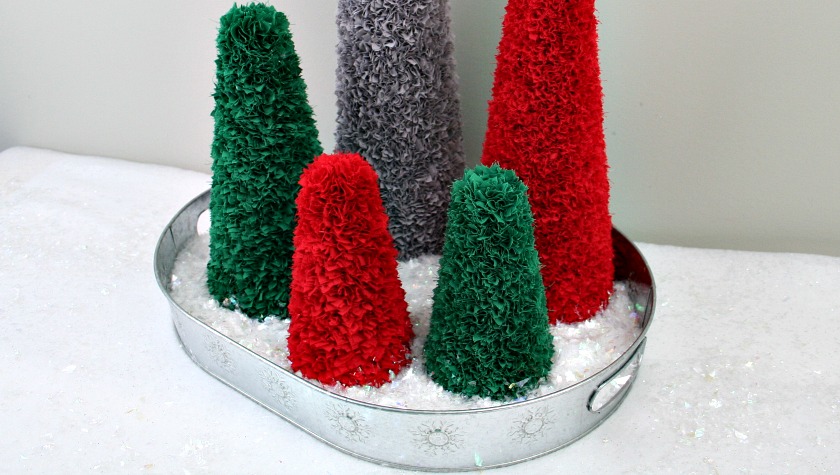
The trees can be made in any color and size you choose.
As you can see below, I’ve made mine in green, red and silver but they would look stunning in white as well. Or if your decorations have a particular theme color each year, you could use colors to match.

Please note that for the taller cones, you’re going to need more fabric. The 10″ cones require about a yard. For the 12″ cones you’ll need between 1¼ to 1½ yards and at least 2 yards for the 16″ cone.
They look really pretty with a little snow on them!

I hope you liked my tutorial for Poke and Push Fabric Christmas Trees as much as I loved making them!
If you do make some of these pretty no sew fabric trees, please do post about it somewhere online and tag me so I can come see. I’m @supermomnocape on Instragram, @1SuperMomNoCape on Twitter and @1SuperMomNoCape on Facebook.
Please feel free to follow me on any or all of the above social media.
Scroll down for many more Christmas Tree decor ideas you can use this holiday season!
 Loading InLinkz ...
Be sure to save this Push and Poke Fabric Christmas Tree Tutorial by clicking on the Pinterest button underneath this post.
And of course, I’d love it if you shared it on Facebook and Twitter as well.


8 Comments
Wanda | From House To Home
December 14, 2018 12:34 amI love your fabric trees! What a great way to use up some remnants and make Christmas decor at the same time 🙂
Leanna
December 12, 2018 3:34 pmI prefer a real tree even if it means last minute decorating. Hubs insists on artificial trees, but I snuck in some small real trees this year.
These are gorgeous, they remind me of the forests in BC. When you see the hillside covered in the thick forest, the trees look almost furry when snuggled together. I love this.
Jenny
December 12, 2018 7:09 amThese trees are adorable! I love the look of them and thanks for the great tutorial.
Addie
December 11, 2018 12:10 amWOW!!! Those are beautiful and you have the patience of a saint!!! You are very creative!!!
Beverly
December 10, 2018 11:16 pmWhat a fun idea. The trees look great and that’s a great tip about making a padded poking stick using a band-aid!
Marie InteriorFrugalista
December 10, 2018 6:48 pmYou and I both shared holiday movie making red fabric mini trees today! Yours are poke & push and mine are wrap & tie. Your trees are beautiful! Pinned 🙂
Mary Anne
December 10, 2018 5:42 pmI love these! Great stash buster too.
Rachel
December 10, 2018 10:44 amSimilar, but quicker, is to wrap on of those styrofoam shapes in tinsel. Hold it in place with occasional croquet-hoop shaped bits of florist’s wire and ta-dah!
Comments are closed.