


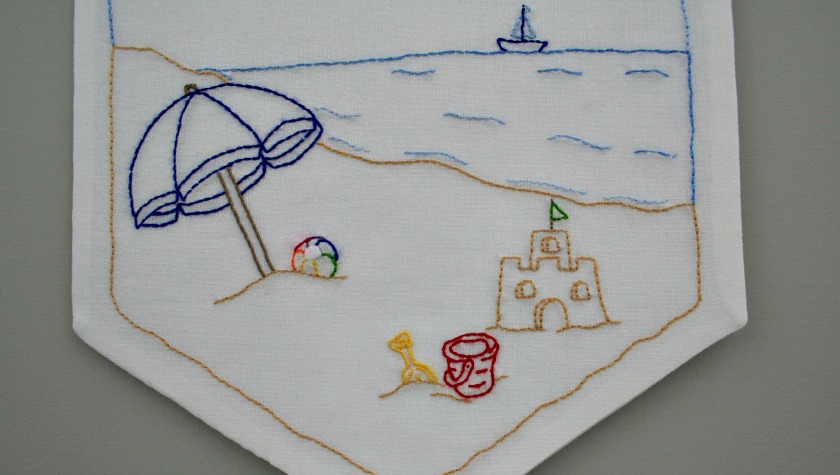
Stitch this cute Summer Beach Days embroidery pattern to celebrate the coming of warm, sunny days relaxing and playing at the beach.
Then turn the finished piece into a fun door banner following the instructions below.
It would also be super fun embroidered on a tote bag to hold beach towels and toys.
Another idea would be to stitch it onto a fabric book cover to create a summer holiday journal. In that case, instead embroidering the sand in a V to follow the shape of the banner, you’d simply follow the outline of the front of the book cover.
Whatever project you decide to make with it, I hope you enjoy stitching this month’s free embroidery pattern as much as I loved creating it for you.
Summer Beach Days Embroidery Pattern


Materials needed to make a Summer Beach Days banner:
- One piece of light colored fabric approximately 10″ X 13″ to stitch the embroidery pattern onto,
- One piece of 10″ X 13″ fabric for the backing
- One piece of 10″ X 13″ Pellon 808 fusible interfacing
- Embroidery floss in colors of your choice
- Thread to match the fabric

To get started: Download and print the pattern (scroll down for the link to get it.)
Please note: The dashed lines all the way around the outside edge indicate the 1/4″ seam allowance for the banner (sew on that line.) The cutting lines are the edge of the paper along the top and sides, as well as the solid lines that form a V at the bottom.
Trace the pattern onto the light colored fabric using a light source of some kind.
I used to just tape the pattern and fabric to a window to trace but now I’ve found that a light box makes this much easier to do.
The light box I use is a Huion LED Light Pad
Mine measures 18.9″ W X 14.2″ L with illuminated space of 16.9″ W X 12.2″ L meaning that I can easily trace A3 and A4 paper patterns.

Have fun stitching the pattern in your choice of colors.
If you’d like to use the same colors of floss as I have, I’ve included them below.
Please note: Two strands of floss are used throughout the beach scene.
The sand is backstitched in DMC 437 Light Tan.
The backstitching for the sky is DMC 4230 Crystal Water – Color Variation floss.
DMC 820 Very Dark Blue Royal Blue in backstitching makes up the canopy of the beach umbrella while the pole is whipped backstitch in DMC 840 Medium Beige Brown.

The multi-colored beach ball has the following colors in order around the ball: DMC 905 Dark Parrot Green, DMC 820 Very Dark Blue Royal Blue, DMC 327 Dark Dark Violet, DMC 321 Red, DMC 740 Tangerine and DMC 743 Medium Yellow.
The center of the ball is satin stitched in white.
As a quick side note, if you follow me on Instagram or Facebook, I posted a photo showing that the red floss had bled when I was giving the beach scene a final pressing. I usually pre-wash red floss to prevent this, but I either missed doing that skein or I didn’t soak it long enough in the water/vinegar solution.
Some followers kindly offered suggestions for how to remove the stain.
One suggestion was to use a bit of bleach on a q-tip and carefully dab where the floss had bled. I was reluctant to try that because while the fabric looks white in the photos, it is Kona Snow. So it’s not a white white.
Another suggestion was to use Color Catchers and if this happens again in the future, I’m definitely going to try that.
What I ended up doing was dabbing a tiny bit of Ivory dish liquid on the stain and then rinsing under cool running water.
As you can see from the photo below, there is a very slight pink stain remaining that can only be seen when really close up. From a distance of more than a few inches, the stain isn’t noticeable.
The running water did cause different areas of floss to fray a tiny bit but again only noticeable close up.

The bucket is backstitched in DMC 817 Very Dark Red Coral with the shovel done with whipped backstitch in DMC 743 Medium Yellow.

All the stitching on the sand castle is done in backstitch with the sand being DMC 437 Light Tan, the stick holding the flag is DMC 840 Medium Beige Brown and the flag; DMC 905 Dark Parrot Green.

The hull and mast of the cute little sailboat is embroidered in the darkest shade of blue from DMC 121 Variegated Delft Blue. The sails and tiny flag are DMC 800 Pale Delft Blue.

The darkest shade of DMC 4230 Crystal Water – Color Variation floss creates the water line. The waves are stitched in progressively lighter shades of the 4230 floss as they get closer to the shoreline.

The three birds flying over the water are embroidered in whipped backstitch using the darkest color of DMC 53 Variegated Steel Grey .

The instructions for completing the banner after the embroidering is done are the same as for the Hello Spring Banner and the Pumpkin Banner but I’ve included them here again for your convenience.
Once all the stitching is done, place the embroidery right sides together with the backing fabric that has had the heavy weight fusible interfacing fuse to it.
Sew on the stitching lines, leaving at least a 3″ opening for turning.
Trim the seam allowances to ¼” all the way around. Clip the corners on the diagonal and turn right sides out.
Make sure to get nice points on all the corners.
Sew the opening closed using a ladder (aka invisible) stitch.
Press well.
The finished size of the banner is approximately 8″X10.5″.
Small straight pins can used to hang it on the wall. I like that option as we live in a rental and the tiny holes made by the pins will barely show when we eventually move.
But you could also add a hanging sleeve to the back of the banner, if desired.
Click the link below to download and print this month’s free pattern:
Summer Beach Days Embroidery Pattern
If you stitch this pretty little banner that celebrates the coming of the lazy beach days of summer, please post a photo of it somewhere on social media and tag me so I can come see. I’m @supermomnocape on Instragram, @1SuperMomNoCape on Twitter and @1SuperMomNoCape on Facebook.
Be sure to save June’s Summer Beach Days embroidery pattern to your embroidery or sewing Pinterest board by clicking on the Pinterest button underneath this post.
And of course, I’d love it if you shared it on Facebook and Twitter as well. 


14 Comments
Joy McDonald
July 4, 2019 6:51 amSo cute Susan! I must say as it’s winter here I am not in beach mode at all.. but I will save this one for later in the year!! I really like the idea of putting it on a journal cover… Thanks! xx
Super Mom No Cape
July 8, 2019 4:15 pmThank you Joy! Good idea to save it for later in the year… though if the cold weather gets you down, it would be a good one to stitch and dream of warmer days. 🙂
Robin
July 1, 2019 2:47 amI love this simple but extremely cute embroidery for summer. Living in FL it will be around more than 3 months. Thank you. I also shared it on Pinterest and Facebook. Hope you get a bit more traffic 🙂
Super Mom No Cape
July 1, 2019 9:47 amThank you Robin, what a sweet comment! I hope you enjoy embroidering it.
And thanks so much for sharing it as well! It’s much appreciated. 🙂
Laurie
June 22, 2019 9:00 amThis pattern is so cute, I hope to stitch it soon!
Super Mom No Cape
June 24, 2019 4:11 pmI’m so glad you like it Laurie!
Leanna
June 21, 2019 10:44 amSo fun, I especially love the little colours blow up ball. It looks exactly like the one I loved so long ago. This scene would be adorable on a little dress for a toddler.
Super Mom No Cape
June 23, 2019 4:12 pmThank you Leanna! It would look sooo cute on a little toddler dress.
Susan
June 14, 2019 12:41 amThanks, that’s a great pattern, and makes a cute banner or framed piece.
Super Mom No Cape
June 19, 2019 2:55 pmThank you, Susan… yes, it would make a cute framed piece as well. 🙂
Rachel
June 13, 2019 4:33 amThat’s a very sweet, summer holiday design!
Super Mom No Cape
June 19, 2019 2:53 pmThanks so much Rachel!
Mary
June 12, 2019 10:26 pmThat is adorable. I love the little sandcastle and bucket. Thank you for the cute pattern.
Super Mom No Cape
June 19, 2019 2:51 pmThanks so much Mary! The bucket and sandcastle were fun to draw and to stitch. 🙂
Comments are closed.