


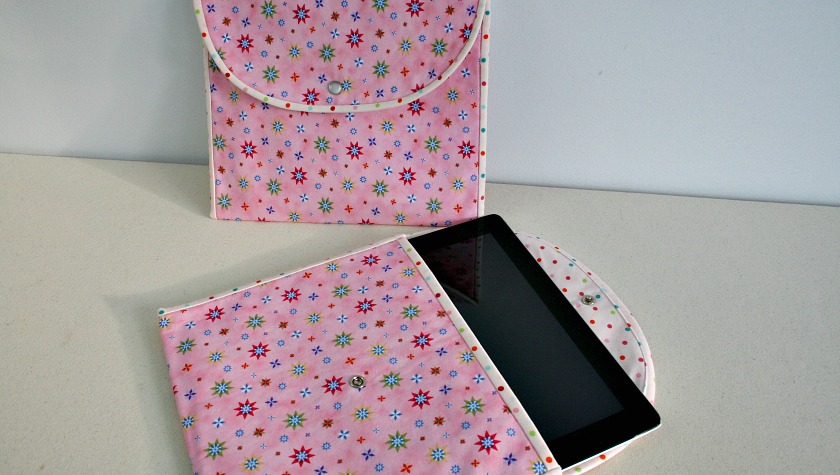
It’s time for February’s Craft Room De-Stash Challenge or in my case, Sewing Room De-stash. This month, I have the prettiest little Tablet Pouch to share with you.
Each month, we are challenged to create a project from our stash. We’re allowed to spend up to an additional $10 to complete the project but I’m pleased to say that everything for this project came from stash, even the pearl snaps.

When I first came up with the idea for this little pouch, I was designing it to work with some really sweet bunny fabric from my stash with the idea that it would be a great gift to make to give to your tween or teen for Easter. But I only have a fat quarter of that fabric so before cutting into it I wanted to make a test item to make sure that my idea would work.
It worked so well, that I’m sharing that project with you today instead and will share the other one later this week.
This project is perfect for all those non-directional fabrics in your stash.
By happenstance, it turns out that an iPad fits perfectly inside!

The finished size of the pouch is 10″ X 8½”.
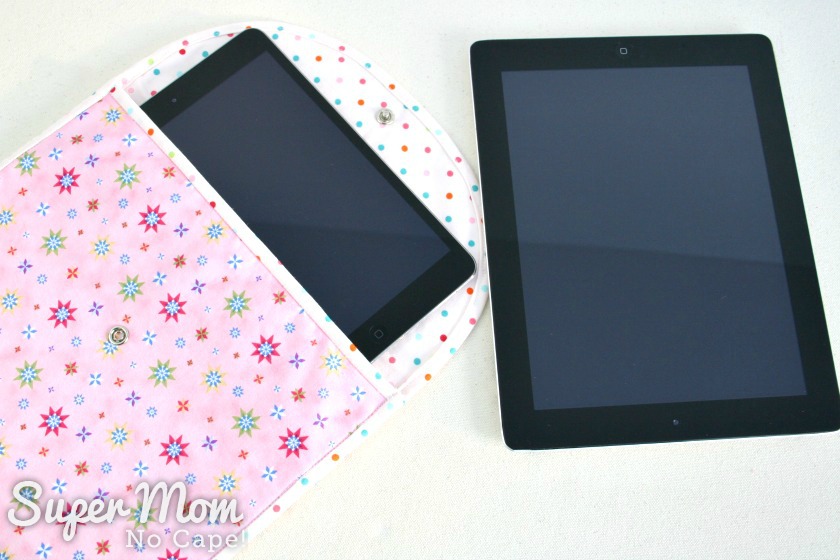
Our oldest daughter has both an iPad and iPad mini. Below you can see that the pouch is quite a bit too big for the mini, so be sure to check the size of the tablet or iPad that you’re wanting to use the pouch for.

Instructions to Make the Tablet Pouch
Materials required:
- 10″X22″ piece of fabric for the outside of the pouch
- 10″X22″ piece of fabric for the lining
- 10″X22″ piece of fusible batting
- 10″X22″ piece of HeatNBond fusible web
- 2 – 2″ strips WOF (width of fabric) for the binding


The link to the pattern piece for the flap can be found by scrolling down to the end of the instructions.
How to make the tablet pouch pattern:
First you’ll need to print off the pattern piece for the flap. Make sure to set your printer to no scale or 100% to make sure the pattern piece prints out the correct size.
Cut out the flap pattern piece.
Next, cut two pieces of paper 8½” X 10″.
Butt the 10″ edges up against each other and tape together. You’ll have a piece that is 8½” X 20″.
Tape this piece to the flap matching one 10″ side to the seam line. (Don’t worry about the seam allowance on this piece. That will only be used if you are using directional fabric and I’ll have that tutorial for you soon.)
To make the tablet pouch:
Using the paper pattern you just made, cut out one outer and one lining, one from fusible interfacing and one from fusible web.
Cut two 2″ strips WOF for the binding.

To make the binding for the pouch:
Place the ends of the binding strips right sides together perpendicular to each other as shown in the photo below:

Draw a diagonal line from point to point, where the binding strips intersect (see photo.)

Sew the seam with the needle just to the right side of the drawn line.

Once the seam is sewn, flip the top strip to the side to check to be sure the two strips line up correctly with each other to form one long strip.

Trim off the excess fabric.

Press the seam open.

Fold the binding strip in half along the long edge and press well.

Coil the binding and set aside for later.

Place outer fabric right side up on top of the fusible fleece with the textured (glue) side facing up.

Cut a piece of parchment paper large enough to use as a pressing cloth.

The parchment paper will prevent any glue from the fusible batting from getting stuck to your iron.
I’ve also found that the parchment helps to ensure that the batting fuses properly to the fabric without leaving indentations from the bottom of the iron.
Lay the parchment paper over the piece to be fused.

Press according to the directions provided with the fusible batting. Start in the middle and work your way towards the outer edges in both directions to ensure the pieces are fused together without any bubbles in the fabric. Set this outer piece of the Tablet Pouch aside to cool.

Place the lining of the Tablet Pouch right side up on top of the fusible web. The fusible web should have the paper side facing down against the pressing surface and the glue side facing up.

Place the piece of parchment over top and press according to the directions provided with your fusible web. Once again, start pressing in the middle and work your way to the edges.

Allow this piece to cool completely before attempting to remove the paper backing.
Once it’s cool, scratch an X in the paper.

Peel off the paper.

Next, place the outer tablet pouch piece right side down on your pressing surface. Layer the lining piece on top with the fusible web facing towards the fusible batting.
Fuse the two pieces together as described in the previous steps.
Now it’s time to attach the binding.
Pin a strip of binding to the right side of the short straight edge of the tablet pouch. Trim the binding so that it is approximately 1/8″ from the edges.
Trimming both ends at this stage will reduce the bulk in the seam when the rest of the binding is attached. Don’t trim off too much though as you still want it to be enclosed within the other binding (scroll down to see what I mean.)

Sew the binding strip in place using a ¼” seam allowance.

Press the binding away from the main fabric.

Fold the binding over to the back and pin in place.

This is what it will look like on the back. You want to make sure that the binding is caught by the pins all the way across.

Stitch in the ditch to secure the binding to the lining side of the pouch.

Now here’s where I’m going to get real with you.
When I sewed that seam, some of the binding on the back side wasn’t caught in the seam.
So I unpicked the seam and pinned it to within an inch of it’s life!


Don’t be afraid to use lots of pins if you need to in order to securely hold the binding in place… no one but you (and whoever you tell will ever know.)
This is what it should look like after the binding is sewn to the lining.

Next you’ll be attaching binding all the way around the tablet pouch piece.
Open the remaining binding strip and fold down a half to three quarters of an inch.

Pin binding to outer edge.

Sew the binding on all the way around the outer edge.
Slow down when you get to the curves and ease the binding into place. For this step, I didn’t use pins because I found it easier to ease the binding around the curves but as mentioned above… if pinning makes it easier for you… use pins. 🙂

Trim binding leaving enough to turn under the end.

Open up the binding, fold in the end and sew it in place as you did at the start of adding this strip of binding.
Grade the seam to reduce bulk.

Don’t worry if your grading isn’t perfect. It will be hidden inside the binding.

Clip the curves of the flap.

Press binding away from the main piece.
 Sew the binding to the lining as described above.
Fold the short straight edge up 8 ¼” and pin.

To begin sewing the sides together, insert needle into binding at the fold.

Sew using invisible stitch aka ladder stitch.


Repeat for the other side seam.
The finished seams should look like this.

To install the snap:
Use a ruler to determine the middle of the flap. Make a mark with a pencil approximately ¾” from the bound edge.

Position the top of the snap over the pencil mark.
Make sure the prongs come through the lining fabric.

Place second part of snap in position.

Using a hammer and the tool provided with the snap kit, secure the two snap pieces together. (Since I couldn’t hold the camera and the hammer and tool, Dave did this part for me while I took the photo.)

Mark the spot for the other half of the snap by folding the flap down and pressing firmly on the snap.
When you lift the flap, you’ll see a slight indentation. Measure again to make sure this is centered, make adjustments if necessary and install the corresponding snap pieces.

You now have a beautiful new Tablet Pouch to protect your tablet or iPad.

This really did turn out to be a great stash busting project because in the process I actually ended up making 2 pouches… the first being the test pouch and then the second pouch was made so I could take photos for this tutorial.
I love how these pouches turned out and can’t wait to show you the version made with the bunny fabric.
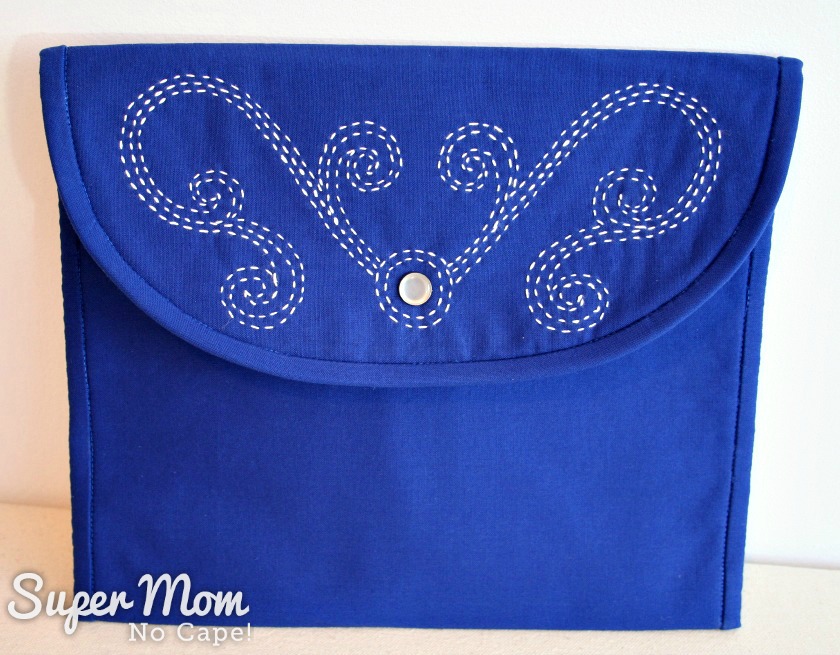
There will also be an embroidered version that I’ll be posting for March’s Embroidery Monday pattern.

Something else I love about this project is how versatile these pouches will be.
If you didn’t want to use them to store your tablet, they would also be great travel pouches for carrying little bits and pieces that you didn’t want to get lost in amongst the rest of your things.
How about as a pouch to put your prettiest panties in.

And wouldn’t this make a really fun way to wrap some lingerie to give to a bride at her bridal shower!
Or maybe you’re the bride or mother-of-the-bride and you want to make special gifts for your bridesmaids.
You might not want to give a pouch full of pretty panties to your mother… or depending on your mother, maybe you do. 🙂
If not, a pouch with a couple of her favorite books inside and a gift certificate for a day at the spa would be a lovely gift for Mother’s Day.
The possibilities for how these pouches could be used are only limited by your imagination.
Click the link below to download and print the pattern piece to get started:
Tablet Pouch Flap Pattern Piece
I also used this tutorial to make this beautiful Sashiko Embroidered Pouch. Click the link to get the free Sashiko embroidery pattern!
Every month a group of bloggers are challenged by C’mon Get Crafty to create a new craft or project from their own stash of goodies! Check out some awesome creations you might be able to make from your own stash! #CraftRoomDestashChallenge
[clickToTweet tweet=”What crafty creations could you make today from YOUR craft stash?! #CraftRoomDestashChallenge” quote=”What crafty creations could you make today from YOUR craft stash?! #CraftRoomDestashChallenge”]
 Loading InLinkz ...
Be sure to save this project for future reference by clicking on the Pinterest button underneath this post.
And of course, I’d love it if you shared it on Facebook and Twitter as well. 🙂


29 Comments
Emily @DomesticDeadline.com
March 20, 2018 7:46 pmWhat a great tutorial. I’ve got so much fabric to destash. And, I just bought that iron, lol
Nicole
March 1, 2018 10:36 pmWhat a useful and cute little pouch! Thank you for sharing your tutorial at the #HomeMattersParty this week.
Super Mom No Cape
March 6, 2018 6:01 pmThank you so much Nicole!
Megan
February 21, 2018 12:41 pmThis is such a great project! So easy to customize/personalize, and I agree with you that you can use it beyond just a tablet pouch! Pinned!
Super Mom No Cape
February 21, 2018 1:28 pmThank you for your lovely comment, Megan! And thank you so much for pinning.
Habiba
February 21, 2018 7:26 amThank you for this very detailed step-by-step instruction. I love these pouches and all the possibilities they could be used for. I made a felt one for my tablet and it included a lot of Hand sewing. I am not a fan of had sewing, though. I bet those little butterfly pins make you happy while sewing, right? I pinned this for future reference.
Super Mom No Cape
February 21, 2018 2:45 pmThank you so much Habiba for your wonderful comment!
And yes… those little butterfly pins do make me happy while sewing. 🙂
Thank you for pinning!
Roseann Hampton
February 20, 2018 10:09 pmGreat tutorial – love all of the pictures!
Super Mom No Cape
February 21, 2018 2:42 pmThank you, Roseann! So many people are visual learners so I try to make sure to have lots of photos. 🙂
Sharon@bluewillowhouse
February 20, 2018 8:37 pmVery versatile pouch. You wrote a fantastic tutorial.
Super Mom No Cape
February 21, 2018 2:39 pmThank you for your lovely compliment, Sharon!
Deborah
February 20, 2018 3:37 pmOh, I love this. I need to start my sewing game!! It’s beyond rusty and was little to being wiht.
Super Mom No Cape
February 21, 2018 2:38 pmThank you sooo much Deborah! It will come back to you quickly and there’s so many tutorials (in addition to mine) and YouTube videos for things you don’t remember. 🙂
Michelle James
February 20, 2018 2:04 pmI love this pretty ipad puch. Thanks for the great tutorial!
Super Mom No Cape
February 21, 2018 2:34 pmThank you, Michelle!
vea
February 20, 2018 12:31 pmYou are the most fabulous crafter and a unselfish sharer. Thank you so much for all your wonderful ideas, patterns, tutorials, etc. I will now apply the tute above to a bag I have not been able to finish due to my inexperience as a sewrer, although I do quilt.
Super Mom No Cape
February 21, 2018 1:57 pmWhat a wonderful and sweet comment and compliment Vea! Thank you so much.
I’m glad my tutorial will help you to complete your tote. That’s one of the things I love about sewing. The same basic techniques can be used on all sorts of projects.
Joy McDonald
February 20, 2018 3:37 amGreat tutorial Sue! Very clear and straightforward, and like you said can be used for other things… I made something just like that for my little travel laptop.. the only problem I had was I didn’t take the cable and charger into consideration! I need to make a drawstring bag for them… one day! xx
Super Mom No Cape
February 21, 2018 1:55 pmThank you so much, Joy!
I completely forgot about the cable and charger too! Hmmm… might have to make some adjustments when I make the bunny pouch. 🙂 Thanks for mentioning that!
Denise Bryant
February 19, 2018 10:15 pmVery cute and far beyond my skills. 🙂
Super Mom No Cape
February 21, 2018 1:52 pmThanks so much Denise!
Debrashoppeno5
February 19, 2018 8:36 pmThis is a very handy pouch for the tablet or anything else. I love the material you used and I can’t wait to see the bunny pouch. Great project!
Super Mom No Cape
February 21, 2018 1:51 pmI love that fabric too, Debra!
In fact, I’ve used in on a few other projects and so that now I only have a few scraps left.
Dione Gardner-Stephen
February 19, 2018 8:25 pmMy soon-to-be tween will be requiring a tablet for school next year. I have pinned this….. I will be needing this tutorial all too soon! Thank you!
Super Mom No Cape
February 21, 2018 1:47 pmThey grow up so fast don’t they, Dione! Thanks so much for pinning!
Rachel
February 19, 2018 5:42 pmAs you say, that’s a very usedul pouch, and you could easily find uses for many different sizes!
Super Mom No Cape
February 21, 2018 1:24 pmYes, it would, Rachel. I agree. And it would be fairly easy to shrink the flap pattern piece using a printer and then cut the other pieces to size.
Marci @ Stone Cottage Adventures
February 19, 2018 5:42 pmThis pouch is very pretty! Thank you for the pattern, I think it is very versatile! -Marci @ Stone Cottage Adventures
visiting from the de stash challenge
Super Mom No Cape
February 21, 2018 1:20 pmThank you so much, Marci! I’m glad you like it.
Comments are closed.