


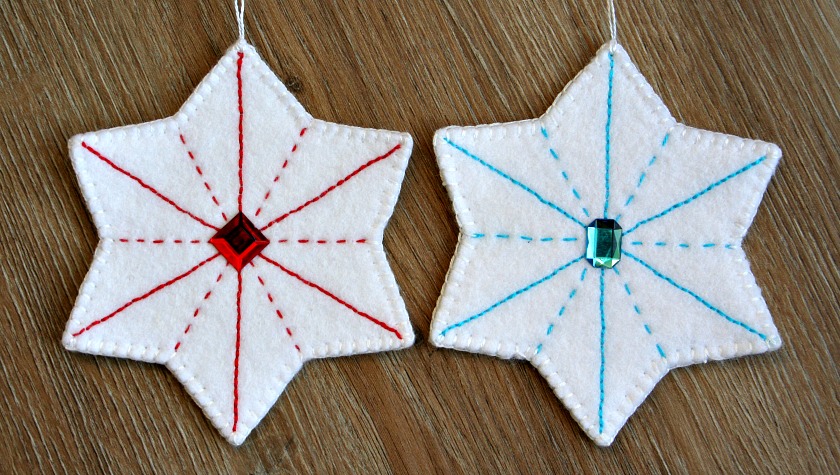
Do you like making new ornaments to hang on your tree each year or to give as gifts. These embroidered felt star ornaments are something you could work on in the evenings watching your favorite holiday movies.
They’d also be a good project to make with children who are old enough to learn a bit of hand stitching since only three basic embroidery stitches are used… running stitch, backstitch and blanket stitch.
Or how about having an ornament making craft night with a few of your best friends.
Not only will these star ornaments look beautiful on your tree, but because they’re flat, they’d be great to pop into Christmas cards for those far away family and friends who you want to send a little something extra.
And wouldn’t they look lovely as gift toppers. Stitch the recipients name on the back and it becomes part of the gift. Want a downloadable copy of this tutorial complete with the patterns? The PDF can be purchased in my shop for $5.00.

Welcome to the 5th annual 12 Days of Holiday Ideas event, hosted by Shirley of Intelligent Domestications and Erlene of My Pinterventures Between Nov. 11th and December 6th there will be hundreds of new ideas shared by over 55 Co-host bloggers!
To see our kick-off collection of 50+ Holiday ideas as well as all of this years talented participating DIY and Foodie Blogs be sure to pop over to my post How to DIY Your Christmas.
As you’ve probably gathered by now, today is all about DIY Christmas Ornaments. You’ll find the link party with all the other bloggers ornaments at the bottom of the post.

Embroidered Felt Star Ornament Instructions
Materials needed to make one embroidered star:
- Scrap of white felt 5″X10″
- Scrap of Pellon 808 heavy weight fusible interfacing
- Embroidery floss in colors of your choice
- Small gem for the center in a color to match the floss
- Freezer paper


Finished size: approximately 4½”X4½
Begin by printing off the pattern (scroll down for the link to download it.)
Note: Be sure to set your printer to 100% or no scaling in order to print the pattern at the correct size.
Next, trace the larger star pattern twice onto the freezer paper (waxed side down) using a light source of some kind. A sunny window works well for this.
In recent years though, I’ve switched to using a Huion LED Lightbox

Being able to trace on a flat surface makes for a more enjoyable experience. It’s more comfortable and saves on arm strain. I’m also able to adjust the brightness of the light to whichever level works best for whatever project I’m working on. If it’s within your budget, I highly recommend one.
You’ll also need to trace the smaller star onto the scrap of fusible interfacing. Make sure to place the fusible side towards the paper.

Cut out the stars you traced onto freezer paper about 1/8″ from the traced lines.
Iron them onto the white felt. Make sure the wax side is facing down otherwise the paper will stick to your iron instead of the felt.

Cut out the stars along the drawn lines. Peel off the freezer paper.

Cut out the smaller star you traced on the interfacing cutting just inside the traced lines so there are no pencil marks left on the interfacing star.
Fuse the interfacing star to one of the larger felt stars. Set aside.

Draw lines on the remaining felt star as indicated on the pattern.
I used a Clover Water Erasable Marker

Your felt star should now look like this.

Embroider three lines of running stitch on the dashed lines shown on the pattern. I used DMC floss color 817 Very Dark Coral Red.

Embroider three lines of backstitch on the solid lines shown on the pattern.

Place the embroidered star and the interfaced star wrong sides together. Blanket stitch all the way around the outside of the stars to join them together.

Spritz with water to remove the blue traced lines and allow to dry.
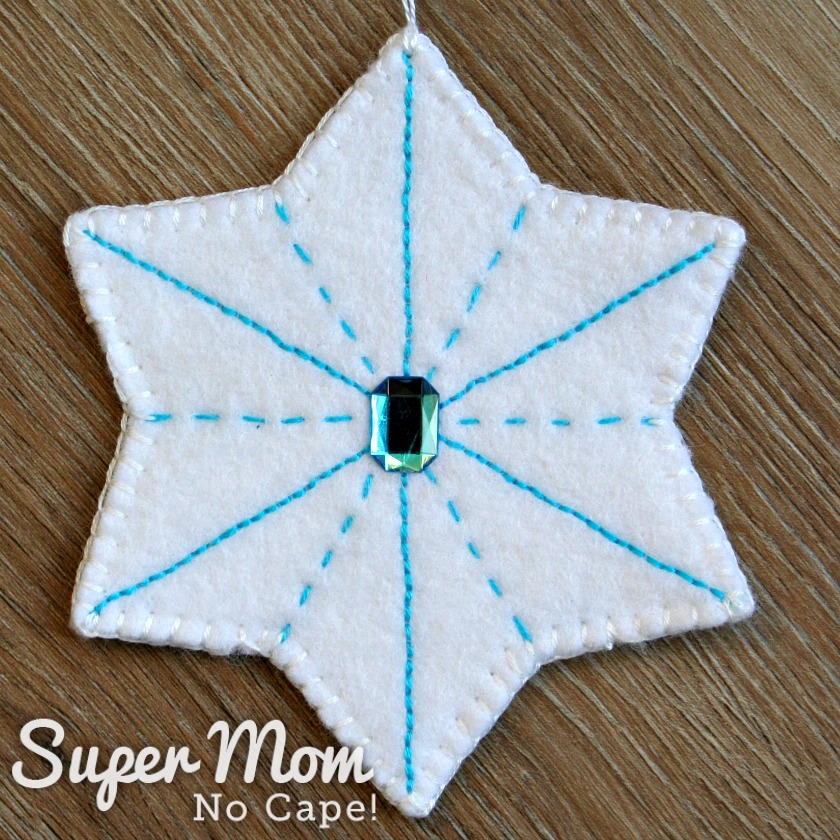
Once dry, glue a gem in the center in a color to match the floss.
Add a hanging loop and your star is ready to hang on your tree.

Here’s one I made using DMC floss color 3845 Medium Turquoise and a matching blue gem.
I can see myself making a lot more of these for our tree, to add to Christmas cards, as gift tags.
Oh… and wouldn’t it be fun to have a tree decorated with just these for a party and each guest gets to choose one to take home with them.
Soo many ways to use them!

Want a downloadable copy of this tutorial complete with the patterns? The PDF can be purchased in my shop for $5.00.
Click the link below to add to your cart and then click checkout:
If you stitch one or more of these pretty little stars, please post a photo somewhere on social media and tag me so I can come see. I’m @supermomnocape on Instragram, @1SuperMomNoCape on Twitter and @1SuperMomNoCape on Facebook.


29 Comments
Mary
December 1, 2019 11:09 amI have been trying to get the pattern for this but have not received the email. Embroidered Felt Star Ornament
Super Mom No Cape
December 1, 2019 11:49 amI’ve sent you an email Mary to see if we can figure out what’s wrong.
Jessa
November 30, 2019 8:18 amThese stars are so pretty! I especially love the red!
Super Mom No Cape
December 1, 2019 11:55 amThank you Jessa. The red one is pretty, isn’t it.
Roseann Hampton
November 27, 2019 5:35 pmVery pretty! Love your color choices!
Super Mom No Cape
December 1, 2019 12:00 pmThanks so much, Roseann!
Pam @Threading My Way
November 27, 2019 6:23 amI love your stars, Susan – elegant, yet simple.
Super Mom No Cape
December 1, 2019 12:02 pmThanks so much, Pam. I’m glad you like them!
Wanda Simone
November 26, 2019 10:46 pmI love your felt snowflakes! And the gem in the middle is so pretty!
Super Mom No Cape
December 1, 2019 12:04 pmThank you Wanda! I love the gem in the middle too. I’m going to have to make a trip to the craft store to buy more.
maria
November 26, 2019 10:12 pmthese are the cutest ornaments love the crystal bead just perfect.
Super Mom No Cape
December 1, 2019 12:04 pmThanks so much, Maria!
Jenny
November 26, 2019 3:53 pmThese snowflakes are so pretty and that pen to write on the felt is awesome. The jewel in the middle is the perfect touch.
Super Mom No Cape
December 1, 2019 12:05 pmThank you, Jenny. I use that water soluble pen a lot in my sewing and crafting.
Nikki from Tikkido
November 26, 2019 9:28 amI’ve always loved felt Christmas ornaments, and absolutely love tehse elegant stars. The rhinestone is a fun addition to the design!
Super Mom No Cape
December 1, 2019 12:06 pmThanks so much Nikki! I love felt Christmas ornaments too.
Debra Jerry
November 26, 2019 5:49 amI love your idea of making these, decorating a tree for a party, and letting the guests choose one to take home!
Super Mom No Cape
December 1, 2019 12:07 pmThank you, Debra! It would be something fun and they’d have a reminder about your time together each year when they decorate their own tree.
Mary
November 25, 2019 7:35 pmThose are so pretty. They would make a nice addition to gift wrapping.
Super Mom No Cape
December 1, 2019 12:12 pmThank you so much, Mary! They would make a lovely addition.
Rachel
November 25, 2019 5:10 pmThese snowflakes are so pretty! I love the simple embroidery and the little gem in the center!
Super Mom No Cape
December 1, 2019 12:14 pmThank you so much, Rachel. Sometimes simple works best, doesn’t it. 🙂
Rachelle
November 25, 2019 2:02 pmSo cute! I like felt and embroidery items like these.
Cherryl Ehlenburg
November 25, 2019 1:24 pmThose turned out cute! I love things that are hand embroidered. It just gives them more of an old-fashioned vintage look!
Super Mom No Cape
December 1, 2019 12:21 pmThanks so much, Cherryl. I agree with you about how it gives them a more old-fashioned vintage look.
Marie
November 25, 2019 12:57 pmI like your idea of adding these pretty felt stars with our Christmas cards for a little special gift! I just picked up my embroidery needle again for the first time in decades so it would be fun to practice the stitches. Pinned 🙂
Super Mom No Cape
December 1, 2019 12:22 pmThank you, Marie! I’m glad you’ve picked up your embroidery needle again. I was away from it for years and years only to rediscover how much I love it.
Rachel
November 25, 2019 8:44 amSimple but delightful!
Super Mom No Cape
December 1, 2019 12:09 pmThank you, Rachel!
Comments are closed.