


On Saturday, I got the third hot pad quilted after a quick trip to the fabric store to buy more thread. Free motion quilting takes a lot of thread!
Then there was another stop in the sewing action while Dave worked on figuring out why the potted motor of my 15-91 was leaking oil. He ended up having to take the motor off and give it a complete cleaning. It turns out that the woman I bought the machine from had put way too much oil in the motor when she refurbished it. It wasn’t noticeable when I was doing small projects where the stopping and starting didn’t cause the motor to warm up. But the fast speed and continuous sewing of FMQ got that motor good and warm.
Luckily I noticed the problem and Dave was able to fix it. That’s one of the great things about these vintage Singers; they were made to last and they were made to be repaired by the home sewer or in this case by the home sewer’s husband.
After Dave got the 15-91 fixed and back into her sewing cabinet yesterday, I got the binding sewn on all three hot pads. Then the later part of the afternoon and evening was spent hand sewing the binding to the back while listening to a book on CD. And here’s the final result:
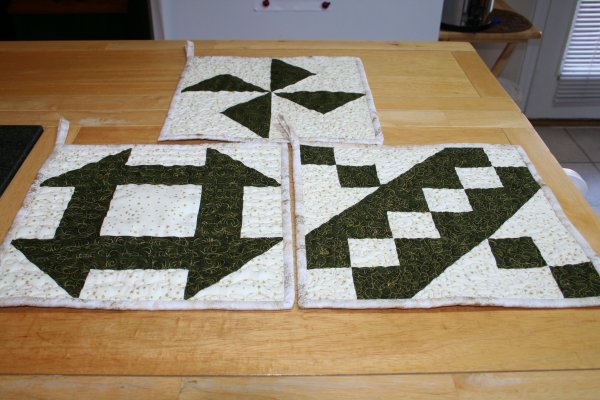
For the churn dash hot pad, I quilted in lines of loop-de-loops leaving the center of the block unquilted.

I did take a break for supper and to watch The Black Cauldron that I’d picked up on our last trip to the library. It’s not one of Disney’s best animated movies but I’ve always loved little Gurgi and his saying “Munchies and crunchies in here somewhere” has become one of those phrases that got incorporated into the family vocabulary, especially when someone is looking through the cupboards for snacks.
On the agenda for today is working on getting a couple of tutorials finished to go along with Thursday’s Christmas on a Budget Series post.
And I’ve also got a trip to the mall planned to use a $10 off $10 or more coupon that I received in the mail from JC Penny. I’m hoping to pick up a top or two in their end of summer sales.
Oh and I might… just possibly… get some placemats or mugrug quilt sandwiches made so that I can have some more fun practicing FMQing.
End of summer, Christmas only 4 months away… where has the year gone?


7 Comments
Maria
August 24, 2011 12:12 pmThe pot holders look lovely hanging there.
Did you relise you are a NO REPLY blogger!!
Sandra :)
August 23, 2011 4:20 pmYour hotpads turned out great – congratulations on getting them finished!
I know how wonderful those old machines are – there’s just nothing to compare to them being made today, sadly. It’s a testament to their quality that so many of them survive even now, and even better – run so well! My 1953 201 is magnficent!
Robin (RsIslandCrafts)
August 23, 2011 12:47 pmYour hotpads look great hanging in the kitchen.
Ayana
August 23, 2011 5:14 amThese are just beautiful!
mosaicthinking
August 22, 2011 6:28 pmLovely hot pads. Would you mind sharing how you did the hangers. From your photos it looks like they might be an extension of your binding but I can’t be sure. Seems you’ve come up with a good technique and I’d like to try it for the pot holders I’m working on right now.
supermom
August 22, 2011 9:54 pmFor the binding… I started at one corner of one side (rather than the middle as when binding a quilt). Then I worked my way around the pot holder, just like you would a quilt, mitering the corners. Then once I got to the fourth side, I took a moment to go back to the first side and fold the binding to the back and hand sewed it in place for about two inches. Then I sewed down the binding on the fourth side, going right over the binding of the first side. Then I cut the binding, leaving a tail of about 6 inches. I folded under the raw short end, then folded the tail in thirds and machine stitched close the edge. Then I hand sewed the binding to the back, starting where I left off on the first side and worked my way around. Once I finished sewing down the fourth side, I folded the tail to the back and hand stitched it in place which gave them about a 2 1/2″ hanging loop.
mosaicthinking
August 23, 2011 6:11 amThanks so much for the detailed description. I’ll give that a try – you’ve achieved a very tidy looking finish.
Comments are closed.