


If you’ve been quilting for any length of time, you likely have half square triangle (hst) blocks leftover from other quilting projects that you’re hanging on to until you can figure out what to do with them. This Quilted Hourglass Candle Mat is the perfect use for them.
We quilters do hate to throw out any scrap or block that we might be able to use, don’t we? Even if it takes us years to find a use for them, they stay in our stash.
You’ll only need 4 hsts to make the hourglass blocks for the candle mat.
And if you don’t happen to have any half square triangles in your stash, I’ll show you how to make them. These candle mats are great scrapbusters!
Don’t want to use it as a candle mat? It would be a great mug rug as well.
They’re so quick to sew together that you can make several to have on hand for last minute gifts this holiday season. Add a pretty candle or a mug and you’ve got a lovely gift that you know will get used.
It’s the Second Day of the Fourth Annual 12 Days of Christmas Series!

We have teamed up with 50 plus bloggers to bring you a oodles of DIY Ideas and Recipes to make your holiday season merrier. There are 12 different posts in the series and we have spread them out over a four week period with three posts per week. Now is the time to subscribe!
GO HERE for the complete list of Dates and Topics plus a collection of most popular holiday ideas including ornaments, games, recipes and more from all 50 plus talented bloggers!
If you haven’t had a chance to check out all the other DIY Christmas Ideas I’ve shared click the links below:
Day 1: How to Make a Christmas Wreath Kit featuring an adorable Hedgehog Wreath
Day 2: You are here. 🙂
Day 3: Ring in the Holly Days Advent Calendar Tutorial
Day 4: Christmas Button Lace Ornament Tutorial
Day 5: Delicious Mini Puff Pastry Cone Appetizers
Day 6: Dresden Charm Ornament Tutorial
Day 7: How to Make a Christmas Floral Arrangment
Day 8: How to Make a Mason Jar Embroidery Kit
Day 9: Christmas Furoshiki (Japanese Fabric Wrapping)
Day 10: Poke and Push Fabric Christmas Trees Tutorial
Day 11: Mini Spiced Orange Buttercream Bundt Cakes
Day 12: DIY Christmas Stocking Stuffer Ideas
It’s Day 2 and we are sharing DIY Gift Ideas!
How to Make a Quilted Hourglass Candle Mat
Materials needed to make one Hourglass Candle Mat:
- 2 – 4¼” squares of main fabric
- 2 – 4¼” squares of white background fabric
- 1 – 4½” X 6½” rectangle of main fabric
- 1 – 2″ strip width of fabric of coordinating fabric for binding
- Scrap of quilt batting at least 8½” X 12¼”
- Scrap of fabric for backing at least 8½” X 12¼”
- Thread
If you’re using HSTs from your stash, you won’t need the first 2 on the list and can skip down to the instructions for making the hourglass blocks using the HSTs.
For the purposes of this tutorial, I’ve gone ahead and made a new hourglass candle mat top to show you the steps but the finished candle mat in the photos is one I made from triangles leftover from the Quilted Christmas Wreath Pillow Cover Tutorial that I made for the Sew Early for Christmas Blog Hop in July.
To make the half-square triangles:
Cut two 4¼” squares of your main fabric, two 4¼” squares of white background fabric and one 4½” X 6½” rectangle of the main fabric.

On the wrong side of each white square, draw a diagonal line from corner to corner and then again ¼” away from the center line to indicate your seam line.

Pin these wrong sides together to the main fabric squares.
Sew just slightly to the left of the seam lines as shown on both sides of the center line.

Cut along the center line.

Press the seam allowance towards the main fabric.

Repeat for the other two squares.
Trim off those little dog ears to make the half square triangle blocks square.
To make the hourglass blocks:
On the wrong side of two of the HSTs, draw diagonal lines as you did above.
Place two HSTs blocks right sides together with white facing the main color as shown below.

Sew along the seam lines as before.

Cut along the center line.

This produces two hourglass blocks.

Repeat the above steps with the other two HST blocks.
Press seam allowance to one side.
Sew two of the hourglass blocks together using a scant ¼” seam allowance. Make sure to pin the main fabric triangle to main fabric triangle (see finished units below.)

Repeat with the other two hourglass blocks.
They should look like this.

Pin the 4½” X 6½” rectangle to one of the hourglass block units along the 6½” edge. Sew using a scant ¼” seam allowance.
Repeat with the other hourglass block unit.
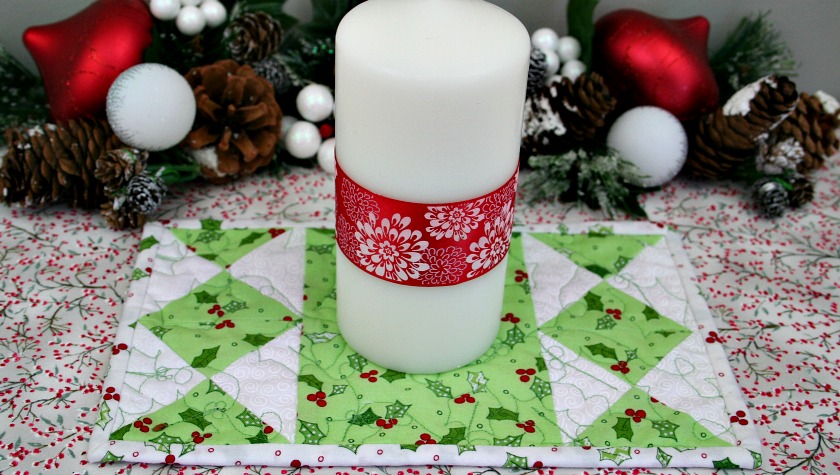
The candle mat top is now complete.

Place the backing piece right side down and add the batting and then center the hourglass candle mat top on the batting.

Baste the three pieces together using whatever method you prefer.
I always hand baste my quilting projects, even small ones like this because I don’t like using pins and spray adhesive gunks up my vintage Singer sewing machine and I want to keep her working for a long time to come.
Hand basting also allows me to simply free motion quilt without having to worry about removing pins.

Quilt as desired.
My candle mat was quilted with holly leaves, vines and loops.
It’s helpful to practice on paper before going to the machine.

Here’s a close up of one holly leaf showing the direction of the free motion quilting.

Once the quilting is done, if you’ve hand basted, remove the basting threads.

Small projects like candle mats are perfect for practicing your free motion quilting and trying out new designs.
This was practice for the Quilted Christmas Wreath Pillow Cover Tutorial.
As you can see, berries were added to the bottoms of some of the holly leaves.

Trim off the batting and square up the candle mat.

Press the 2″ strip of fabric in half lengthwise and sew the binding on to the front of the candle mat.

Fold the binding over to the back and either machine sew or hand sew using a ladder or invisible stitch.
These will be much faster to make if you machine sew the binding to the back but I must confess that I’ve never gotten the hang of doing that, so hand sewing it was. 🙂
The finished mat will measure approximately 6½” X 10¼” depending on how densely you quilt it.

Doesn’t it look festive with a white candle wrapped with red ribbon!

I hope you’ve enjoyed my contribution to the DIY Gift Ideas Day of the 12 Days of Christmas Series.
If you make a Quilted Hourglass Candle Mat, please do post it somewhere on line and tag me so I can come see. I’m @supermomnocape on Instragram, @1SuperMomNoCape on Twitter and @1SuperMomNoCape on Facebook. Please feel free to follow me on any or all of them. 🙂
Scroll down for many more DIY Gift Ideas!
 Loading InLinkz ...
Be sure to save this Quilted Hourglass Candle Mat by clicking on the Pinterest button underneath this post.
And of course, I’d love it if you shared it on Facebook and Twitter as well. 🙂


7 Comments
Sam – Raggedy Bits
November 30, 2018 6:20 amOh how I miss my patchwork!! What a beautiful idea for a gift! I love the fabric you chose!
Jenny
November 23, 2018 10:50 amVery festive and adorable! Great tutorial on how to make this quilted candle mat.
Susan
November 22, 2018 1:24 pmVery pretty with the candle. Excellent directions, too. This is a great time of year. Thanks for all the links to wonderful DIY projects for the holidays! This one could be made with any fabric for any time of year, and I like that, too!
Meegan
November 21, 2018 7:03 pmSuch a cute idea and gift! Thanks for sharing the step by step tutorial.
Addie
November 21, 2018 2:12 pmWOW!!!! your directions are easy and well planned out to follow. I just moved, so I need some time to set up but creative juices are a-flowin!!!! I am new to quilting and need good directions.
God bless!!!
Addie
Kate
November 21, 2018 11:05 amVery nice – thank you. ^^
Rachel
November 21, 2018 6:40 amIt’s always good to have a stashbusting project or two up your sleeve!
Comments are closed.