


Just wait until you see the adorable sewing themed glasses case sewing kit tutorial that I have for you today!
It’s super quick and easy to make and will be a fun addition to your sewing supplies. Not to mention, it would be an awesome gift for all the sewists, quilters and embroiderers you know!
The idea for this came from Debbie over on my Facebook page after I shared a photo of this new sewing themed glasses case I’d treated myself to.

Isn’t it just the cutest!
Debbie commented that it would make a cute mini sewing kit for your pocketbook. And as you’ll see, she was right!
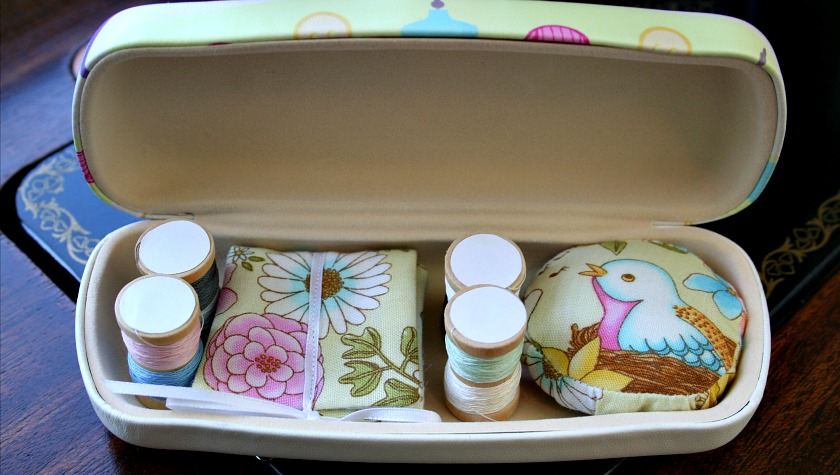
It’s filled with a teeny, tiny pincushion, matching needle book and miniature wooden spools of thread, all of which I’m going to show you how to make. So let’s get started!

Glasses Case Sewing Kit Tutorial
What you’ll need to make the sewing kit:
- Sewing themed glasses case
(or other glasses case of your choice)
- Scraps of fabric for pincushion and needlebook
- “6½” X 2½” piece of wool felt
- Polyester fiberfill (to stuff the pincushion)
- 12″ of narrow 1/8″ silk ribbon
- Pins
- Needles
- 1″ miniature wooden spools
- Thread (from your stash)
- Small white printer labels
- Small embroidery scissors


To make the pincushion:
Use a compass to draw a 2.5″ circle on a piece of paper. Or find something round that is 2.5″ across and trace around that.

I wanted to be able to fussy cut the top and bottom of the pincushion so I created a clear template to trace around. If you’re not going to be fussy cutting your fabric, cut out the circle and skip over this next step.
Place a piece of thin clear plastic over the drawn circle and trace the circle onto the plastic. I dug through my recycling bin to find a flat piece of plastic to use.
Check my post: Not All Plastic is Created Equal to see what kinds of plastic might work for this.

Cut out the plastic circle. Center it over the area on the print fabric that you want to fussy cut and trace around it with a water soluble pen.
I like the Clover Blue Water Soluble Pen

Cut 2 circles of fabric and one rectangle that’s 8 ¼” X 1″.

Fold the rectangle in half, right sides together and sew with a ¼” seam allowance along the short ends to create a fabric tube. Finger press the seam open.
Divide the fabric tube and the circles into quarters and mark with pins.

With right sides facing, pin the fabric tube to one of the circles. Start by matching the pins and then pin all the way around.
As you can see, I used a lot of pins to ease the tube around the fabric circle. On a project this small, pins are your best friend!

Sew using a ¼” seam allowance.

Repeat this step to attach the second fabric circle. Do NOT leave an opening. Sew all the way around the circle.
Next, carefully unpick the seam on the side of the pincushion between the two seams.
Note: Ignore the extra seam on one side of the pincushion. I hadn’t sewn the seam at the correct width and since that extra seam was inside the width I needed, I was too lazy to unpick it. 🙂

Turn the pincushion right side out through the opening you just created in the side of the pincushion. It will take a bit of fussing and pulling to do this but trust me… it will work.

Next, you’ll need to stuff the pincushion with the polyester fiberfill. Whenever I’m stuffing small items, I use a stainless steel surgical clamp


Once the pincushion is stuffed to your liking, sew the opening in the side of the pincushion closed using a ladder stitch, aka invisible stitch.

Here’s my finished 2 inch pincushion for the Glasses Case Sewing Kit.

It fits perfectly in one corner of the sewing themed glasses case.

To make the needlebook:
Cut one 6.5″ X 2.5″ piece of cotton fabric and one 6.5″ X 2.5″ piece of wool felt.

Sew the two rectangles together using a ¼” seam allowance. Backstitch at the beginning and end of the seam. Leave at least a 2″ opening for turning.

Clip the corners and slightly round them before turning.

Turn right side out and pin the opening closed.

Sew the opening closed using a ladder stitch.

Press well.

Fold the rectangle in thirds with the felt on the inside and press well again.

Unfold the needle book and center the narrow 1/8″ ribbon down the length of the rectangle. Pin in place only on the right hand two-thirds of the rectangle.

Sew down the center of the ribbon as indicated in the photo below:

Add a couple of needles and some pins to the inside.

Refold the needle book and tie a bow in the ribbon to hold it closed. If the ribbon is longer than you want, trim it to length.

Now you’ve got a pincushion and a needle book finished for your Glasses Case Sewing Kit.

It’s time to add some thread to your sewing kit.
To make the miniature spools of thread:
Gather the wooden spools, the printer labels and the thread from the supply list at the top of this post.

Search through your button box. What you don’t have a button box?
Every house should have at least one button box (or button jar.)
Anyway… find a button or small circular object that is slightly smaller than the top of the miniature wooden spool.

Trace around the button onto the white label paper.

Cut out the circles.
Wrap thread around half of the wooden spool.

Once you’ve got a generous amount of thread on the spool, lay the tail end across the top of the spool.

Trim the thread.

Remove the paper from the back of the circle and apply it to the top of the spool to hold the thread in place.

Add a second color of thread to the other half of the wooden spool and add a round sticker to that end as well.
Two miniature thread spools laying down fit perfectly in the Glasses Case Sewing Kit.

Four spools will fit if you stand them up.

I haven’t been able to find just the right pair of scissors to add to my sewing kit. I would love an excuse to order these pretty Tula Pink rainbow scissors I found on Fabric.com but I’m not sure they’d fit in the case.
While I make up my mind whether or not to spurgle on those, I’ve added these folding scissors that usually live in my purse.

I hope you’ve enjoyed this tutorial. If you make one, please post it on Twitter, Facebook or Instagram and tag me so I can come see. I’m @supermomnocape on Instagram, @1SuperMomNoCape on Twitter and @1SuperMomNoCape on Facebook.
And please do follow me on any or all of them.
Be sure to save this post for future reference by clicking on the Pinterest button underneath this post.
And of course, I’d love it if you shared it on Twitter and Facebook as well. 🙂


9 Comments
MaryAnne
July 24, 2018 9:21 pmThis is a great project – most of us likely have a glasses case hanging around and a little sewing kit like this would be perfect (and make great gifts too).
Jane Burke
July 7, 2018 8:56 amDid you cover the case itself or did you buy it like that?
Super Mom No Cape
July 7, 2018 10:42 amHello Jane,
As I mentioned at the beginning of my post, I bought the first sewing themed glasses case at a local fabric shop and then I ordered the second case so I’d have an extra one to make the sewing kit from. So no need to cover a case it, as they come like that.
In the materials list is a link where you can buy the sewing themed glasses case on Amazon.
Rachel
June 30, 2018 4:00 amThe folding scissors are a neat idea, aren’t they!
Super Mom No Cape
July 7, 2018 10:36 amI love my little folding scissors, Rachel! I keep trying to find some more so I can give them as gifts because they’re so useful to have.
Becky
June 29, 2018 8:54 pmI use those hard sided glass cases for a tatting kit for my tatting needles and small scissors .
For the hand sewing kit I use bobbins of thread. Take less room and get more thread on each.
I use a magnet in the top of the case to hold needles and pins.
Super Mom No Cape
July 7, 2018 10:34 amThose are all great ideas, Becky! Thanks!
Mary
June 29, 2018 8:43 pmThat is such a cute idea.
Super Mom No Cape
July 7, 2018 10:33 amThank you so much Mary! I had fun putting it together.
Comments are closed.