


Hello and Welcome to another Embroidery Monday where I share a free embroidery pattern and host the monthly Stitchery Link Party for all things hand embroidered. The design for today’s vintage inspired Embroidered Felt Christmas Baubles has been floating around in the back of my mind for a while now.
I love vintage glass Christmas baubles. I’m even old enough to have quite a few glass ornaments that would now be considered vintage… some of which Dave and I bought the first Christmas we were posted to CFB Lahr in what was then West Germany.
It was our second Christmas together after getting married and any Christmas decorations we did have were back in storage in Canada. The shape for today’s ornament was inspired by the glass tree topper we bought.
For this easy to stitch felt version, I’ve turned that basic shape upside down and made it shorter and plumper.

To make them, you’ll need to print out the Embroidered Felt Christmas Baubles pattern that is linked below.
Cut 2 of the ornament shapes from good quality felt.
To transfer the embroidery pattern, trace it on to tissue pattern, cut out and pin to one of the felt ornament pieces. Stitch through the tissue paper.
After you’ve completed the embroidery, carefully tear away the tissue paper.
If you’ve never used this method for transferring an embroidery design, Kristyne from Pretty By Hand has a great tutorial that shows perfectly how to transfer embroidery patterns using the tissue paper method.
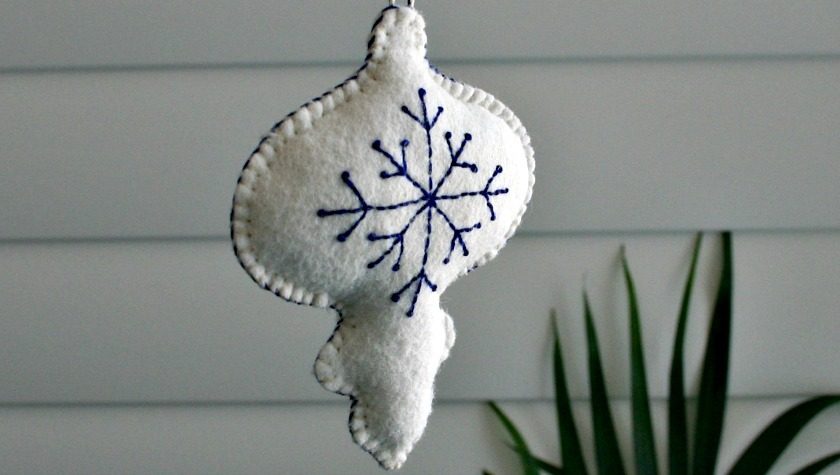
This first embroidered felt Christmas bauble pictured above and below was made from white felt.
The snowflake was stitched using 2 strands of Dark Royal Blue DMC 796 floss. The backstitching was done through the tissue paper with the French knots being added after the tissue paper was removed.

After the embroidery is finished, pin the felt ornament pieces together and blanket stitch using 2 strands of floss all the way around to join the two pieces together.
Leave about 2″ open for stuffing. Stuff the ornament lightly, adding slightly more stuffing to the top part than the bottom section. Once it’s stuffed to the fullness you’d like, continue to blanket stitch to close the opening.
The blanket stitched edge can be left plain or you could whip stitch around the blanket stitch with 2 strands of the same color you used to stitch the snowflake.
The ornaments finish at about 3.5″ wide X 4.5″ tall.

And because it’s Christmas… okay… Christmas in July, I’ve included a second embroidery pattern that features tiny stars in place of the snowflake.
I chose green felt for the ornament below with the stars stitched using 2 strands of white DMC floss.

I debated whether or not to add the contrasting whip stitching to this one but as you can see, it does finish the ornament off beautifully.

These embroidered felt Christmas baubles would be a good beginner embroidery project as it uses just three basic stitches… backstitch, French knots and blanket stitch.
And if you have small children or pets, these would be unbreakable ornaments to make to hang on the lower branches of your tree.
Click the link below to go be taken to the download page.
Vintage Inspired Embroidered Felt Christmas Baubles
If you like this felt embroidery project, you might also like to check out this pretty Embroidered Felt Heart.
Or try your hand making this Embroidered Butterfly Pincushion.

STITCHERY LINK PARTY #141
For those who are newly subscribed or are visiting for the first time, every Monday I host a link party in which I invite others to share their hand embroidery projects.
If you’ve never linked up to a link party before and would like to join in, I’ve written a quick tutorial on How to Link Up to a Link Party. It provides step-by-step instructions for linking to this party (or any other link party you might like to participate in.)
The rules for the Stitchery Link Party are simple:
1. The project can be anything as long as it includes hand embroidery stitches in some form. Such projects might be but are not limited to redwork, blackwork, goldwork, bluework, (etc), counted cross-stitch, crazy quilting, crewel, silk ribbon, pulled thread, hardanger and sashiko.
These projects do not have to be vintage or vintage inspired. All styles are welcome as long as it’s hand embroidered.
2. Link directly to your blog post, not to your blog home page.
3. If you happen to sell your embroidery or embroidery patterns, feel free to link up to a blog post you’ve written about a project you’re selling, but No direct links to shops or websites selling things.
4. This will be a curated link party. In other words, if a link does not conform to the three simple rules above, it will be removed.
The next three are more requests than rules. They are by no means a requirement to take part in the party:
5. Please link back to the Stitchery Link Party with a text link somewhere in your post.
6. As well, please share the love and visit one or two (or more) of the other links and take time to leave a comment.
7. It would be wonderful if you decided to follow me but it’s not necessary in order to take part in the link party.
 Loading InLinkz ...
Save these Vintage Inspired Embroidered Felt Christmas Baubles so you can find them again when you want to make some by clicking on the Pinterest button underneath this post.
And of course, I’d love it if you shared it on Twitter or Facebook. 🙂


4 Comments
MaryAnne
July 24, 2018 9:23 pmVery cute! And nice that they’re simple to make so it would be easy to make a bunch. I always make a series of ornaments every year and use them as ‘bows’ on my parcels. These would be perfect for that.
Catherine
July 9, 2018 2:49 amWhat beautiful Christmas ornaments! Simple yet so effective. Thanks for hosting!
Joy McDonald
July 3, 2018 8:18 pmThat’s gorgeous Sue! Now where is my felt…….?! xx
Mary
July 2, 2018 3:09 pmThose look so nice. It won’t be long before we are stitching for Christmas again.
Comments are closed.