


Get a head start on your spring decor by stitching March’s Hello Spring embroidery pattern. It’s free to download and print.
Even if you’re still dealing with several inches (or even feet) of snow, the happy little butterflies, bees and flowers will help to chase away any of those winter blues you may be experiencing.
A few evenings of embroidering, an hour or so of sewing and you’ll have a pretty little spring banner ready to welcome the official start of spring on March 20th.

Hello Spring Embroidery Pattern

Download and print the pattern (scroll down to the link to get it.)
Materials needed to make one Hello Spring banner:
- One piece of light colored fabric approximately 10″ X 13″ to stitch the embroidery pattern onto,
- One piece of 10″ X 13″ fabric for the backing
- One piece of 10″ X 13″ Pellon 808 fusible interfacing
- Embroidery floss in colors of your choice
- Thread to match the fabric

Please note: The dashed lines all the way around the outside edge indicate the 1/4″ seam allowance for the banner (sew on that line.) The cutting lines are the edge of the paper along the top and sides, as well as the solid lines that form a V at the bottom.
Trace the Hello Spring embroidery pattern onto fabric using a light source of some kind.
For years, I simply taped the pattern and my fabric to a window to trace patterns, but now I use a Huion Lightbox.


It’s so much more comfortable to sit at the table to trace patterns. The brightness of the light can be adjusted up and down by tapping the button. And it remembers the last setting you used so if for some reason you can’t finishing tracing in one session, it’s ready to go at the touch of a button when you’re able to get back to it.
Once you’ve got the pattern traced, it’s time to go through your stash of embroidery floss and choose colors.
I’m going to share which colors I used to create my little spring banner but feel free to use whatever colors strike your fancy.
Please note… unless otherwise indicated, 2 strands of floss were used throughout.
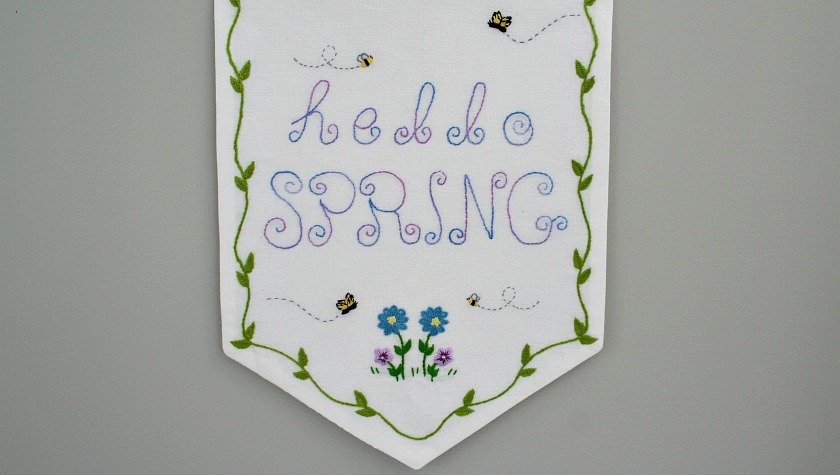
The backstitching of the words “hello SPRING,” was done in DMC 4215 Northern Lights – Color Variations Floss.
I love the blend of colors in this floss!
I’ve been wanting to find a project to use it in again ever since I embroidered the owl with it for the tote bag I made for my swap partner Debbie in the 2015 Santa Sack Swap.
I was actually quite surprised at how different it looks on this white background fabric compared with the batik that Debbie’s tote was made with.

The blue daisies are double lazy daisy stitch with a single straight stitch in the center of each lazy daisy… DMC 518 Light Wedgewood.
I have to confess that I don’t know the exact color of violet floss that I used to do the satin stitch for the little pansies. I seem to have forgotten to write the number on the floss bobbin. 🙂
Edited to add: I found another bobbin with the same color and it had the number written on it. It’s DMC 210 Medium Lavendar.
DMC 327 Dark Dark Violet was used for the straight stitches radiating out from the center of the pansies.
The french knots for the center of all four flowers were worked in DMC 727 Very Light Topaz.
The stem stitch for the flower stems, satin stitch for the leaves and straight stitch for the grass is DMC 905 Dark Parrot Green.

I’m so please with how the butterflies worked up! They are teeny, tiny… measuring only 5/8″ across. Because they were so small, I stitched them using a single strand of floss.
The body, outline of the wings and wing markings are DMC Black, while the satin stitch inside the wings is DMC 743 Medium Yellow.
The flight trails of the butterflies and bees is DMC 414 Dark Steel Gray.

The bees are even smaller, measuring about ½” from antenna to bottom. The same colors of floss were used in the bees as the butterflies.

Lastly, the vines and leaves that frame the Hello Spring pattern were done in DMC 581. 123Stitch.com has it listed as Tangerine but they must mean an unripened Tangerine… lol.
The vines were worked in stem stitch.
The leaves were created by working the fly stitch very close together. If you’ve never worked this stitch before, click here for the fly stitch leaf video tutorial. (It’s the very first leaf example that she demonstrates.)

Once all the stitching is done, place the embroidery right sides together with the backing fabric that has had the heavy weight fusible interfacing fuse to it.
Sew on the stitching lines, leaving at least a 3″ opening for turning.
Trim the seam allowances to ¼” all the way around. Clip the corners on the diagonal and turn right sides out.
Make sure to get nice points on all the corners.
Sew the opening closed using a ladder (aka invisible) stitch.
Press well.
The finished size of the banner is approximately 8″X11″.
Tiny straight pins were used to hang it on the wall, but you could also add a hanging sleeve to the back if desired.
Click the link below to download and print this month’s free pattern:
Hello Spring Embroidery Pattern
I do hope you’ll stitch this pretty little banner to welcome spring. If you do, please post a photo of it somewhere on social media and tag me so I can come see. I’m @supermomnocape on Instragram, @1SuperMomNoCape on Twitter and @1SuperMomNoCape on Facebook.
Other spring embroidery patterns you might like as well are:
April Showers Bring May Flowers
Make yourself a beautiful felt butterfly pin to wear with this Beaded Felt Butterfly pattern.They’d also make really cute hair clips for any little girls you may know.
One can never have too many pincushions! Stitch up this Butterfly Pincushion.
And if you’re looking for individual flowers or butterflies, you’ll find lots to choose from in the embroidery archives.
Stitchery Link Party Announcement
Now for the announcement that I’ve been putting off making for a few months now. I have decided that the time has come to retire the Stitchery Link Party. The party has been running since April 2015 with parties every week until December 2017 when it transitioned to once a month for 2018.
So many beautiful projects have been shared over the years by truly amazing and talented hand embroidery artists. I’ve been inspired and learned so many techniques I might never have been exposed to if it weren’t for the ladies linking up and sharing what they were working on.
I will still be sharing a free embroidery pattern at the beginning of each month. And I’ll try my best to post those on the first Monday of the month but there may be times, like today, when the pattern is posted a day or two later. (Sometimes inspiration doesn’t strike until 5 am on Sunday!)
I want to take this opportunity to thank everyone who has supported the Stitchery Link Party over the past four years by linking up and/or visiting links!
Be sure to save March’s Hello Spring Embroidery Pattern by clicking on the Pinterest button underneath this post.
And of course, I’d love it if you shared it on Facebook and Twitter as well. 🙂


9 Comments
Leanna
April 9, 2019 5:27 pmThis is such a nice craft for Spring. I see all these Americans with beautiful yard picks long before we can even buy tulips. This is a perfect solution to hurry Spring along. Pinning.
Carla A ELDRIDGE
March 7, 2019 12:12 pmThat is so cheerful and fun!
Super Mom No Cape
March 8, 2019 2:44 pmThanks so much Carla!
Rachel
March 7, 2019 5:13 amYet more happy stitching to enjoy…
Super Mom No Cape
March 8, 2019 2:44 pmThank you Rachel!
Mary
March 6, 2019 7:11 pmThat’s so cute and I am so ready for spring!
Super Mom No Cape
March 6, 2019 7:15 pmThank you Mary! And I agree… I’m more than ready for spring!
Mary Anne
March 6, 2019 5:55 pmThis certainly does look like spring! Now to get some of the same appearance outside.
Super Mom No Cape
March 6, 2019 7:15 pmI’m so looking forward to things warming up and growing again, Mary Anne. I’ve pretty much had my fill of winter!
Comments are closed.