


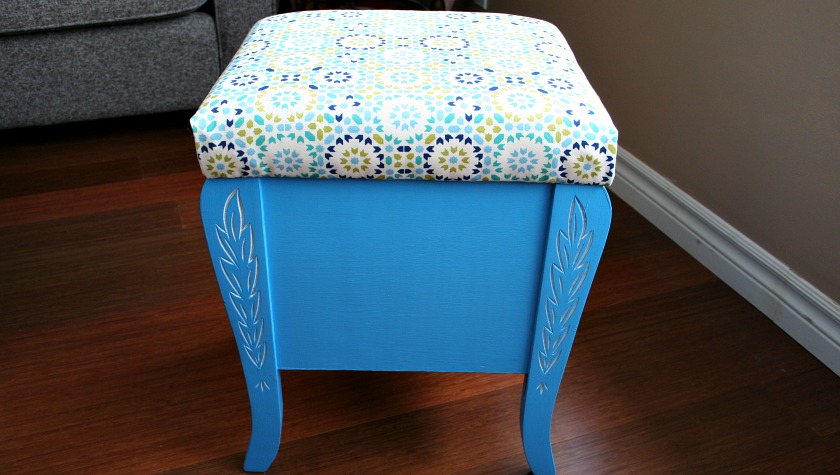
Do you struggle to find ways to store all your thread from the various sewing projects you’ve worked on? My husband, Dave and I created an awesome Thread Storage Stool from a stool I found at one of our local thrift stores for $5.
I thought I’d show you how we did it so you can be on the look out for a similar piece to transform for your thread storage.
Now, I know most people would probably have passed this stool by even at that steal of a price and the cool leaf carvings on the front.
The wood had several small scratches and wear marks.

The upholstery on the seat had certainly seen better days. The fabric was thin and almost worn through in places.

It was definitely an ugly ducking of a stool.
But you see that compartment? Now that had potential!


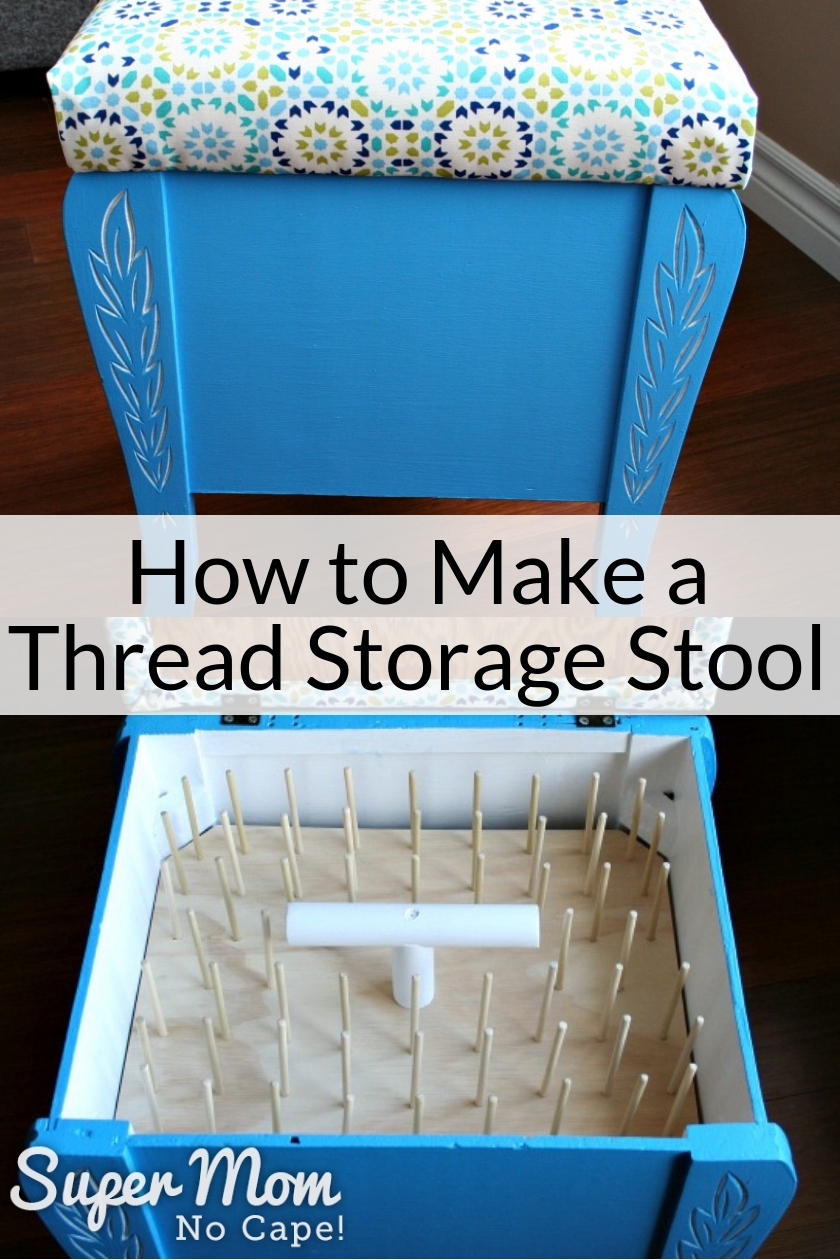
How to turn a Thrift Store Stool into a Thread Storage Stool
We began by removing the hinged seat of the stool.

The wood base was given a good wash to remove cobwebs and then was sanded lightly to prep it for paint.
Two strips of wood were added just beneath the corner braces on opposite sides. Those hold the top thread tray.
This is what it looked like after the first coat of primer.

After that dried, a second coat was applied.

Then the interior and the inside of the leaf carvings got a third and final top coat with paint left over from painting the walls of my sewing room at our previous rental.

The outside was painted in the same pretty blue as the bookshelves and ironing station that Dave custom built for my sewing room and office.

I love how the white leaf carvings pop against that blue.

The paint was allowed to cure for a few days while Dave worked on making the inserts for the thread spools.

Reupholstering the seat was a must so that was done during the paint curing time as well.
The old, dirty upholstery was removed.
I decided a bit more cushioning on the seat was in order so a piece of 2 inch foam 

Somewhere in one of our many moves our electric carving knife

Here you can see the fabric right side down layered with polyester batting from my batting scraps bin.

My hands aren’t strong enough to make our ancient staple gun work so Dave took on that job. Before we do our next upcycle/reupholstery project, I want to get an electric staple gun!
It should be noted… that while we have recovered stools, chairs and footstools over the years, neither of us are professional upholsterers. This is just the way we recovered this particular seat.
To attach the upholstery fabric to the wood seat of the thread storage stool:
Fold the fabric edge to create a neat edge that won’t fray over time and use.
One staple on one side, flip around, pull the fabric so that it’s smooth. Fold and staple on the opposite side.
Then work along each side until about 3 to 4 inches from the corners.

Repeat this process for the third and fourth side.

After stapling, the seat will look like this.

Trim the excess batting away from the corners.

It doesn’t have to be perfect, but try to make the cut as neat as possible.

Fold and staple one side almost to the corner.

Fold the corner neatly.

Trim off excess fabric.

Staple the corner fabric in place.

Here’s the seat with all the stapling complete.

And here it is, right side up, ready to reattach to the base of the stool.

The hinges were re-positioned slightly to give the screws fresh wood to bite into.

If I hadn’t already decided this needed to be turned into a thread storage stool, it would have made a really pretty foot stool.

For the bottom of the stool compartment, Dave cut a piece of 3/4 inch plywood to fit.
Then holes were drilled to fit serger spools. Notice that the type of holes alternate. You’ll see why in a minute.

Another piece of 3/4 plywood was cut to make a tray for the top of the compartment. Small holes were spaced and drilled to insert dowels to hold regular thread spools.

Then it was time to fill the stool.
I had been keeping my serger thread in the drawer but no matter how neatly I stood them up in there, they always looked like this.

Now they are sooo much neater. The different sized holes you saw 2 photos up, allow me to fit more spools in the compartment by having every other cone standing upside down.

The thread drawer of my Art Deco Sewing Machine cabinet was overflowing with a bag of thread on top of the spools and bobbins.

It will take me a while to fill the top tray of the thread storage stool with thread!
The dowels were cut extra long to allow me to put the matching bobbin either underneath or on top of the spool.

I’d never had a stool to go with the Kenmore Sewing Machine cabinet that Dave retrofitted to house my modern Singer. Now I do!

I hope you liked seeing how we turned an ugly duckling of a vintage thrift store stool into a swan as a beautiful and functional Thread Storage Stool.
Other posts you might be interested in:
Did you know that your thread spool is hiding a secret?
The thread storage tray inserts my husband added to my sewing machine cabinets.
The fabric dresser where I store most of my fabrics.
Please be sure to save this Thread Storage Stool upcycle project by clicking on the Pinterest button underneath this post. You never know when you might come across a thrift store stool that you can transform into thread storage for your sewing room.
And of course, I’d love it if you shared it on Facebook and Twitter as well. 🙂


23 Comments
Kathleen
December 15, 2018 5:08 pmLove it! One of the best furniture remake ever! Great job!
Sheri
October 22, 2018 6:27 pmGreat idea! Thanks for sharing at our To Grandma’s House We Go DIY, Crafts, Recipes and More Link Party. I pinned this! Hope to see you again Wednesday!
Super Mom No Cape
October 29, 2018 1:58 pmThank you Sheri for your sweet comment and for pinning!
Debrashoppeno5
October 19, 2018 4:13 pmWhat an excellent upcycle. The color is so bright and pretty. Then to open up the stool with all of the storage! Fabulous.
Super Mom No Cape
October 29, 2018 1:57 pmThank you Debra. I’m so glad you like it!
Susan
October 16, 2018 7:24 amWhat a clever idea
Super Mom No Cape
October 29, 2018 1:56 pmThank you Susan!
Joy
October 14, 2018 2:01 pmJust love this!! Would be perfect for my bigger cones for the long arm… I will need to send my dad out to look for a stool like this 🙂 xx
Super Mom No Cape
October 29, 2018 1:55 pmThank you so much Joy! I hope your Dad has fun on the hunt and makes a lucky find like I did.
Raewyn
October 14, 2018 1:30 amWhat a great idea – I know what I’ll be hunting for now!! Thanks for sharing how you did this 🙂
Super Mom No Cape
October 29, 2018 1:53 pmThank you Raewyn! I hope you find a stool to transform.
Sue
October 13, 2018 11:19 pmI love what you have done!
Super Mom No Cape
October 29, 2018 1:51 pmThank you so much Sue!
Linda
October 13, 2018 9:44 amMy mom had a stool just like that one, except it was covered in green (similar pattern). I recovered it in denim and we painted it blue as well but left the leaf grooves dark. My daughter has it now.
Super Mom No Cape
October 29, 2018 1:48 pmIt’s so fun to learn that there are other stools like this out there. So glad that yours has been passed along and is still be used.
Lavern Golden
October 13, 2018 9:03 amAwesome Stool! Love the repurpose. I am going to have to
keep my eyes out for a stool that I can repurpose like that.
Husband is an aircraft mechanic and he brought me a old drink cart
home that has drawers in it that I use currently. But they are kind of inconvenient.
Dana
October 13, 2018 10:43 amI have a suggestion for you if you can’t find antique stool. I used one of the plastic milk crates that Walmart and other stores sell for storage. My husband cut a piece of plywood to fit the top and I upholstered it just like SuperMom did. Then I wrapped the milk crate with batting, attaching it here and there to the crate. Then wrapped the crate with fabric and then sewed covered buttons to tuft the crate and make it look less like a plastic crate. Can’t remember if the crate included a set of wheels or not but we added them to the bottom of the crate so I can move it easily around my sewing area.Great place to store my future projects or make into a thread storage box. Its amazing what can be done with these crates!
Super Mom No Cape
October 29, 2018 1:38 pmHello Dana… that’s an excellent suggestion for thread and other sewing room storage! Thanks so much for taking time to share your solution with us. 🙂
Super Mom No Cape
October 29, 2018 11:50 amThank you Lavern! I hope you’re able to find a stool like that or something similiar to repurpose into a thread storage stool.
Mary
October 13, 2018 8:56 amThat looks really nice and it makes a great storage space for thread. It will keep your thread so clean too.
Super Mom No Cape
October 29, 2018 11:47 amThank you Mary! That’s one of the things I love about it… that the thread will stay dust free.
Rachel Wright
October 13, 2018 3:08 amWell done. Both beautiful and useful, very William Morris!
Super Mom No Cape
October 29, 2018 11:46 amThanks so much Rachel. What a lovely compliment!
Comments are closed.