


There’s nothing that will take your table from pretty to elegant more quickly than adding beautiful handmade cloth napkins to each place setting. And if you’re going to spend the time making them yourself, why not go the extra step of mitering the corners.
Your finished napkins will look polished and professional with none of the bulky corners that results from simply turning under the hem and then turning it under again. Not to mention, napkins with mitered corners are a must if you plan to up the elegance of your table setting even further by folding them into various shapes.
You’ll find all sorts of tutorials out there showing you how to sew mitered corners but in this tutorial, I’ll show you the easiest method I’ve found for getting perfected mitered corners every single time.
It only requires one extra, super easy step during the initial pressing process and one extra, equally easy step in the sewing phase.
If you’re new to sewing, this is a great project to expand your confidence.
Once you know this technique, you’ll find it useful for all sorts of items besides sewing napkins. Over the years, I’ve used it to make tablecloths, table toppers and furoshiki.

Want the ad free PDF?
All the instructions you need to make these elegant napkins with mitered corners are right here in this post. But I realize that it might be more convenient for you to have a copy that you can download to your computer to print out and have beside you as you work. You can purchase the ad free Printable Napkins with Mitered Corners PDF file for only $5 from my shop. It has this complete step-by-step tutorial with all the accompanying photos.
How to Sew Napkins with Mitered Corners
Materials needed:
21 inches of 44″ wide 100% cotton fabric for every two 18″ napkins (finished size)
Matching thread
So if you want to make 6 napkins, you’ll need 63 inches… assuming your fabric is at least 42 inches wide not including the selvages. I would buy 2 yards to allow extra for shrinkage and squaring up.
For this tutorial, I purchased a little over 3 yards of Pearl Essence by Maywood Studio (all that was left on the bolt) on sale from my favorite local quilt shop and was able to make 10 napkins.
Please note: If you want to make larger napkins, you’ll need to adjust the yardage accordingly.
A 24″ X 36″ cutting mat

Prewash your fabric using the temperature settings that you’ll be using when laundering the finished napkins.
Give the fabric a pressing to remove wrinkles.
Fold the fabric in half lengthwise, square up one end and cross-cut at 21″. If you’re making 6 napkins, you’ll need to make 3 cuts measuring 21″ each.
You can use the lines on your cutting mat as a guide or do what I did and use a 15″ and a 6″ quilting ruler butted up against each other as pictured below.

Trim off the selvages on both sides, so that you end up with pieces that are 21″ X 42″.

Cut each 21″ X 42″ section into two 21 inch squares.
Stack them as you go.

The key to this method of making napkins with mitered corners is all in the pressing.
Press under ½” on all four sides.

Make sure to press the corners well.

Turn under 1″ and press well. Repeat for the remaining 3 sides.

Again make sure to give those corners a good press.

When you open out the corners, your creases should look like this.

You’ll see that the pressing has resulted in a creased square in the corner.
Fold the corner down on the diagonal and match the 1″ creases on the square with the 1″ creases on the sides, as shown in the photo below.

Press the corner well.

This creates the crease that you will use as a guide for sewing the mitered corners.

Fold the corner right sides together, matching the crease lines. Pin.

Begin with your needle down about 1/8″ from the outside edge (you’ll see why in a moment.) Using the crease as a guide, backtack to that outside edge, then continue sewing forward.
Backtack at the end of the seam.

As you can see in the photo below, when you trim the thread, any little thread tail ends will be neatly concealed inside the mitered corner.

Clip the corner on the diagonal and trim the seam to about ¼”.

Finger press the seam open.

Turn the corner right side out and use a point turner 


Repeat the above steps for the other three corners of the napkin.
Give the corners and hems another good pressing.

Stitch close to the edge all the way around.

And there you have it… beautiful, handmade cloth napkins with perfectly mitered corners.

In the photo above, the napkins have simply been folded in half, pressed and then folded in half again and pressed.
But there are so many fun ways to fold napkins that you can try something new for each dinner party.
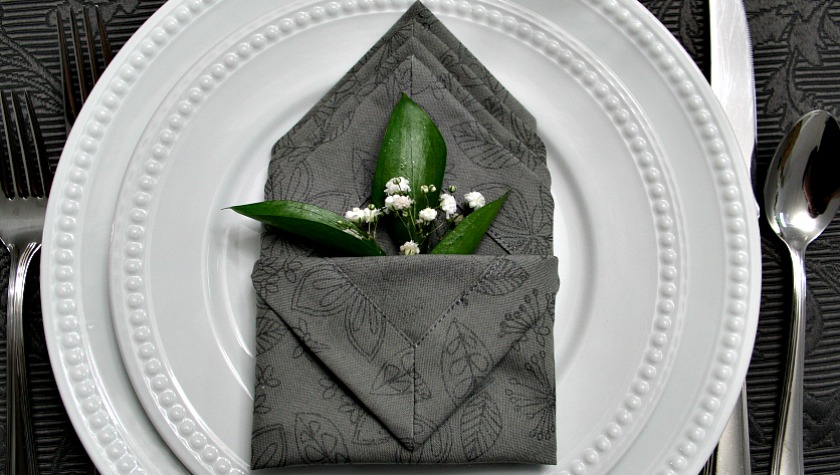
Here I’ve started to give them a handkerchief style fold.

Look closely at the photo below and you’ll see how the mitered corners create a smooth finish to the handkerchief folds used on the napkin.

You can even create a small pocket by folding down that last corner. Insert a bit of greenery and some baby’s breath and you’ve got a table setting that could rival that in any high end restaurant.
This is where those mitered corners really shine and make all the difference!

And how pretty would your Easter brunch table be if you added a couple of white tulips to each napkin.

Have fun making your napkins in different fabrics.
They can be made in elegant tone on tone fabrics such as the one used in this tutorial.
Or in fun novelty prints such as the bird print below.

I do hope that you’ll give sewing napkins with mitered corners a try. And if you do, please be sure to take a photo, post it on your favorite social media and tag me so I can come see. I’m @supermomnocape on Instragram, @1SuperMomNoCape on Twitter and @1SuperMomNoCape on Facebook.
Another super easy sewing project you might like to make to add to your table are these One Hour Table Runners.
Be sure to save this tutorial for How to Sew Napkins with Mitered Corners so you can find it again by clicking on the Pinterest button underneath this post.
And of course, I’d love it if you shared it on Facebook and Twitter as well. 🙂


14 Comments
Granddebbie
July 7, 2021 7:14 pmThis is the BEST tutorial I have ever seen! Your directions are so clear and the pictures are excellent for an old seamstress who needs to see the steps! You make me feel like I can sew these pretty napkins with mitered corners. Thank you…
Super Mom No Cape
July 13, 2021 8:51 pmThank you for your lovely compliment, Granddebbie. Have fun sewing your new napkins.
Carol
July 12, 2020 8:30 pmPerfect tutorial! I haven’t sewn in ages and you gave me the confidence to start again!
Super Mom No Cape
July 15, 2020 5:00 pmI’m so glad you like it Carol. Welcome back to sewing!
Jenny
March 18, 2019 7:35 amWhat a wonderful tutorial. These napkins are so pretty at a place setting. Thanks for sharing at Merry Monday!
Super Mom No Cape
March 20, 2019 10:36 amThanks so much for your sweet compliment, Jenny!
Leanna
February 26, 2019 10:32 pmThank you very much for the tutorial. So easy to follow and they are a perfect practice project. Pinning
Super Mom No Cape
March 6, 2019 7:00 pmThanks so much Leanna! They’d be great practice project. Thanks so for sharing by pinning it.
Joy McDonald
February 26, 2019 8:57 pmThey’re so pretty! I am going to put them on my sewing & quilting bucket list 🙂 Thanks for the great tutorial! xx
Super Mom No Cape
March 6, 2019 6:50 pmThanks so much Joy!
Rachel Wright
February 26, 2019 2:35 pmThat’s a very useful bit of kit you had to help you!
Super Mom No Cape
March 6, 2019 6:49 pmYes, I love that Nancy Zieman sliding ruler. I use it a lot.
QuiltShopGal
February 25, 2019 10:57 pmBest tutorial for mitred cornersI’ve ever seen. Beautiful napkins too!
Super Mom No Cape
February 26, 2019 8:08 amThank you so much QuiltShopGal! What an awesome compliment!
Comments are closed.