


Welcome!
Whether you’ve arrived from Pinterest, CraftGossip, Total Tutorials or another of the wonderful sites that have linked to my Prairie Point Star Ornament Tutorial, I’m so glad you’re here!
The step-by-step instructions with lots of photos make this an easy sewing project to complete in a couple of hours time.
They will look stunning hanging on your tree or displayed in a window throughout the holiday season.
Make several to add to your holiday decor or to give to family and friends.
For this tutorial, 5″ charm squares are used but you could easily cut your own 5″ squares from scraps of fabric from your stash of holiday fabrics. Or cut different size squares to make larger or smaller ornaments.
Please note: When making different sizes, you’ll also need to adjust the size of the lightly stuffed circle that forms the base that the prairie points are sewn on to. Scroll down to the end for instructions for how to do that.

Want the ad free PDF?
All the instructions you need to make these beautiful Prairie Point Star Ornaments are right here in this post.
But I realize that it might be more convenient for you to have a copy that you can download to your computer to print out and have beside you as you work. You can purchase the ad free Printable Prairie Point Star Ornament PDF file for only $5 from my shop. It has this complete tutorial plus a bonus page with 3.5″, 4″ and 4.5″ circle templates (no need to get out your compass) for making the stuffed circle bases.

Materials required to make one Prairie Point Star Ornament:
- Sixteen 5” charm squares
- 5″X10″ scrap of cotton fabric or two 5″ squares (These will be completely covered so use whatever scraps you have. I used scraps of thrifted cotton sheets.)
- Polyester stuffing
- Hand sewing needle
- Strong thread. (I used 30 wt quilting thread
)
- Satin cording
or ribbon
for the hanger
- 2 Buttons
for the center (one for each side)


To make the inside of the ornament:
1. Fold the 5″X10″ scrap of fabric in half or if using 5″ squares, place one on top of the other.
2. Use a compass

If you don’t have a compass, you can use the lid from a yogurt container as a template.

3. Stitch completely around the circle following the pencil line.

4. Use pinking shears

Alternatively, the seam allowance can be trimmed to 1/4 ” and notched as shown below.

5. Pull the layers of the circle apart.

6. Cut a small X in one side.

Avoid cutting the X too close to the center as you will be sewing through the center point several times.
7. Turn the circle right side out through the opening.
8. Mark the center point of each side.

9. Stuff lightly.

You want a flattish, puffed circle, not a round ball.
10. Whipstitch the opening closed.

It doesn’t have to look pretty. It just needs to hold the stuffing inside while you’re adding the prairie points.
Set the stuffed circle aside.
To make the prairie points for the Prairie Point Star Ornament:
11. Divide the charm pack into colorways.

For this tutorial, I used Reindeer Games by Sandy Gervais for Moda. As there were four colorways, I chose 4 charms from each.

12. Place a charm square wrong side up on the ironing board.

13. Fold it in half, opposite corner to opposite corner to form a triangle. Press.

14. Fold the triangle, corner to corner along the folded edge to form the prairie point.

15. Repeat for the remaining 15 squares.
To assemble the prairie point star ornament:
16. Thread the needle with about 30 inches of thread and tie a good strong knot.
I found that a soft sculpture doll needle worked best, but these can certainly be made using a regular hand sewing needle.

17. Insert the needle into the center mark on one side and draw through the mark on the opposite side of the stuffed circle.

18. Place one corner of the prairie point on the center mark and take a stitch.

19. Make another stitch, pulling the thread through to the opposite side of the circle as demonstrated in the left photo below.

20. Fold the prairie point over the circle and take a stitch in the opposite corner. Secure by taking a stitch back through to the first side.
21. Continue to add prairie points in this manner.

If it becomes difficult to pull the needle through the layers of fabric, a surgical clamp


It can be a little tricky to sew that last prairie point in place as it needs to be tucked under the first prairie point.

22. Once the final prairie point is sewn in place, secure the thread with a knot but don’t cut the thread yet.
23. Cut a 12″ length of cording (or ribbon) to form a hanger.

When using cording, I knot the ends to give me a larger area to sew through.
24. Sew the cord to the center of the circle.

25. Sew a pretty button on each side. Secure with a knot and cut the thread.

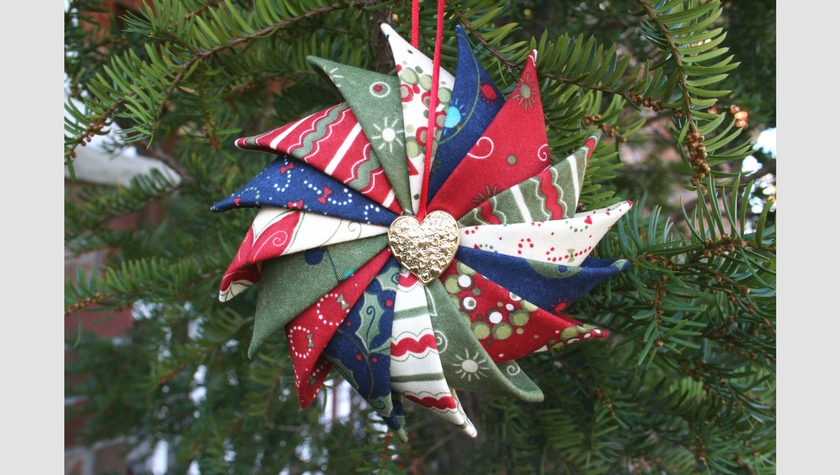
The finished size using 5″ charm squares is approximately 6″ across from tip to tip of the prairie points.
Prairie Point Star Ornaments can be made in a variety of different sizes and fabric combinations.

In the photo above, the center one is the one made while creating this tutorial. The red and white used 4.5″ squares while the green and white has 4″ squares to make prairie points.
Changing the size of the ornament is easy. Simply decide what size squares to use to make the prairie points and cut the circle for the inside ½” smaller in diameter.
For example:
If you are cutting 4.5″ squares, cut a circle that is 4″ in diameter. 4″ squares would require a 3.5″ circle.
The one pictured below is the first Prairie Point Star Ornament I made back in September.

It’s made from leftover charm squares of Season’s Greetings by Sentimental Studios for Moda.
They look stunning done with white and gold fabrics with ribbon flower centers in place of the buttons.
These are beautiful additions to our collection of Christmas ornaments.
They’re a great way to use up some of those charm packs or Christmas fabric in your stash!
Over the years since I posted this sewing tutorial, I have made several for our home and for gifts.
You can even make Prairie Point Star Ornaments for other occasions.
Patriotic Prairie Point Star Ornaments hung in a window makes a beautiful display from Memorial Day through to the 4th of July. When making them in red, white and blue fabrics, use 15 prairie points instead of 16.
Make them in shades of pink for Valentine’s Prairie Point Star Ornaments.
Get the ad free PDF
All the instructions you need to make these beautiful Prairie Point Star Ornaments are right here in this post.
But I realize that it might be more convenient for you to have a copy that you can download to your computer to print out and have beside you as you work. You can purchase the ad free Printable Prairie Point Star Ornament PDF file for only $5 from my shop. It has this complete tutorial plus a bonus page with 3.5″, 4″ and 4.5″ circle templates (no need to get out your compass) for making the stuffed circle bases.
As always, if you make something with one of my tutorials, I’d love to see a photo. You can either e-mail me by clicking on the little envelope in the upper left-hand sidebar. Or tag me on instagram @supermomnocape.
Edited to add:
After you’ve made one (or more) Prairie Point Star Ornaments be sure to blog about it, post it on Instagram, Facebook or Flickr, then come share it in my Prairie Point Star Ornament Link Party!
This post contains affiliate links. For more information please check my Disclosures and Disclaimers page. It doesn’t cost you any extra, but it does help support this site.


86 Comments
Melissa Fox
October 1, 2021 9:42 pmWhat does the back look like?
Super Mom No Cape
October 2, 2021 12:20 pmHello Melissa,
The back looks the same as the front. The prairie points are folded over the lightly stuffed circle and sewn to the back in the same way they’re sewn to the front.
Joanne
November 18, 2020 12:10 pmI love these! Can’t wait to make them!!!!
Super Mom No Cape
November 19, 2020 6:59 pmI’m so glad you like them Joanne!
Beverley Jones
November 1, 2020 9:59 amI just made 3 of these, they’re so beautiful and so easy to make! Thank you.
Super Mom No Cape
November 2, 2020 6:43 pmYou’re welcome Beverley. I’m sooo glad that you like them!
Corrina
July 19, 2020 3:55 pmHow can I subscribe to ur blog
Thanks ur ornament is pretty, I am going to give it a try.
Arendje
July 6, 2019 10:18 pmMay I have a PDF of the Prairie Point Ornament – thank you for sharing –
Super Mom No Cape
July 12, 2019 10:02 amHello Arendje, we’re still working on a new way to deliver the tutorial pdfs, so it’s unavailable at the moment.
Cheryl
December 13, 2018 9:58 amHas any one tried using a layer cake maybe that would make a cute door wreath!
Bri Adams
November 19, 2018 12:24 amVery cute! Happy Holidays!
Lisa
October 10, 2018 10:32 amJust wandering, do these look the same front and back? Yours are beautiful!
Peggy
September 13, 2018 7:09 pmI love this! Can it also be enlarged to make a door wreath?
Super Mom No Cape
September 17, 2018 2:08 pmHello Peggy… I’ve never tried to make one large enough for a door wreath. It couldn’t hurt to try.
judy matlock
May 28, 2018 1:59 pmCould you possibly send me the explanation of how to subscribe to receive Pdf of the Prairie Point Start Ornament Tutorial? Thanks so much. jam
Super Mom No Cape
May 30, 2018 7:52 amHello Judy,
The pdf for the Prairie Point Star Ornament is currently unavailable as we are making some updates to how we deliver our tutorials. It will be available again soon. Sorry for the inconvenience.
Nancy
May 23, 2018 5:48 pmplease add me to your subscribers member list.
Super Mom No Cape
May 23, 2018 8:08 pmHello Nancy,
I sent you an email explaining how to subscribe to receive the Pdf of the Prairie Point Star Ornament Tutorial. 🙂
Lori George
February 5, 2018 1:45 pmI love your Prairie Point Star Ornament! Do you have the option to download the instructions? I would love to make them as gifts for my family.
Thank You.
Erlene
December 16, 2017 10:59 pmI’ve never tried making an ornament like this. Very unique and pretty.
L J
December 12, 2017 4:58 pmLove this, looks easy enough for young children, I was a bit confused regarding the other point, but read it more slowly and understood. Thank You, Great instructions.
Super Mom No Cape
December 13, 2017 11:17 amThank you for your lovely compliment LJ!
I hope you have as much fun making them as I do. 🙂
Diane
December 10, 2017 12:22 pmI keep trying to get the tutorial but it does not come through on my e-mail.
Super Mom No Cape
December 10, 2017 4:55 pmHello Diane,
According to my records you were sent the email with the link to the download page. Did you check your spam folder to see if it went there? In any case, I’ll send you another email with that link.
Anna-Maria Naidoo
December 6, 2017 2:50 pmHello,
Please be so kind as to email me the PDF instructions for the prairie point Star.
Kindest regards
Anna-Maria
Super Mom No Cape
December 13, 2017 1:52 pmHello Anna-Maria,
I’ve been on holiday but am taking time today to catch up replying to comments.
According to my records you have already received the email with the link to the download page where you can download the PDF to your computer. However, I will sent you another email with the link. Please make sure to download it to your computer so that you have it for future reference. 🙂
Debra
November 29, 2017 6:47 amThis is beautiful. I found that if I threaded all the points on the needle at once and just went through the cushion once with all of them, it was much easier to do. I have arthritis in my hands and found it quite difficult to keep going through all that fabric. Once one side was done, I just turned it over, and repeated on the flip side.
Super Mom No Cape
November 29, 2017 7:48 amThank you Debra. I’m so glad you like it.
It can be difficult to keep pushing the needle back and forth through the stuffed circle. So I’m glad you found a solution that works for you.
Once the craziness of the holiday season is over, I’m going to give your method a try and then I can update the tutorial with a new option for how to make them. 🙂
Laurie Waddell
December 18, 2019 11:13 amoh yeah I just had this idea too and came here to find out if anyone else had and it works like a dream finished in under 20 minutes….and prob less once i do a few!
Irene Partridge
November 29, 2017 6:02 amTrying to get the Prairie point star PDF have input e-mail address but nothing coming through
Super Mom No Cape
November 29, 2017 7:47 amHello Irene,
I’ve sent you an email but I’ll reply here too.
Where did you add you email address? Did you add it to the little window that pops-up when you click on the link in my post? Or did you add it somewhere else? In order to receive the Prairie Point Star Ornament pdf, you have to sign up through the little window that pops up when you click on the link in my post.
Once I know how you signed up, I’ll be able to figure out why you didn’t receive it.
Thanks,
Sue
Super Mom No Cape
November 29, 2017 8:08 amHello again Irene,
I was able to check the records for my email provider. And I think I know what happened.
You had signed up to receive the pdf of the Prairie Point Star Ornament in October of 2016 and then a few months later, you unsubscribed.
When you resubscribed/signed up again using the same email address… it didn’t trigger the send function for the delivery email because it’s set up to only send that email once to each address. And since you’d already received it once last year, it didn’t send it again.
I’ve sent you another email with the link to the download page.
Pauline Austen
November 28, 2017 7:53 amWent for coffee this morning and saw some ladies admiring a selection of these ornaments. The were so beautiful that I had to be nosey and have a look. I eventually found your site and can’t wait to get started (after I’ve finished my ironing). You are so talented. Thank You for sharing.
Super Mom No Cape
November 29, 2017 7:50 amThank you so much Pauline for your sweet compliment! Have fun making the Prairie Point Star Ornaments!
joanne.rawson@sbcglobal.net
November 18, 2017 6:47 pmThat is such a pretty ornament! Pinned.
Valerie
October 10, 2017 3:17 amThis is beautiful. Can’t wait to try it.
Thank you for sharing your talent with like minded sewers.
Terry
September 15, 2017 2:09 pmI love this idea of an ornament, but my questions is when you fold in half and then again, when you put it on the ball the raw edges are showing. Are they supposed to show or not? If not, what am i doing wrong?
Super Mom No Cape
September 15, 2017 4:25 pmHello Terry,
First make sure that you are working with each prairie point as a unit. Do not open them up after folding and pressing them.
Each time you add a new prairie point to the stuffed circle, the raw edge of the previous one is covered up (as shown in the fifth photo on page 4) and then the raw edge of the final prairie point is tucked under the first (as shown in photo 7 on page 4.)
I’m sending you an email to see if we can figure out what’s happening. 🙂
Tammy
September 6, 2017 3:50 amAbsolutely beautiful!!! Can’t wait to try this!! ❤️❤️❤️
Steffini
July 5, 2017 12:48 pmWould love to have this tutorial sent to me if possible.
Super Mom No Cape
July 5, 2017 4:47 pmHello Steffini,
I replied via email but thought I’d reply here as well. The pdf of the Prairie Point Star Tutorial is only available to those who sign up through the links provided in Prairie Point Star Tutorial post. When you see Click Here… click on that and a form will pop-up for you to sign up. Shortly after you’ve signed up, you’ll receive an email with the link where you can download the pdf of the tutorial.
Hope that helps. 🙂
Wishing you a wonderful, heart-centered day with much Aloha,
Sue
Renee
January 2, 2017 11:56 amI have had the worst time sewing on the buttons. Any tips or hints? I also tried bells & had a bad time sewing them on. I love them! They are beautiful!
Sarah
December 13, 2016 11:44 amquick question about spacing…about how far apart should the Prairie points spread from each other so there is equal spacing for all 16? super beautiful. thanks!
Patricia
November 6, 2016 9:05 pmwhen I click on the “next” button all I get is a bunch of code, but no tutorial or pictures. Is there another way to get the tutorial, a different link, I tried both the Christmas one and the Patriotic one, must be they link to the same place. I have loved this ornament since the first time I saw it on Pinterest and was so excited when I found this tutorial tonight, now I am bummed 🙁
Super Mom No Cape
November 6, 2016 10:11 pmHello Patricia,
I sent you an email but wanted to reply here too. The coding on the Next and Previous buttons has been fixed. They should work fine now.
Diana from SC
November 6, 2016 1:06 pmSorry, I accidentally deleted tutorial. Please resend it. I am not getting thru my email for some reason. Thanks, Diana
Super Mom No Cape
November 6, 2016 5:05 pmHello Diana… No problem. I’ll resend the email. 🙂
Diana from SC
November 3, 2016 6:24 amI am having trouble sending the tutorial for the Prairie Point Star to my email….yes, checked the spam folder. Nothing
Thanks for your help. Diana
Janet Anderson
October 21, 2016 8:44 amI had a problem when making m8ne. The points don’t seem to look like yours. Kine looks moree like a round piece of candy. I made it with a 4 inch circle. Any suggestions.
Super Mom No Cape
October 21, 2016 5:41 pmHello Janet,
I’ll help in anyway I can. I sent you an email. 🙂
Karen Wilde
October 10, 2016 12:00 pmNow l k ow what to do with all my xmas fabrics. Thanks
Mary Ann
September 9, 2016 7:17 pmI am so glad i bought your prarie point kit at the quilt show in August at the church in Maine. Can’t wait to make some tonight. Thanks.
Audrey
July 11, 2016 2:18 amThanks for sharing. I really like these ornaments.
Susan
February 8, 2016 8:45 amI just recently found your blog via another blogger. Unfortunately, I can’t remember which one. I really like this ornament and am going to attempt to make some for Christmas 2016. If I start now, I should be able to get some made. Thanks for this “complete” tutorial.
Also, thanks for answering Jenny’s question as I was wondering that myself. Once you pointed out that it was in picture 20, I could see it. Even thought I had read it, it hadn’t clicked. I have subscribed to your blog.
Jean Russum
January 17, 2016 7:07 pmLove the ornament, and just finished my first one. I would like permission to use this in a sewing guild program. Please contact me, as I can find no way to contact you directly. Thanks.
Linda – Sewing Shop
December 14, 2015 8:41 amWow what a gorgeous ornament! It looks intricate, but it’s pretty simple to make. Thanks for making this tutorial!
I featured it on my blog today, you can see it here: Prairie Point Star Ornament
Susan
December 13, 2015 4:07 amI do NOT know how I missed this post! I did, because there’s no comment on here from me, and I don’t remember seeing it, but this is the coolest thing ever! I must make one for my Secret Shoebox partner for next year. It’s fabulous! Thank you so much for showing how to do it. It looks pretty easy!
Tina in FL panhandle
December 10, 2015 8:39 pmThank You For The Tutorial. The Ordinate Was Great Fun To make.
Maryse
December 10, 2015 9:31 ambeautiful….I’m gonna make some right now…Love it!
Heather Stockton
December 6, 2015 10:55 pmI just absolutely love them, they are gorgeous 🙂
Beth A
December 2, 2015 2:25 amI had the same question as Jenny. I’m glad the back is covered, too. I love this ornament. I could use fabric especially chosen for the recipient, like Hello Kitty for a certain daughter. Also perfect for an ornament exchange at my guild. Thank you so much for the tutorial!!
Janine
November 30, 2015 6:37 pmThese are beautiful – such a lovely effect to see them hanging together. Thank you for the tute 🙂
Jenny Kavanagh
November 29, 2015 11:15 pmI love these. I want to make some!!!
Marsha
November 29, 2015 12:47 pmGreat tutorial. Great gift for a fabric-loving friend or anyone. I will share this tutorial, with a link to your site, on my Friday Finds this week, Dec. 4th. Thank you; I can’t wait to make one!
Vicki in MN
November 28, 2015 9:03 amOMG, what a super cute ornament!! Thank you for the tute 🙂
Joanne
November 24, 2015 4:29 pmWonderful ornament!!
Thanks so much for linking up!
Lesley Gilbert
November 22, 2015 10:38 pmWhat a wonderful thing to see hanging on a tree or perhaps in front of a window – I shall certainly give this ornament a go sometime soon – thanks for sharing all your lovely photo’s.
Lesley – wrapped up warm in a cold England 🙂
Sandra F. Miller
November 20, 2015 10:44 pmGreat tutorial. Made a sample ornament for myself tonight. Very easy. I showed my mom and she didn’t believe I had made it myself. I told her how to make it and she will be making some herself. I plan to make some as gifts for friends.
Karen Andrews
November 16, 2015 11:44 pmThese look fabulous. Definitely going to make these to add to my many handmade ornaments!
Nanette
November 16, 2015 11:34 pmGreat! I made one as soon as I saw the idea! It came out beautiful! Thank you for the holiday ornament!?
Jeanine
November 16, 2015 7:38 pmLove the idea. I will be making some myself.
Martha herbert
November 16, 2015 6:39 pmThank you so much for sharing I have wanted to make these for a very long time. Yours are beautiful
alice hahn
November 8, 2015 3:03 pmThanks for clearing up the step for photo 20. I didn’t get that either. these are so perfect as ornaments. Thanks for sharing with everyone.
norma
March 27, 2017 11:03 amI missed it too. Thanks. Do you stitch the points together. looks like it one of the pictures.
Flashinscissors
November 6, 2015 7:51 amThank you for this lovely clear tutorial, Sue. It looks absolutely super!
Barbara xx
Rachel
November 6, 2015 6:31 amIt’s charming, and the tutorial seems very clear.
Gina
November 6, 2015 4:02 amTHis is wonderful. I have a small tree up all year and I like to change the ornaments depending on the season. I’ll be making a few of these to use throughout the year. xxx
Debbie
November 6, 2015 1:21 amThese are awesome, fabulous tutorial
hugs and stitches
Maria
November 5, 2015 9:35 pmThank you the great tutorial…
Karen
November 5, 2015 10:09 pmThank you for the great tutorial. I now have a use for my collection of Christmas charm squares.
Mary Anne
November 5, 2015 7:30 pmThese look amazing – thank you so much for the tutorial. I know it took a lot of time to do this!
Mary
November 5, 2015 5:31 pmThose look fantastic. Thanks for the fun tutorial.
Kate
November 5, 2015 5:25 pmI’ve been anxiously awaiting this tutorial Sue! Your ornies are beautiful and I thank you for the fabulous tutorial!
Jenny Benton
November 5, 2015 4:48 pmThanks for sharing this lovely pattern. But I’m just a little confused – are the prairie points just stitched to the front of the puffy circle? If so, is the back uncovered? Or do they fold right around to the back?
Thanks in advance,
Jenny from New Zealand
Super Mom No Cape
November 5, 2015 5:10 pmHello Jenny,
The tutorial is very photo intensive so it would be easy to miss that part of the directions. If you scroll down, under photo 20, the instructions say… Fold the prairie point over the circle and take a stitch in the opposite corner. Secure by taking a stitch back through to the first side.
So the prairie points are stitched to both sides of the circle completely covering both the front and the back of the puffy circle.
Christine M
November 5, 2015 4:22 pmYour ornaments are gorgeous, Sue. Thanks for the great tutorial.
Comments are closed.