


Do you love homemade pickles but maybe don’t have the time or canning equipment to make pickles the traditional way? Then this recipe for Quick and Easy Refrigerator Pickles is just the one you’ve been needing.
The recipe below is the one my mother used to make when we were kids. The only difference is that she made hers in an ice cream pail with a lid while I put mine in a ½ gallon glass jar.
In fact, you’ll find variations of this recipe online called Ice Cream Pail Pickles.

Quick and Easy Refrigerator Pickles
- 7 c thinly sliced pickling cucumbers or approximately 2 lbs
- 1 ½ tbsp salt
- 1 green pepper thinly sliced and cut into 1 inch pieces
- 1 red pepper thinly sliced and cut into 1 inch pieces
- 1 onion thinly sliced
For the Refrigerator Pickle Brine:
- 2 c sugar
- 1 c vinegar
- 1 tsp celery seed
You will also need a large jar with lid. This recipe fits perfectly in a half gallon canning jar.
Wash the cucumbers thoroughly to remove any dirt.

Thinly slice the clean cucumbers.

Continue slicing until you have 7 cups of sliced cucumbers.
Because the cucumbers are odd shapes and don’t necessarily fit evenly into a one cup measure, if you happen to have a kitchen scale, you may want to weigh them.
My little Cuisinart Digital Kitchen Scale

Just to give you a general idea, out of the cucumbers in the sink pictured above, I had 4 pickling cucumbers left.

Those 4 cucumbers certainly didn’t go to waste though. They were used in cucumber sandwiches and also as one of the ingredients for this Refreshing Summer Drink. It takes plain old water to a entirely new level of taste!
Now, back to making pickles… place the sliced cucumbers in a large bowl. Sprinkle the salt over them.

Add enough water to the bowl to completely cover the cucumbers. Let stand for 2 hrs.

While the cucumbers are soaking, thinly slice and cut the onion into 1 to 1½ inch pieces.

Do the same with the red and green peppers.

After 2 hours, drain the sliced cucumbers well.

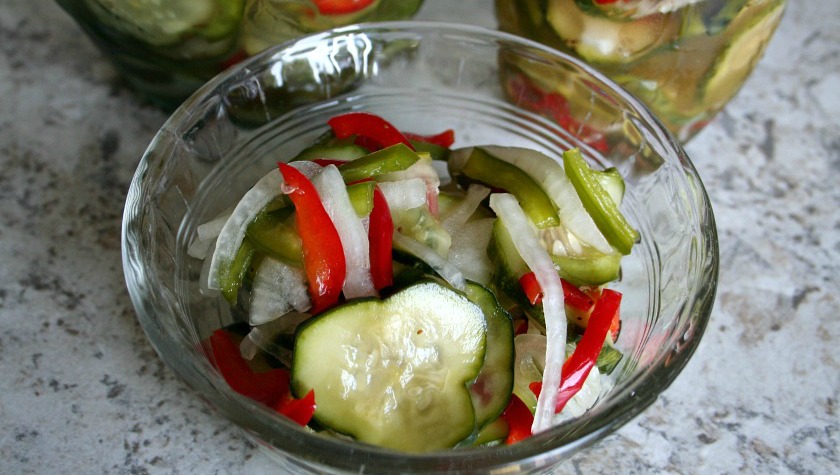
Place them in a medium sized mixing bowl and add the onions and peppers. Stir thoroughly to combine.

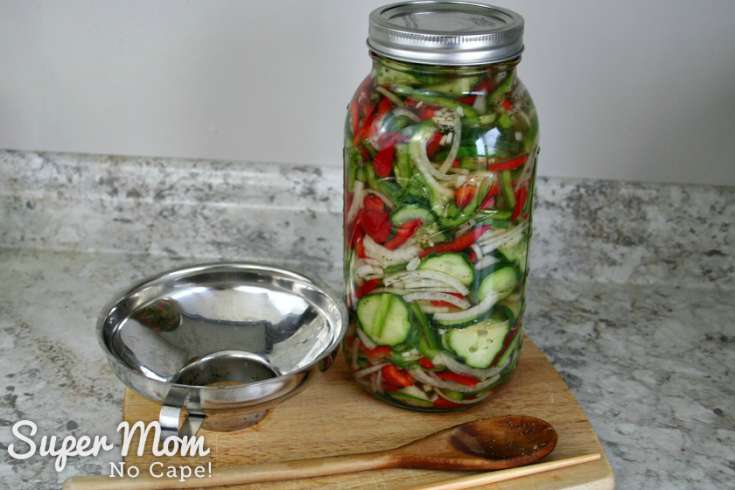
Transfer the veggies to a large jar.

To make the brine for the Refrigerator Pickles:
Add the sugar, vinegar and celery seed in a medium sized sauce pan. Stir over medium heat until the sugar is completely dissolved. Do Not allow to boil.

Once sugar is dissolved pour over the veggie mixture.

Use a chopstick to get out any bubbles.

Make sure the veggies are completely covered with brine.

Push firmly on them with a wooden spoon, if necessary.

Note: If for some reason you don’t have enough brine to cover the veggie mixture, you can make more brine to add. If all the veggies don’t fit in the jar, put the rest in a second jar.
This recipe is very forgiving… as long as you make the brine as directed and make sure the veggies are covered in brine, the pickles will taste the way they should.

Put the jar in the fridge and allow 2 to 3 days for the pickles to develop their flavor.
After that time, these quick and easy Refrigerator Pickles are ready to eat.
Notice in the photo below that the pickles have shrunk down a bit. This is a perfectly normal part of the pickling process.

Now the Refrigerator Pickles are ready to eat.
They will last in the fridge for 3 to 4 months but if your family is anything like mine, those pickles will be eaten up long before 4 months are up!
These would be great to take on a picnic or tailgating. Leave them in the original jar or transfer them to a pretty jar like the one pictured below.

Don’t they look delicious!

Those red and green colors make me think of Christmas.
In fact, Refrigerator Pickles would make an awesome hostess gift during the holidays (or anytime really.) You could also a small jar to food gift baskets.
Make one or two 1/2 gallon jars of pickles in late November, early December and fill gift jars as you need them. Note: If you can’t find pickling cucumbers due to the time of year, regular slicing cucumbers can be substituted.
I found these fun jar lids at our local Home Hardware. Bernardin is a division of Jardin which also owns Ball. So for those of you in the States check out these Green Ball Lids and Bands


And aren’t those lid inserts fun! The Star Mason Jar Lid Inserts


I even found these Snowflake Mason Jar Lids

Tie a bit of raffia or ribbon around the lids to make them even more festive.

Be sure to add a note telling the recipient to keep the pickles refrigerated and to use them up within 4 months.
The batch that I made for this recipe post ended up being divided between ours and our children’s households. But I will definitely be making more closer to the holidays.

I hope you love this recipe for Quick and Easy Refrigerator Pickles as much as my family does.
If you make a batch (or two) please take a photo and feel free to tag me @supermomnocape on Instagram or @1SuperMomNoCape on Facebook so I can come see.
Save this recipe for Refrigerator Pickles so you can find it again by clicking on the Pinterest button underneath this post.
And of course, I’d love it if you shared it on Facebook and Twitter as well. 

Quick and Easy Refrigerator Pickles
Refrigerator Pickles are quick and easy to make to have in the fridge as a sweet pickle condiment. No special canning equipment required.
Ingredients
- 7 c thinly sliced pickling cucumbers or approximately 2 lbs
- 1 ½ tbsp salt
- 1 green pepper thinly sliced and cut into 1 inch pieces
- 1 red pepper thinly sliced and cut into 1 inch pieces
- 1 onion thinly sliced
- For the Refrigerator Pickle Brine:
- 2 c sugar
- 1 c vinegar
- 1 tsp celery seed
Instructions
- Wash the cucumbers thoroughly to remove any dirt.
- Thinly slice the clean cucumbers.
- Place the sliced cucumbers in a large glass bowl. Sprinkle the salt over them.
- Add enough water to the bowl to completely cover the cucumbers. Let stand for 2 hrs.
- While the cucumbers are soaking, thinly slice and cut the onion into 1 to 1½ inch pieces.
- Do the same with the red and green peppers.
- After 2 hours, drain the sliced cucumbers well.
- Place them in a medium sized mixing bowl and add the onions and peppers. Stir thoroughly to combine.
- Transfer the veggies to a large canning jar.
- To make the brine: Add the sugar, vinegar and celery seed in a medium sized sauce pan. Stir over medium heat until the sugar is completely dissolved. Do Not allow to boil.
- Once sugar is dissolved pour over the veggie mixture.
- Run a chopstick along the sides of the jar to get out any bubbles.
- Make sure the veggies are completely covered with brine.
- Put the jar in the fridge and allow 2 to 3 days for the pickles to develop their flavor.
- Enjoy!
Notes
This recipe is very forgiving, if you don't have enough brine to cover the pickles, make more and pour it over. If you have more veggies than will fit in the jar, add those to another jar and pour brine over those.
The important thing is that the veggies are covered with the brine.
Nutrition Information:
Yield:
20Serving Size:
1Amount Per Serving: Calories: 87Total Fat: 0gSaturated Fat: 0gTrans Fat: 0gUnsaturated Fat: 0gCholesterol: 0mgSodium: 539mgCarbohydrates: 22gFiber: 0gSugar: 21gProtein: 0g
The nutritional values listed are approximate. If you require more accurate information, please be sure to do the calculations for yourself.
Please note: This post was originally published on Super Mom – No Cape in the summer of 2014. It has been completely updated with new text and photos and a printable recipe card.


2 Comments
Mother of 3
October 2, 2018 4:34 pmThanks so much for sharing your wonderful recipe with us at the Hello Fall Linky party. Pinned.
Brenda @ Its A Beautiful Life
September 15, 2014 11:32 amThis pickle recipe looks yummy. I want to try it.
Thanks so much for leaving a comment over at my blog re the courage posts and quotes. It was lovely to ‘meet’ you.
I’ve enjoyed a wee visit on your blog… lots of creativity going on here.
Wishing you a great day…
Brenda
Comments are closed.