


People often ask me where I get the ideas for the patterns I create. My answer… from everywhere. 🙂
For instance, the inspiration for this Beaded Felt Butterfly Embroidery Pattern was sparked by some super cute foil wrapped chocolates that one of the vendors at Covent Garden Market in London, Ontario was selling.
Aren’t they just adorable!

I actually traced around the wings of one of the butterflies, folded the paper in half and started cutting it into the size and shape I wanted for the pattern.

After that, I went to one of my favorite sources for creative inspiration. Pinterest!
I searched on felt butterflies and came up with all sorts of different ideas for how to embellish it.
BTW…if you don’t already follow me on Pinterest, I’d love for you to pop over and click on the follow button.
Here’s my first attempt at making a beaded felt butterfly.

I quite liked it but thought it could still do with some improvement. I decided the satin stitching didn’t really work. And those pink beads look pink in the container but as you can see in the photo, in certain lights, some of them are showing as light purple or mauve.
For the second butterfly, I chose a dark purple felt. Since I don’t have any dark purple beads and those pinky/mauve beads weren’t the look I wanted, I chose to add French knots instead.

I liked this butterfly much better.
But I really wanted to add beads.
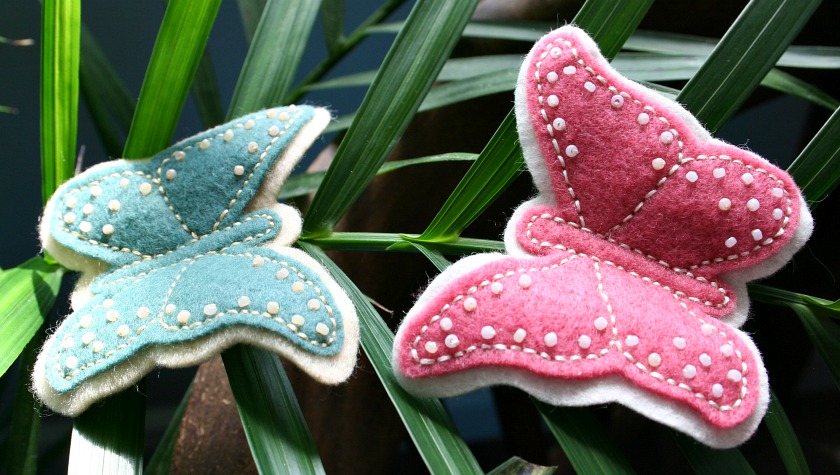
As they say, the third times the charm! I’m so pleased with how this turquoise Beaded Felt Butterfly turned out.

Once I had the design I wanted, it was time to draw the final pattern and make a fourth butterfly to make sure the pattern pieces all fit together the way they should.
Beaded Felt Butterfly Embroidery Pattern
Materials required to make one Beaded Felt Butterfly:
- Scraps of good quality felt in contrasting colors
- Embroidery floss
- Seed beads to match the color chosen for the outer butterfly
- Freezer paper
Before we begin, I’d like to take a moment to talk about felt. If you can, buy the best quality felt that you can find. It really does make a difference.
If you use a thinner felt like what you’ll find in craft stores, the wings won’t be as sturdy or as easy to shape as it will be if you’re able to use a heavier, thicker felt.
For the second butterfly pictured below, I used a thinner felt for the outer butterfly and if you scroll down to the end of the instructions where I have three of the butterflies pictured, you’ll be able to see that the wings on the purple one made with the thinner felt don’t have that nice “in flight” look that the other two butterflies have.
Which brings me to a question I have for all of you who like to work with felt.
Do you know of any online sources for good quality felt? If so, could you post about them in the comments. I would love to make more of these butterflies if I can find some pretty colors of felt.
To make the Beaded Felt Butterfly:
Download and print the free Beaded Felt Butterfly Embroidery Pattern
Trace the pattern for the butterfly onto the paper side of freezer paper. The shiny/waxed side should be facing down.

Iron the pattern pieces for the butterfly onto felt colors of your choice.

Cut out the butterfly shapes.

Remove the freezer paper from the felt butterfly pieces.

Pin the inner butterfly to the outer butterfly piece.

Embroider the butterfly using backstitch following the dashed lines on the Beaded Felt Butterfly Embroidery Pattern.
You can use this tissue paper method to transfer the pattern to the felt. That’s the method I used to transfer the pattern for the Embroidered Felt Butterfly Pincushion and the Vintage Inspired Felt Christmas Baubles.
But to be honest, for all these butterflies, I freehanded the backstitching.
If you decide to freehand it too, begin by stitching the body of the butterfly and then move on to one of the top wings. Then stitch the bottom wing. Repeat for the other side of the butterfly.

Add the beads according to the pattern. Or get creative and choose your own placement for the beads.
Once the beading is done, whip stitch the back wing pieces to the back of the butterfly.
Those extra pieces do two things.
First they cover up the back of the embroidery stitches. And second, they give the butterfly wings a bit more body to help shape the wings.

Now the butterfly is ready to have a brooch finding added to the back.

You could also add a strip magnet to turn your butterfly into a fridge magnet.
I think they’d also be really pretty hung in a window using invisible thread.
Whatever you decide to do with your butterflies, I hope you have as much fun making them as I had designing them.

Do you love butterflies as much as I do. There are lots more butterfly patterns in the Embroidery archives. Here are just a few:
Three Beautiful Butterfies from Vintage Workbasket Embroidery Pattern 64
Now, please join me for this month’s Stitchery Link Party.

STITCHERY LINK PARTY #142
For those who are newly subscribed or are visiting for the first time, at the beginning of each month I host a link party in which I invite others to share their hand embroidery projects. The party runs for the entire month.
If you’ve never linked up to a link party before and would like to join in, I’ve written a quick tutorial on How to Link Up to a Link Party. It provides step-by-step instructions for linking to this party (or any other link party you might like to participate in.)
The rules for the Stitchery Link Party are super simple but please do read before linking up as links that don’t follow the rules will be removed:
1. The project can be anything as long as it includes hand embroidery stitches in some form. Such projects might be but are not limited to redwork, blackwork, goldwork, bluework, (etc), counted cross-stitch, crazy quilting, crewel, silk ribbon, pulled thread, hardanger and sashiko.
2. Link directly to your blog post, not to your blog home page.
3. If you happen to sell your embroidery or embroidery patterns, feel free to link up to a blog post you’ve written about a project you’re selling, but No direct links to shops or websites selling things.
The next three are more requests than rules. They are by no means a requirement to take part in the party:
4. Please link back to the Stitchery Link Party with a text link somewhere in your post.
5. As well, please share the love and visit one or two (or more) of the other links and take time to leave a comment.
6. It would be wonderful if you decided to follow me but it’s not necessary in order to take part in the link party.
 Loading InLinkz ...
Save this Beaded Felt Butterfly Embroidery Pattern so you can find it again by clicking on the Pinterest button underneath this post.
And of course, I’d love it if you shared it on Twitter or Facebook. 


8 Comments
MA
August 24, 2018 5:01 pmawww – these would look so pretty on a bag or on the front of perhaps a needlecase.
Super Mom No Cape
August 30, 2018 1:56 pmThey would look lovely on a bag or the front of a needlecase, MA!
Ali B
August 22, 2018 12:03 amThanks for linking up at the Ultimate Pinterest Party! I featured your absolutely cute butterflies. My 10 year old wants to start to embroider and I think this would be a great project for her!
Super Mom No Cape
August 24, 2018 1:55 pmThank you so much, Ali for featuring my Beaded Felt Butterflies!
Andi
August 9, 2018 9:35 amI really liked the first butterfly you did because of the extra embroidery details and that is the one I will make.
Super Mom No Cape
August 10, 2018 1:47 pmThank you Andi! I’m glad you liked that one!
Super Mom No Cape
August 9, 2018 8:57 amThank you so much Deb! I hope that little girl you make them for loves the butterflies.
And I will definitely be checking out those shops.
Deborah
August 9, 2018 8:07 amThese beaded butterflies are so sweet I know the perfect little girl who will love them
I have purchased some wonderful felt from this Etsy shop https://www.etsy.com/shop/bbdsupplies
and this Etsy shop as well https://www.etsy.com/shop/BenzieDesign
both are wool blends and work up quite nicely in many of my craft projects including hand embroidery.
I found this shop wonderful for 100% wool in some of the listings. https://www.etsy.com/shop/sweetemmajean
I hope this is helpful to you. Have a wonderful day,
Deb
Comments are closed.