


This Christmas Button Lace Ornament Tutorial is an updated version of Lace Bear Ornaments that I used to make and sell at Christmas craft fairs back in the late 80s, early 90s.
I made dozens of them during those years and I remember them selling well… which helped pay for our Christmases in those early years when my husband, Dave was a master corporal in the army.
Each of our children were given a pair of the Lace Bear Ornaments to add to their handmade Christmas ornament collections that I started for them when they were little. As a military family, they don’t have the same kind of Christmas memories that a lot of young people do.
But each year when they decorate their tree with ornaments, handmade by Mom, they’ll be able to remember hanging those same ornaments on the Christmas trees of their childhood.
Want a downloadable copy of this tutorial? The PDF can be purchased in my shop for $5.00.

Today’s tutorial is designed to encourage beginner sewing skills in your children but don’t let the word sewing scare you away. If your child can thread a needle, they can make these Christmas Button Lace Ornaments.
I’ve purposely kept the instructions super simple so that if this is their first sewing experience or even your first sewing experience, it will be a good one.
The ornaments would be great for children, say tweens and teens who have a bit of experience sewing to make several as gifts for their friends and family or even to do what I did and sell them to earn money for Christmas.
Welcome to Day 4 of the Fourth Annual 12 Days of Christmas Series!

We have teamed up with 50 plus bloggers to bring you a oodles of DIY Ideas and Recipes to make your holiday season merrier. There are 12 different posts in the series and we have spread them out over a four week period with three posts per week. Now is the time to subscribe!
GO HERE for the complete list of Dates and Topics plus a collection of most popular holiday ideas including ornaments, games, recipes and more from all 50 plus talented bloggers!
It’s Day 4 and we are sharing Kids Christmas Craft Ideas!
If you haven’t had a chance to check out all the other DIY Christmas Ideas I’ve shared click the links below:
Day 1: How to Make a Christmas Wreath Kit featuring an adorable Hedgehog Wreath
Day 2: Quilted Hourglass Candle Mat Tutorial
Day 3: Ring in the Holly Days Advent Calendar Tutorial
Day 4: You are here. 🙂
Day 5: Delicious Mini Puff Pastry Cone Appetizers
Day 6: Dresden Charm Ornament Tutorial
Day 7: How to Make a Christmas Floral Arrangment
Day 8: How to Make a Mason Jar Embroidery Kit
 Christmas Button Lace Ornament Tutorial
Materials needed to make the Christmas Button Lace Ornaments
- Dress It Up Holiday Collection Buttons
- 2″ to 2¼” wide straight eyelet lace
- Plain white buttons for back of the ornament
- White thread
- Hi-tack glue
- White embroidery floss (for the hanger)

The lace pictured in the center above is actually 3½” eyelet lace. I cut it down to 2¼” wide to use in making several of the Christmas Button Lace Ornaments.
For each ornament, cut 12″ to 14″ of the eyelet lace. I simply counted out 12 scallops.

Fold the eyelet lace in half wrong sides together.

Thread the needle with approximately 18″ of white thread and tie a knot in the end. Trim the thread close to the knot. (I’ve used red thread for demonstration purposes.)
Sew the short ends together using a basic running stitch as pictured.

Tie a knot to secure the stitches but Don’t cut the thread.

Sew a running stitch all the way round top of the eyelet lace through one layer only.

It will look like this.

Pull on the thread to gather the lace into the center. Tie another knot to secure the gathering in place.

The lace portion of the ornament is complete.

If your child has enjoyed sewing to this point and they want to try sewing on the button, they can sew on the button now.
However, if they don’t want to try sewing on the button, it’s perfectly okay to glue the button to the center front of the ornament.
We want this to be a pleasant learning experience for them.
If gluing the button, you’ll need to wait for about an hour for the glue to dry enough to handle the ornament again.

Once the button is on the front, apply hi-tack glue to the center back,

Press the white button in place and hold for several seconds until the glue grabs the button. Allow to dry.

I was having so much fun making these Christmas Button Lace Ornaments that I ran out of white buttons for the back, so I went rummaging through my craft supplies and came across some small metal disks that I think might have come from Pillsbury cookies several years ago. So if you don’t have white buttons, you can use something like this on the back of the ornament.
You could even cut small circles from card stock.
Edited to add: Jan commented that she uses felt circles for the back of her ornaments. So if your child has mastered the running stitch and sewing on the button and is ready to learn another stitch, you can show them how to whipstitch circles of felt in place of the button.
That would also allow the ornaments to be attached to pins to make brooches. They could also be made into hairclips as well.

To make the hanger for the Christmas Button Lace Ornament cut approximately an 8″ length of white embroidery floss.
Thread it through the top of the ornament.

Tie a knot in the floss to hold it in place.

Then knot the two ends of the floss together. Trim the floss close to the knot and the ornament is ready to hang on the tree.

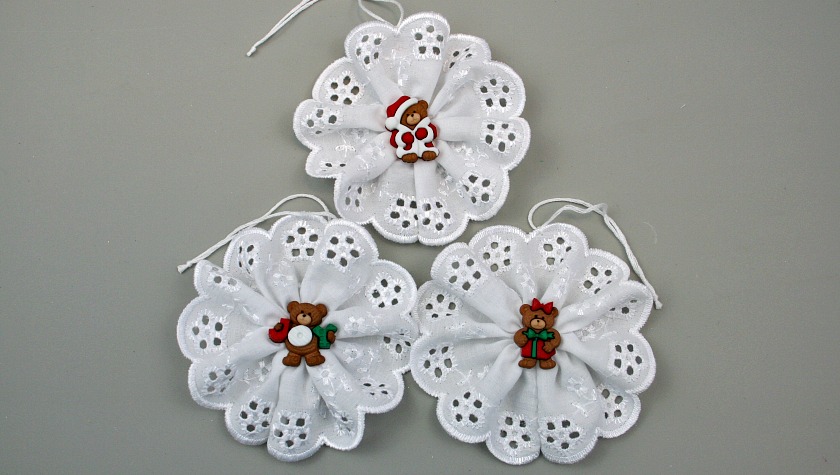
Don’t you just adore these ones made with bear buttons

The buttons on the ornaments below came from 2 different packages of novelty buttons. The snowmen were in a package by themselves and the rocking horse and toy soldier were in another package.

The flower buttons make really pretty centers too.

As do the different tree buttons.

All of these Christmas Button Lace Ornaments are going to make really pretty gift toppers that people can add to their trees after they open their gifts this year!

I hope you’ve enjoyed my contribution to the Kids Christmas Craft Ideas – Day 4 of the 12 Days of Christmas Series.
Want a downloadable copy of this tutorial? The PDF can be purchased in my shop for $5.00.
Click the link below to add to your cart and then click checkout:
If you and your kids make some of these Christmas Button Lace Ornaments, please do post about it somewhere on line and tag me so I can come see. I’m @supermomnocape on Instragram, @1SuperMomNoCape on Twitter and @1SuperMomNoCape on Facebook.
Please feel free to follow me on any or all of them. 
Scroll down for many more Kids Christmas Craft Ideas!
 Loading InLinkz ...
Be sure to save the Christmas Button Lace Ornament Tutorial by clicking on the Pinterest button underneath this post.
And of course, I’d love it if you shared it on Facebook and Twitter as well.


13 Comments
ColleenB. ~Tx.
August 13, 2021 10:25 amWonderful tutorial. Nice to see the step by step instructions. Thank You
Instead of ornaments, a person could glue a magnet on the back and place on your refrigerator.
Sam – Raggedy Bits
November 30, 2018 7:15 amHow cute are these!! A tree for full of these ornaments would be so beautiful!!
Jessa
November 28, 2018 3:15 pmI love these lace ornaments, it’s a perfect project to do with my daughters!
Rachel
November 27, 2018 2:11 pmThese are so very pretty! I love the ones with the trees in the center – especially that gold tree!
Jenny
November 27, 2018 6:43 amThese are adorable! I love the teddy bears.
Rachel
November 26, 2018 3:37 pmSimple and delightful!
Laura
November 26, 2018 2:23 pmWhat sweet ornaments! They remind me so much of a hairbow I used to wear when I was little with lace and a bear in the middle!
Kathleen
November 26, 2018 12:47 pmThese are really cute! Thanks for sharing.
Super Mom No Cape
November 26, 2018 1:13 pmThank you Kathleen!
Marie InteriorFrugalista
November 26, 2018 11:54 amThese are so pretty and thanks for a wonderful tutorial too!
Super Mom No Cape
November 26, 2018 1:12 pmThanks so much Marie!
Super Mom No Cape
November 26, 2018 10:21 amHello Jan… I’m glad I was able to show you something new. 🙂
And I like the idea of using a felt circle for the back. Thank you for mentioning that. I’m going to add that to the post as an option.
Jan
November 26, 2018 8:26 amExcellent tutorial.
I make these a lot so I almost didn’t read it, but sewing the ends of the lace together first is so much easier.
And for the back I’ll frequently cut a circle of felt. I stitch it around the edge, just catching the back of the ruffles. For an ornament it only has to be big enough to cover raw edges. If I’m putting a button on front, I’ll add it last and stitch through the felt.
With a lager piece of felt you have a base for a pin or a hair clip if you want.
Now I have to go through the rest of your tutorials and see what else I don’t know.
Jan
Comments are closed.