


Whether you’re a kid or just a kid at heart, counting down to Christmas is a fun yearly tradition. But for those of us who fall into the kids at heart category, we may want to make a more grown up version like the one in this Ring in the Holly Days Advent Calendar Tutorial.
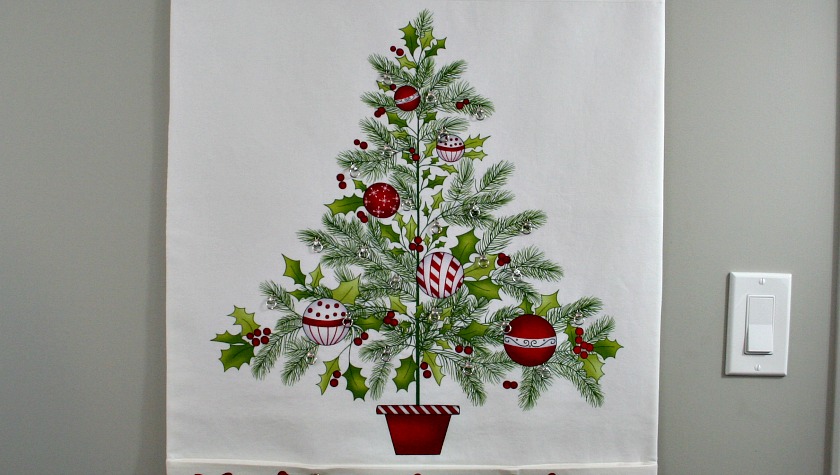
If you’re like me you sometimes buy fabric just because you love it without knowing what you’re going to make with it. But when I saw this Ring In the Holly Days fabric panel at my local quilt shop, there was no question that it was coming home with me because I immediately knew that I wanted to turn it into an Advent Calendar.

Instead of pockets that need to be filled with some kind of treat, I decided it would be fun, if each day from the 1st of December to the 24th, Dave or I could add an ornament to the tree so that by the time Christmas comes around, the tree would be fully decorated.
Welcome to Day 3 of the Fourth Annual 12 Days of Christmas Series!

We have teamed up with 50 plus bloggers to bring you a oodles of DIY Ideas and Recipes to make your holiday season merrier. There are 12 different posts in the series and we have spread them out over a four week period with three posts per week. Now is the time to subscribe!
GO HERE for the complete list of Dates and Topics plus a collection of most popular holiday ideas including ornaments, games, recipes and more from all 50 plus talented bloggers!
If you haven’t had a chance to check out all the other DIY Christmas Ideas I’ve shared click the links below:
Day 1: How to Make a Christmas Wreath Kit featuring an adorable Hedgehog Wreath
Day 2: Quilted Hourglass Candle Mat Tutorial
Day 3: You are here. 🙂
Day 4: Christmas Button Lace Ornament Tutorial
Day 5: Delicious Mini Puff Pastry Cone Appetizers
Day 6: Dresden Charm Ornament Tutorial
Day 7: How to Make a Christmas Floral Arrangment
Day 8: How to Make a Mason Jar Embroidery Kit
Day 9: Christmas Furoshiki (Japanese Fabric Wrapping)
Day 10: Poke and Push Fabric Christmas Trees Tutorial
Day 11: Mini Spiced Orange Buttercream Bundt Cakes
Day 12: DIY Christmas Stocking Stuffer Ideas
It’s Day 3 and we are sharing DIY Christmas Countdown Calendar Ideas!

Ring In the Holly Days Advent Calendar Tutorial
Materials needed to make a Ring in the Holly Days Advent Calendar:
- 1 – Ring in the Holly Days fabric panel by Mary Jane Carey for Henry Glass Fabrics (See note below)
- Approximately 22″X32″ of white backing fabric
- 2 – 5½”X23″ pieces of white fabric
- 2 Squares 5½” squares of white fabric
- 1 – 5½”X23″ piece Pellon 808 fusible interfacing
- Approximately 22″X32″ of fusible fleece
- White thread
- 24 decorative toggle clasps
- 24 mini ornaments
Note: The Ring in the Holly Days panels sold out quickly from Fat Quarter Shop and Fabric.com but can still be found for sale from the follow online shops:


You could also try searching on Etsy and Ebay.
The fabric panel is a bit too long for our purposes so begin by cutting the bells and wreaths border off the top of the fabric panel.
To do this measure down ½” from the bottom of the ribbon.

Flip the border around and trim it down to 7 inches deep. You’ll end up with a border strip approximately 7″X23″ depending on how accurately the fabric shop cut the panel.
With the border removed, now you’ll measure again to cut a 2¼” strip above the tree as shown in the photo below.
Pin the border to the tree section right sides together.

Sew using a ¼” seam allowance.

Press the seam allowance towards the border.
To cut the bottom border off of the fabric panel, measure up 5/8″ from the top of the bows on the bells and cut.

Flip the bottom border around and trim to 5½ inches deep, leaving you with a piece 5½”X23″. Set the bottom border aside.
Cut a 2¼” strip off the bottom of the tree section of the panel.

Next, cut 2 strips of fabric 5½”X23″ of white fabric.
Sew one of the strips to the bottom of the tree section.
You should now have a piece that looks like this.

To make the pocket to hold the ornaments to hang on the tree:
Sew the bottom border to the second 5½”X23″ piece of white fabric using a ¼” seam allowance.

Press the seam allowance towards the border.
Place the interfacing glue side down on the border.

Be sure to tuck the interfacing underneath the seam allowance close to the stitching.
Fold the pocket lining down and press well.

Pin the pocket to the bottom of the advent calendar and baste in place using a long stitch on your sewing machine.

The next step is to square up the advent calendar. Fold it in half as pictured below. You’ll be trimming it down to 22″ wide. You’ll want to be sure to cut an even amount away from those holly wreaths while trying to keep the trunk of the tree as close to the center as possible.
If you’re wondering why the squaring up is being done now rather than at the beginning… in my experience working with fabrics with a printed border, those borders aren’t always printed on the fabric squarely to begin with, so I trim them off first, making sure to have a straight cut and then sew them back on to another straight cut. Does that make sense?

Next, place the advent calendar right side down onto the pressing surface.
Layer on the fusible fleece with the glue side down.

Fuse according to the directions provided with your fusible fleece.
Quick tip: Be sure to press and lift, press and lift. Moving the iron back and forth while it’s in contact with the fusible fleece will cause wrinkles to be ironed into the fleece.

Trim off any excess fleece.

To keep the pocket from flopping open when the advent calendar is hung up, you’ll want to add some kind of closure.
I’ve added two decorative snaps 6″ in from either side of the pocket. You may prefer to add a couple of pretty buttons or perhaps apply hook and loop tape to the inside upper edge.

Decorative toggle clasps will be used to hang the ornaments on the advent calendar tree.

Arrange them on the tree on the branches.

Sew the toggles in place using thread that closely matches the tree branches.

To make the hanger for the Ring in the Holly Days Advent Calendar:
Cut two 5½” squares.

Fold them in half diagonally to form triangles and press.

Pin one triangle to the corner of the backing and baste in place.
Repeat with the other triangle, placing it so that the triangles are on the same 22″ side of the backing fabric.

Pin the backing to the advent calendar front, right sides together. Sew all the way around leaving a 6″ to 8″ opening for turning.
Trim the corners on a diagonal to reduce bulk. Turn right side out.
Poke out the corners with a point turner.


Sew the opening closed using a ladder stitch, aka invisible stitch.

Press the advent calendar well. And you’re finished!
To hang it up. add the dowel cut to size under the hanging triangles.
Or if you live in a rental like we do, you can tack it up using flat head straight pins. The pins are small enough that the holes they leave are barely noticeable when you take the advent calendar down to store away until next year.

Once December arrives, you can start adding ornaments.
Which I must confess, I’m still in the process of making. I’ve never worked with these little toggle clasps before and I’m still trying to figure out the best way to add them to the ornaments. But I’ll come back and add a photo tomorrow when they’re done.

I hope you’ve enjoyed my contribution to the DIY Christmas Countdown Calendar Ideas – Day 3 of the 12 Days of Christmas Series.
If you make a Ring in the Holly Days Advent Calendar, please do post it somewhere on line and tag me so I can come see. I’m @supermomnocape on Instragram, @1SuperMomNoCape on Twitter and @1SuperMomNoCape on Facebook. Please feel free to follow me on any or all of them. 
Scroll down for many more DIY Christmas Countdown Calendar Ideas for your holiday season!
 Loading InLinkz ...
Be sure to save the Ring in the Holly Days Advent Calendar Tutorial by clicking on the Pinterest button underneath this post.
And of course, I’d love it if you shared it on Facebook and Twitter as well.


12 Comments
Leanna
December 1, 2018 12:40 amThis is just gorgeous. I think it would be a wonderful gift for anyone who lives in a small apartment, in seniors care, the hospital, a college dorm. What a beautiful advent calendar.
Sam – Raggedy Bits
November 30, 2018 7:00 amOh my! This is just beautiful! I love that gorgeous fabric and what a lovely alternative to a treat advent calendar!
Jessa
November 28, 2018 3:09 pmThis turned out gorgeous and I love the idea of adding an ornament each day!
Rachel
November 25, 2018 10:20 amThat’s a really charming idea, and a lot more interesting than chocolate!
Rosalyn Schultze
November 24, 2018 11:22 amI have made three advent calendars in the past (tree of my own design), using black hooks (from hook and eyes) which I sewed on the tree (24) with a snap at the top of the tree for a fabric star. I purchased mini wooden ornaments and placed each ornament in a small drawstring bag. All of the bags went into a tin with a Santa motif and the grandchildren got to pick one and were surprised when they opened the bag. They placed the ornament on the hook of their choice. Such fun! After the holidays, the ornaments were put back into the bage and stored in the Santa tin.
Super Mom No Cape
November 24, 2018 9:29 pmOh how fun, Rosalyn! And what wonderful memories you created for your grandchildren!
I hadn’t even thought to make a star for the top. 🙂
LINDA HUMPHREY
November 24, 2018 9:39 amNow you have solved a dilemma I’ve had for over 30 years! I have the Beary Merry Christmas Advent calendar that I embellished and had been using as our Christmas countdown since my kids were young. (It will be a problem when I no longer an here ’cause each of them want it!) I’ve been using safety pins and ribbon to move Little Bear around as he looks for “Christmas” but I’ve been worried that all the pinning and reining would wear out the fabric. Now I’m on a mission to find those clasps. What a brilliant idea turning a panel into a calendar.
Super Mom No Cape
November 24, 2018 9:53 amThank you Linda!
And I’m so glad to have help solve your problem so that LIttle Bear can move around and not have to be pinned and unpinned.
I found those little packages of toggle clasps at Dollar Tree in the crafting section. So maybe try there first.
Jenny
November 23, 2018 1:43 pmIt’s beautiful! The tree, bells, wreaths are so pretty!
Super Mom No Cape
November 24, 2018 9:53 amThanks so much Jenny!
Trish
November 23, 2018 9:17 amSo pretty!
Super Mom No Cape
November 24, 2018 9:53 amThank you Trish!
Comments are closed.