


Do you ever buy a new craft tool, make a few things that it was intended to make and then think, “Hmmm, that’s cool. Now what else can I make with this?”
That’s how these Dresden Charm Ornaments came about. After I bought a small Dresden quilt ruler I made a Dresden plate quilt block and then used it to frame my April Showers Embroidery Pattern which in turn became a pretty spring pillow cover.
The ruler sat on the shelf beside my sewing machine and every time I looked at it I thought, “Are making Dresden plate blocks all that ruler is good for?”
So I did some experimenting and after a couple of projects that looked so odd they ended up in the scrap bin and one other project that I’m still playing with, the Dresden Charm Ornament was created.
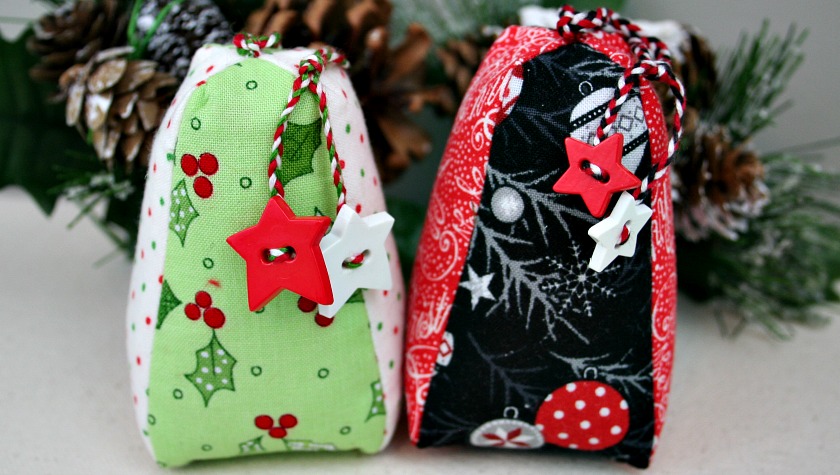
Dresden in the name is obvious and charm comes from the fact that they’re made using 5″ charm squares.
Want a downloadable copy of this tutorial complete with the patterns? The PDF can be purchased in my shop for $5.00.
Welcome to Day 6 of the Fourth Annual 12 Days of Christmas Series!

We have teamed up with 50 plus bloggers to bring you a oodles of DIY Ideas and Recipes to make your holiday season merrier. There are 12 different posts in the series and we have spread them out over a four week period with three posts per week. Now is the time to subscribe!
GO HERE for the complete list of Dates and Topics plus a collection of most popular holiday ideas including ornaments, games, recipes and more from all 50 plus talented bloggers!
If you haven’t had a chance to check out all the other DIY Christmas Ideas I’ve shared click the links below:
Day 1: How to Make a Christmas Wreath Kit featuring an adorable Hedgehog Wreath
Day 2: Quilted Hourglass Candle Mat Tutorial
Day 3: Ring in the Holly Days Advent Calendar Tutorial
Day 4: Christmas Button Lace Ornament Tutorial
Day 5: Delicious Mini Puff Pastry Cone Appetizers
Day 6: You are here. 🙂
Day 7: How to Make a Christmas Floral Arrangment
Day 8: How to Make a Mason Jar Embroidery Kit
Day 9: Christmas Furoshiki (Japanese Fabric Wrapping)
Day 10: Poke and Push Fabric Christmas Trees Tutorial
Day 11: Mini Spiced Orange Buttercream Bundt Cakes
Day 12: DIY Christmas Stocking Stuffer Ideas
It’s Day 6 and we are sharing DIY Ornament Ideas!

Dresden Charm Ornament Tutorial
Materials needed to make one Dresden Charm Ornament:
- 2 – 5″ charm squares (from a charm pack or cut your own)
- 5″X10″ piece of Pellon 911FF Featherweight Fusible Interfacing
- Small amount of polyester fiber fill
- Embroidery floss (for the hanger)
- Small red and white star buttons (optional)


You’ll also need an 8″ Dresden quilt ruler
Choose two squares from the charm pack or cut two 5″ squares from your stash.
Cut two 5″ squares of interfacing.

Fuse the interfacing to the wrong side of both fabric squares.

Place the Dresden ruler on the fabric square, lining up the 6″ mark at the bottom as pictured below and cut along both sides.

Flip the fabric around and cut another Dresden blade.

Repeat with the second square of fabric.
You’ll have 4 Dresden blades.

Fold the blades in half lengthwise. Sew the ends, sewing from the edge towards the fold using a ¼” seam allowance.

Sew the other end in the same manner.
The blades will look like tiny boats.

Trim the corners on the diagonal to reduce bulk.

Finger press the seams opens.

Turn the corners right side out. Use a point turner
The Dresden blades should look like this.

Fold in half and very lightly make a crease to use as a reference. This is just a light crease, not a sharp one.
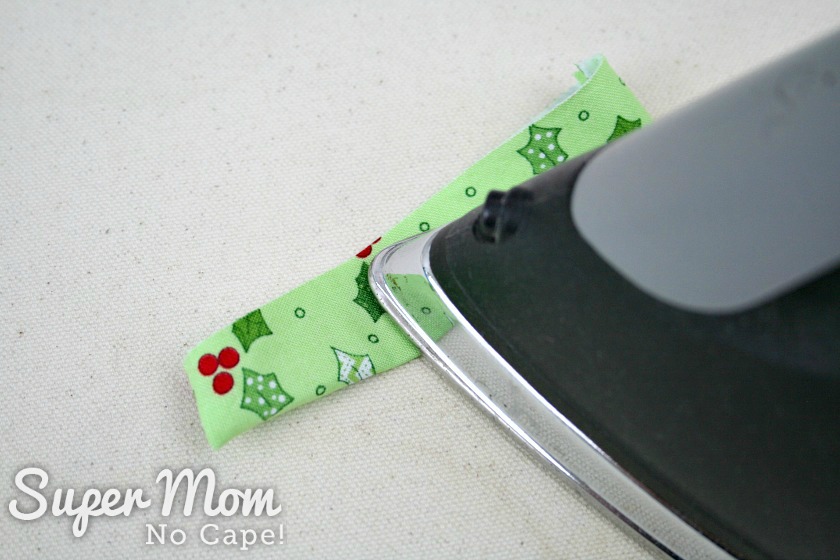
Line up the seam with the crease. Press well.

Repeat for all ends of the Dresden blades.
Flip them over and press on the right side to remove any trace of the crease that was made. You now have four double pointed Dresden blades.

Pin two opposite color Dresden blades together and sew using a ¼” seam.

Repeat for the two remaining Dresden blades.
Sew those sets together. Press all seams open.

Pin right sides together and sew the fourth seam to form a tube.
To press that fourth seam open, roll up a facecloth or small rag and insert into the tube.

The tube should look like the one pictured below.

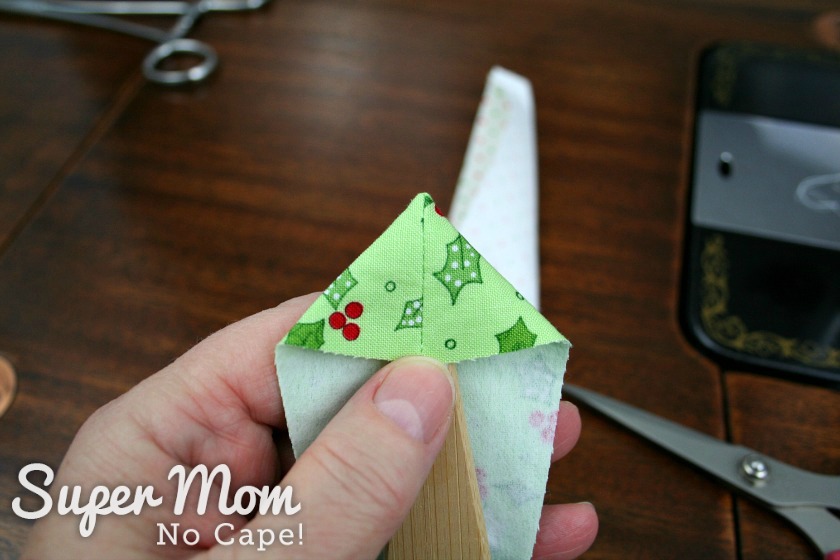
Fold the larger points wrong sides together. Sew using a ladder stitch (aka invisible stitch.) Stitch towards the point.

Make a small slip stitch in the point as shown.

Fold the next blade point against the one just stitched and sew those two edges together.

Repeat until all edges are sewn together as shown below.

Stuff the Dresden Charm Ornament with polyester filling.

Sew the top in the same manner as the bottom.
When you get to the last seam, if the ornament needs more filling, add more before closing the seam.

A surgical clamp

Sew the last seam.
To make the hanger for the ornament, cut three 15″ lengths of embroidery floss. For this ornament, I used white, red and green.
Braid the floss. Find the center point of the braided floss and attach it to the center top of the ornament with regular thread, sewing through the braid several times.

Tie a knot in the braid right at the top of the ornament. Then tie another knot to make a 3 to 4 inch hanging loop.
If desired, thread the end of the braided floss through a button and knot in back of the button. Add a small drop of hi tack glue and allow to dry. This will keep the knot from coming undone.
The Dresden Charm Ornament is ready to hang.

These Dresden Charm Ornaments are a great way to use up scraps of fabric. They could be made in so many different combinations of fabrics.

I’m hoping to have time to make several more of these before Christmas to add to our collection of handmade ornaments and those of our children.


I hope you’ll give them a try. They really are fun to make!
If you make some of these Dresden Charm Ornaments, please do post about it somewhere on line and tag me so I can come see. I’m @supermomnocape on Instragram, @1SuperMomNoCape on Twitter and @1SuperMomNoCape on Facebook.
Please feel free to follow me on any or all of the above social media.
Want a downloadable copy of this tutorial complete with the patterns? The PDF can be purchased in my shop for $5.00.
Click the link below to add to your cart and then click checkout:
Scroll down for many more DIY Ornament Ideas for your holiday season!
 Loading InLinkz ...
Be sure to save the Dresden Charm Ornament Tutorial by clicking on the Pinterest button underneath this post.
And of course, I’d love it if you shared it on Facebook and Twitter as well. 🙂


11 Comments
Erlene
December 5, 2018 7:31 amI like these! I can see this being a great way to use up fabric scraps. I’m wondering if you pack the stuffing in if this could be used as a pin cushion too?
Susan Shaw
December 2, 2018 10:23 pmWhat a great way to make an ornament! I had not seen anything like this at all. Thanks for a great tutorial!
Jenny
December 2, 2018 9:46 amThe fabric is very pretty & looks beautiful!
Wanda Simone
December 1, 2018 11:25 amWhat a creative way to use a Dresden ruler 🙂 Your ornaments look so pretty!
lexi@that fit fam
December 1, 2018 11:07 amthese turned out so cute! great tutorial!
Beverly
December 1, 2018 9:30 amThese are so pretty and unique. The tutorial is great, too.
Leanna
December 1, 2018 12:35 amOh my, these are lovely and what a great tutorial. I was intrigued by the title as I had no idea what a Dresden was. You’re educating me, talented lady. Pinning to try
Marie InteriorFrugalista
November 30, 2018 1:43 pmOh wow! These are absolutely beautiful. Did you sew them on an old Singer sewing machine too?
Rachel
November 30, 2018 11:57 amThey are very sweet. And if you weighted them, they could become pattern weights or paperweights…!
Stephanie A. Drake
November 30, 2018 11:09 amSo cute, how about a small bell senw on the bottom?!
Mary
November 30, 2018 10:12 amThose are really cute. There have been so many great ideas.
Comments are closed.