


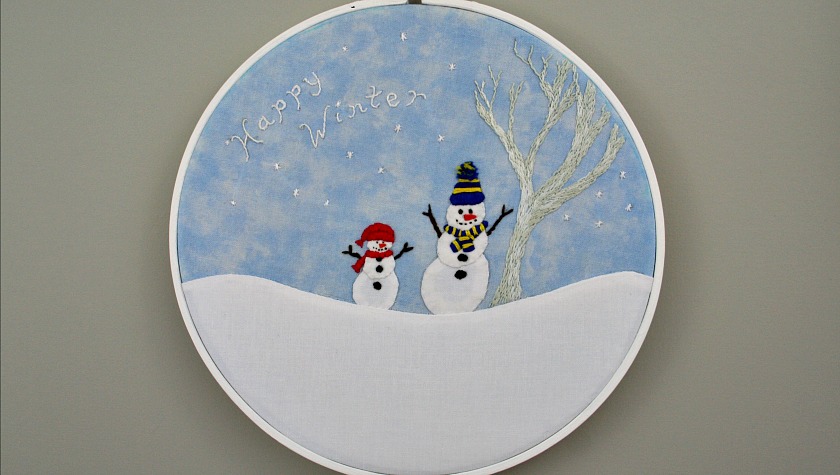
Even if winter is your least favorite season, I think you’re going to love this month’s Happy Winter Snowmen Embroidery Pattern. There’s just something so fun about people made of snow that makes a person smile!
Some of my favorite winter memories are of making snowmen with my brother and sister when we were kids.
But most fun of all are the times we made snowmen with our kids. They still talk about the year we made a huge snowman when we went to Grandma’s and Grandpa’s place for Thanksgiving. Canadian Thanksgiving is always the first Monday in October, so snow was early that year!
But you don’t have to brave the cold temperatures to make today’s snowmen. You can stay toasty warm inside while stitching away.
Begin by downloading the Happy Winter Snowmen Embroidery Pattern (scroll down for the link)

Trace the pattern on to your fabric using a light source of some kind.

Your light source can be something as simple as taping the pattern and fabric to a window.
However last year, I bought the Huion A3 LED LIghtbox

No more tired arms and I can trace patterns any time day or night. The brightness of the light is easily adjusted with the touch of a button and it remembers the last setting you used when it’s turned on again.
The pattern is designed to fit into an 8″ wood embroidery hoop

Once you’ve got the pattern traced onto fabric, you’re ready to get creative and put your own spin on things with your choice of floss colors.
Should you want to duplicate the one I made, I’ll explain below which stitches and floss were used for each element of the design.
Please note: 2 strands of floss were used throughout.
The tree was embroidered using long and short straight stitches in two different colors of floss… DMC 3072 Very Light Grey Beaver and DMC 3756 Pale Bay Blue (though it’s actually a really pale grey.)

The words Happy Winter were done in whipped backstitch with white floss.
White was also used to embroider the snowflakes.
 Rather than embroider the snowmen’s bodies, I decided to experiment with some freezer paper appliqué.
I’m not very experienced doing this kind of needle turn appliqué but I found a great video tutorial by Jan Patek and followed her method to make the two snowmen and the snow hill.
Jan suggests using pencil but I chose to use my Clover water soluble pen to trace around the freezer paper before it was removed.

What I like about using the water soluble pen is that a squirt or two of water and the lines disappear completely.

The snowmen came out a little lumpy in places but if you’ve ever built a snowman, you know they don’t always come out perfectly round, so we’ll just pretend that I did that on purpose! 🙂

The larger snowman’s toque (hat) and scarf were worked in satin stitch. The blue stripes are DMC 796 Dark Royal Blue while the yellow are DMC 973 Bright Canary Yellow.
The pom pom was made using the pom pom stitch.
Black satin stitches made the eyes, mouth and buttons. Satin stitch in DMC 720 Dark Orange Spice was used to make the carrot nose.
Long and short straight stitches in DMC 938 Ultra Dark Coffee Brown formed the stick arms.

The smaller snowman’s toque and scarf were stitched using DMC 321 Red.

Needle turn appliqué created a snow hill from the same scrap of white fabric as the snowmen.

Once the top of the hill was stitched down, I decided that it needed a bit of a soft rounded edge to make it look more like snow. This was achieved by adding a piece of fusible fleece
Be sure to place the fleece fusible side down so that it fuses to the background fabric, not the snow.

After the fleece was fused in place, the rest of the snow was appliquéd in place.
If you look closely, you’ll see that the snow extends past the circle drawn on the fabric. This is so that when the finished embroidery is placed in the hoop the snow wraps around to the back.

To get the piece ready to be hooped, the background fabric was cut 1¾” larger all the way around than the circle traced off the pattern.

The raw edges were then folded under approximately ¼” and a running stitch worked all the way around.
Next, the piece was carefully centered in the hoop and any adjustment made before tightening the screw to hold it firmly in place.
Then the whole thing was flipped over, the running stitches were gathered tight and fastened off.
This may not be the “correct” way of finishing hoop art, but if the time ever comes that I want to use the embroidery for something else, I’ll be able to do so.

I just love the way this Happy Winter Snowmen hoop art turned out.

Here it is hanging up with November’s double hooped Cardinal Embroidery.

Click the links below for the downloadable pdf of the pattern.
Happy Winter Snowmen Embroidery Pattern
Bonus Page with needle turn appliqué pattern pieces
Important notes: The seam allowances have not been added to the appliqué pattern pieces. Cut the fleece on the drawn lines.
If you stitch up these adorable little snowmen, please do post about it somewhere online and tag me so I can come see. I’m @supermomnocape on Instragram, @1SuperMomNoCape on Twitter and @1SuperMomNoCape on Facebook.
Please feel free to follow me on any or all of the above social media.
For more cute snowmen embroidery patterns, check out the links below:
Snow Family and Their Snowmen Friends
STITCHERY LINK PARTY #146
For those who are newly subscribed or are visiting for the first time, at the beginning of each month I host a link party in which I invite others to share their hand embroidery projects. The party runs for the entire month.
If you’ve never linked up to a link party before and would like to join in, I’ve written a quick tutorial on How to Link Up to a Link Party. It provides step-by-step instructions for linking to this party (or any other link party you might like to participate in.)
The rules for the Stitchery Link Party are super simple but please do read before linking up as links that don’t follow the rules will be removed:
1. The project can be anything as long as it includes hand embroidery stitches in some form. Such projects might be but are not limited to redwork, blackwork, goldwork, bluework, (etc), counted cross-stitch, crazy quilting, crewel, silk ribbon, pulled thread, hardanger and sashiko.
2. Link directly to your blog post, not to your blog home page.
3. If you happen to sell your embroidery or embroidery patterns, feel free to link up to a blog post you’ve written about a project you’re selling, but No direct links to shops or websites selling things.
The next three are more requests than rules. They are by no means a requirement to take part in the party:
4. Please link back to the Stitchery Link Party with a text link somewhere in your post.
5. As well, please share the love and visit one or two (or more) of the other links and take time to leave a comment.
6. It would be wonderful if you decided to follow me but it’s not necessary in order to take part in the link party.
 Loading InLinkz ...
Be sure to save the Happy Winter Snowmen Embroidery Pattern by clicking on the Pinterest button underneath this post.
And of course, I’d love it if you shared it on Facebook and Twitter as well.


7 Comments
Joy
January 28, 2019 6:23 amSo cute Sue! I wish we had snow here at the moment.. I’m sure I would be much more productive than I am now!! And the “lumps” on the snowmen make them look more real!! xx
Jocelyn Thurston
January 24, 2019 11:28 amHow generous you are to share this very cute little design! Thank you. and Thanks for hosting a stitchery link up!
Mary
January 24, 2019 9:51 amThey are so darn cute for these wintery months. We had that nasty bug here too so I know what you mean. My BIL ended up in the hospital with pneumonia. I hope you have finally recovered and that 2019 will be a healthy one for you.
Brenda
January 23, 2019 9:49 amYour stitching is lovely!! I’m just starting hand embroidery and getting a little better at it! Now, machine embroidery, I can do all day! LOL
Super Mom No Cape
January 23, 2019 4:34 pmThank you for your sweet compliment Brenda!
I took a machine embroidery class years and years ago but at the time hubby was only a master corporal and we couldn’t afford for me to buy a machine or all the threads that were needed so I never did go any further.
You’ll get there with the hand embroidery. I find it really relaxing.
Deborah
January 23, 2019 8:57 amThank you for the Happy Winter Snowman pattern, I just love snowmen it’s the one thing I miss living here in Florida.
Super Mom No Cape
January 23, 2019 4:34 pmI hope you enjoy stitching it Deborah!
Comments are closed.