


Are you looking for a quick, easy sew project? One that will be reused again and again? I’m going to show you how to make a fabric book cover that you can adjust to cover any size book.
Whether you’re wanting to make a cover for a much loved book that is getting a little worn from being read over and over again or to protect a favorite inspirational book, this basic tutorial can be used to make a fabric cover for them.
Fabric book covers are awesome gifts because they can be personalized to the tastes of each individual recipient.
Need a quick teacher gift? This may just become your new go to gift for your children’s teachers. It’s something you know will get used and not stuck on a shelf somewhere to gather dust.
For this tutorial, I’m covering a composition book to turn it into a daily writing or bullet journal.
This is the exact method that I used to turn October’s Gratitude Embroidery Pattern into a Gratitude Journal.
Want the ad free PDF?
All the instructions you need to make beautiful fabric book covers are right here in this post. But I realize that it might be more convenient for you to have a copy that you can download to your computer to print out and have beside you as you work. You can purchase the ad free Printable Fabric Book Cover Tutorial PDF file for only $5 from my shop. It has this complete step-by-step tutorial with all the accompanying photos.

How to Make a Fabric Book Cover
Materials needed for one fabric book cover:
- One fat quarter (or yardage) of main fabric for outside of cover
- One fat quarter (or yardage) of coordinating fabric for the lining
- One fat quarter (or yardage) of a second coordinating fabric for the flaps
- Pellon 987F fusible fleece
- Pellon 911FF fusible featherweight interfacing
- Matching thread


Begin by measuring the book that you want to cover.
Place your measuring tape on the edge of the back book cover. Wrap it around the spine and across the front cover.

Next measure the height of the book.

For this particular composition book, the measurements were: 15 1/8″ X 9 5/8″.
Note: If you’re going to cover a composition book as well, don’t just use these measurements. Please be sure to measure yours to double check as I’ve discovered that not all composition books are the same size.
Next, you’re going to add ¼” seam allowances all the way around. 2 X ¼” = ½”
You’re also going to want to account for the thickness of the book cover.
For composition books, I add an extra 1/8″. Hard cover books have a variety of thicknesses and will require a different measurement to account for that.
Below are the equations for you to use to calculate what size to cut the fabric. Simply plug your numbers in where applicable.
Height to cut for the fabric book cover:
9 5/8 + ½ + 1/8 = height
Now we need to find the common denominator of the fractions so we can add them up:
9 5/8 + 4/8 + 1/8 = 9 10/8 or 10 1/4″
Width to cut the fabric for the cover:
15 1/8 + ½ + 1/8 = width
Finding common denominator:
15 1/8 + 4/8 + 1/8 = 15 6/8 or 15 3/4″
For the flaps for the book cover:
I wanted them to be 4″ wide when finished so that number needed to be doubled.
(4 X 2) + ½ + 1/8 = size to cut flaps
8 + 4/8 + 1/8 = 8 5/8″
You can round that number up to 9 if you like. That’s what I did. 🙂
The height for the flaps needs to be the same as for the outside and lining… 10 1/4″
Once you have the measurements it’s time to cut fabric.
Outside fabric – cut one 10 1/4″ X 15 3/4″
Lining fabric – cut one 10 1/4″ X 15 3/4″
Flaps – cut two 9″ X 10 1/4″
Fusible fleece

Featherweight fusible interfacing

Note: The fusible fleece and interfacing are cut slightly smaller to reduce bulk in the seams.
Pictured below are the pieces you should have once you’ve finished cutting.

For those of you who would like to make a book cover in the same fabrics, I’ve listed them below.
That pretty print with swirls and stylized angels is Wilmington Artic Wonderland Damask White Fabric.
The fabric for the book cover flaps is Folio 7755 71 Cerulean Blue by Henry Glass.
And the lining fabric has been in my stash for a while now. It’s Artisan Spirit Shimmer 20256M by Deborah Edwards of Northcott.
Fold each flap piece in half lengthwise and press well.

Open the flap and place the fusible interfacing as pictured below.

Close the flap and press according to the directions for the interfacing.

Repeat for the second flap. Set them aside.
Center the fusible fleece on the wrong side of the outside fabric.

Carefully flip the fabric and fleece over.
This step isn’t essential but I find that the fleece adheres better to the fabric if I’m pressing from this side.

I also like to layer a piece of parchment paper over the fabric. Again, I seem to be able to get better adhesion when I use a parchment paper “pressing” cloth.
I may be wrong, but I think the reason for that is that the heat from the iron gets distributed more evenly.
It also protects my iron from the fleece adhesive if for some reason the fleece or fabric shifts while pressing.

Next, pin the flaps to the right side of the outside book cover fabric.

Baste the flaps in place using a long stitch on your sewing machine.

Place the lining right sides together with the outer cover and pin.
Quick tip: Place 2 pins close together to indicate where to leave the opening for turning the fabric book cover right side out.
As well… if you are using a directional fabric, make sure to place the opening at what will be the bottom of the book cover.

Sew all the way around using a 1/4″ seam allowance, backtacking at the beginning and end of the seam.

Another quick tip: Baste the opening closed using a long stitch on your machine.

Press the lining where the basting stitches are as shown below. Flip the book cover over and press the outside in the same manner.
This provides a neatly pressed, even edge when hand sewing the opening closed. See below.↓

Remove the basting stitches.

Clip the corner to reduce bulk.

Turn right side out through the opening.

Poke out the covers using a point turner
Before you sew the opening closed, try it on your book to make sure it fits the way you want it to fit. If it doesn’t, turn the book cover wrong side out and make any adjustments that need to be made.

Sew the opening closed using an invisible stitch aka ladder stitch.

Press well and you’re done!

The inside of the book cover will look like this.

Insert the book into the fabric book cover.

Now that your new book cover is finished, it’s time to sit and have a tea.

What will you write in yours?

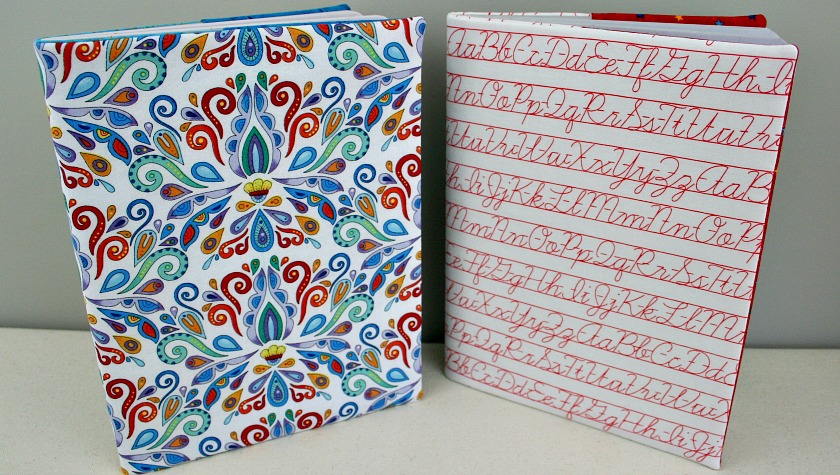
This Alphabet “Writing Practice” fabric called Bee Backgrounds Pattern C6388 by Lori Holt of Bee in My Bonnet for Riley Blake Designs was used for both the outside and lining of the composition book cover bullet journal pictured below.
Now wouldn’t this be the perfect teacher gift!

Some cute star fabric from my stash was used to make the flaps.

Does anyone else remember how much fun it was to receive a star sticker on one of your assignments or on the classroom chore charts?
Do they even do that anymore? Or have I just given away my age? 🙂
I love how these fabric book covers turned out!

This is such a quick sewing project that you can make a whole stack of book covers in an afternoon or evening!

I’ve made lots of fabric book covers over the years. Click through the links below to see just a few of them.
Inspirational book covers made for middle daughter and one of her friends.
Journal made for future son-in-law for Christmas one year.
A fabric bow closure was added to the quilted journal cover for my Ninth Blog Anniversary Giveaway.
My favorites are the two large Art Journal Covers I made from fabric panels that I embellished with quilting, embroidery and beads.
Get the ad free PDF?
All the instructions you need to make beautiful fabric book covers are right here in this post. But I realize that it might be more convenient for you to have a copy that you can download to your computer to print out and have beside you as you work. You can purchase the ad free Printable Fabric Book Cover Tutorial PDF file for only $5 from my shop. It has this complete step-by-step tutorial with all the accompanying photos.
Don’t forget to save How to Make a Fabric Book Cover for future reference by clicking on the Pinterest button underneath the post.
And of course, I’d love it if you shared it on Facebook and Twitter as well. 🙂


8 Comments
Barbara
October 18, 2021 1:13 amThank you! Loved it! ‘Sew’ easy!,, Lol!
Super Mom No Cape
October 18, 2021 9:17 amYou’re welcome, Barbara. They are super easy to make. 🙂
Mary
November 1, 2018 10:06 amThese are so pretty and would make great gifts too!
Lydia from Life Beyond the Kitchen
October 31, 2018 3:40 amNice tutorial and I am enchanted by the fabrics you’ve chosen. Glad you took the time to explain how to measure and add extra to account for the thickness of the book. I had to chuckle about the fractions. It brought back memories! Thanks for sharing with us at Creatively Crafty #ccbg 🙂
Vickie
October 28, 2018 6:20 pmWhat is the extra 4/8 and 1/8 which was added?
Super Mom No Cape
October 29, 2018 10:40 amHello Vickie… I didn’t add an extra 4/8 and 1/8.
I was showing you that in order to add the fractions together you needed to find the common denominator. I have edited the instructions to make that part clearer.
Rachel
October 26, 2018 4:32 amIt certainly cheers up a dreary notebook, doesn’t it!
Super Mom No Cape
October 29, 2018 10:43 amIt sure does Rachel! 🙂 I have such fun making them. They’re like these tiny canvasses that you can use the fabric to make the statement or add embellishments like embroidery, beading and quilting.
Comments are closed.