


Are you one of those people like me who find themselves using patterns or tutorials as more of a guideline for inspiration when making something? That’s what happened with these Fabric Snow Globe Ornaments Using Iron-on Vinyl.
Back on the last Monday in July, Dione over at Clever Chameleon Quilting shared her Snow Globe Coaster Tutorial as the final tutorial for the Sew Early for Christmas Blog Hop. (You’ll find links to the other tutorials in the hop at the end of this post.)
The moment I saw Dione’s tutorial, I knew that there was no way I’d be able to bring myself to use organza covered snow globes for coasters. I’d be too worried about staining or otherwise ruining them.
So when making my own versions of her snow globes, I decided to replace the organza with iron-on vinyl and turn them into tree ornaments.
I loved that Dione had used down under themed novelty fabrics to cut the appliques for her snow globes. Unfortunately, I don’t have any novelty fabrics with polar bears or beavers or moose that could have represented Canada for my versions.
But I did have a couple of small scraps of this fun fabric called Snowball Fight left after making the Drawstring Gift bags.


To make my Fabric Snow Globes using Iron-On Vinyl, I began by printing off Dione’s pattern.

A line was drawn ¼” on either side of the base of the globe to allow for seam allowances and then the globe and base patterns were cut out. I’ve added text to the photo to show what fabric was cut from each piece.
To make the appliques, I cut around the shape, leaving about ¼ to ½ an inch all the way around.
Next, a piece of fusible web such as the HeatnBond Lite
With the applique shape wrong side up on top of a piece of parchment paper
Once cool enough to work with, I followed as closely as possible the outline of the characters I was cutting out.

Once all the applique pieces were fused to the globe, I used the globe pattern piece to trace onto the backing of the HeatnBond Iron-On Vinyl
The vinyl was applied according to the package directions being very careful Not to touch the iron to the vinyl itself.
The parchment paper
After the vinyl cooled, the base was sewn on, fusible fleece was fused to the back and then the two completed snow globe pieces were sewn together.
Clover clips

Quick tip: when working with iron- on vinyl, after turning the piece inside out, make sure to really smooth out the edges and get them exactly the way you want them before giving your item a final pressing. Once the vinyl is given that last pressing, it’s impossible to make any further adjustments.
As you can see in the snow globe below, the globe isn’t as round as it could have been.
Still, considering this was my first time working with iron-on vinyl, I think it turned out okay.
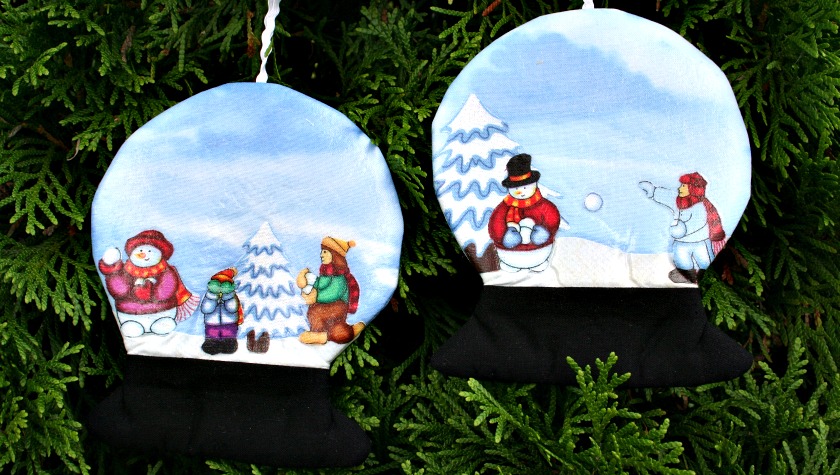
This is the front of my first Fabric Snow Globe.

And this is the back.
I don’t think the littlest girl is having much fun in this snowball fight. 🙂

I decided to make the snow globes reversible so that even if the ornament gets twisted around there would be a fun scene showing.
The second Fabric Snow Globe turned out much better!


When I was photographing them, I decided to have some fun making different scenarios by flipping the snow globes this way and that.


Even though I didn’t follow Dione’s tutorial exactly, I did have a lot of fun making these Fabric Snow Globe Ornaments.
Don’t miss the other three tutorials that were shared in the Sew Early for Christmas Blog Hop!
On Monday, July 9th, I showed you how to make a Quilted Christmas Wreath Pillow Cover.
Pam from Threading My Way posted her Drawstring Gift Bag with Divider ~ Nail Polish Bag ~Tutorial on July 16th.
If you want to see my versions of Pam’s tutorial click through for helpful hints and lots of suggestions for what to fill the Drawstring Gift Bags with.
And then on the 23rd of July, Joy from the blog Days Filled with Joy shared her Fabric Christmas Crackers Tutorial.
I made a whole bunch of those Christmas Crackers from her tutorial that you can see in my DIY Fabric Christmas Crackers post. And just as for the drawstring gifts bags, I show you lots of ideas for fillers.
Be sure to save these Fabric Snow Globe Ornaments Using Iron-On Vinyl so you can find them again by clicking on the Pinterest button underneath this post.
And of course, I’d love it if you shared it on Facebook and Twitter as well. 🙂


1 Comment
Rachel Wright
August 31, 2018 3:11 amThat’s charming. And such a good use of the material!
Comments are closed.